User Guide
- 1. Introduction
- 2. Quick start
- 3. About
-
4. Features
- 4.1 Client Manager (Done by Chang Rui Feng)
- 4.2. Service Manager (Done by Hans Sebastian Tirtaputra)
-
4.3. Appointment Manager (Done by Khoong Wei Kit)
- 4.3.1. Appointment Manager Command Parameters
- 4.3.2. Add an appointment:
addapt - 4.3.3. List all appointments:
listapt - 4.3.4. Find an appointment:
findapt - 4.3.5. Edit an appointment:
editapt - 4.3.6. Mark an appointment as done:
done - 4.3.7. Mark an appointment as not done:
undone - 4.3.8. Delete an appointment:
deleteapt - 4.3.9. Clear all appointments:
clearapt
- 4.4. Revenue Tracker (Done by Galvin Leow)
- 4.5 Expense Tracker (Done by Tan Yan Lyn)
- 4.6 Schedule Viewer (Done by Every Team Member)
- 4.7 Finance Tracker (Done by Every Team Member)
- 4.8 Others (Done by Every Team Member)
- 4.9. Features coming in v2.0
- 5. FAQ
- 6. Glossary
- 7. Command summary
1. Introduction
Welcome to the User Guide of Homerce!
Are you an independent home-based beauty salon owner, scrambling between your calendar, client contacts, and notebook to keep track of all your appointments, revenue and expenses? Do you spend hours tabulating all your revenue and expenses just to get an idea of how your business is doing? Fret not, our application, Homerce, will reduce the hassle of managing your business and save your valuable time. Homerce is an all-in-one application that helps home-based beauty salon owners consolidate their business details - such as their appointments, revenue and expenses - into a single application.
The application uses a Command Line Interface (CLI); this means that you operate the application by typing commands into a Command Box. If you are fast at typing, you can operate the application faster than other Graphical User Interface (GUI) applications; GUI applications allow users to interact with the application through graphical icons such as buttons.
If you are interested, jump to Section 2 - Quick Start to learn how to start managing your business using Homerce.
2. Quick start
This section gives you step-by-step instructions on how to download and open the application.
-
Ensure you have Java
11or above installed in your Computer. You may install it here. -
Download the latest
Homerce.jarhere. -
Copy the file to the folder you want to use as the home folder for Homerce.
-
Double-click the file to start the app. If you are using Windows, please ensure that your Computer’s Display Settings are set to 100%.
-
A GUI similar to Figure 1 below should appear in a few seconds. Note how the app contains some sample data.
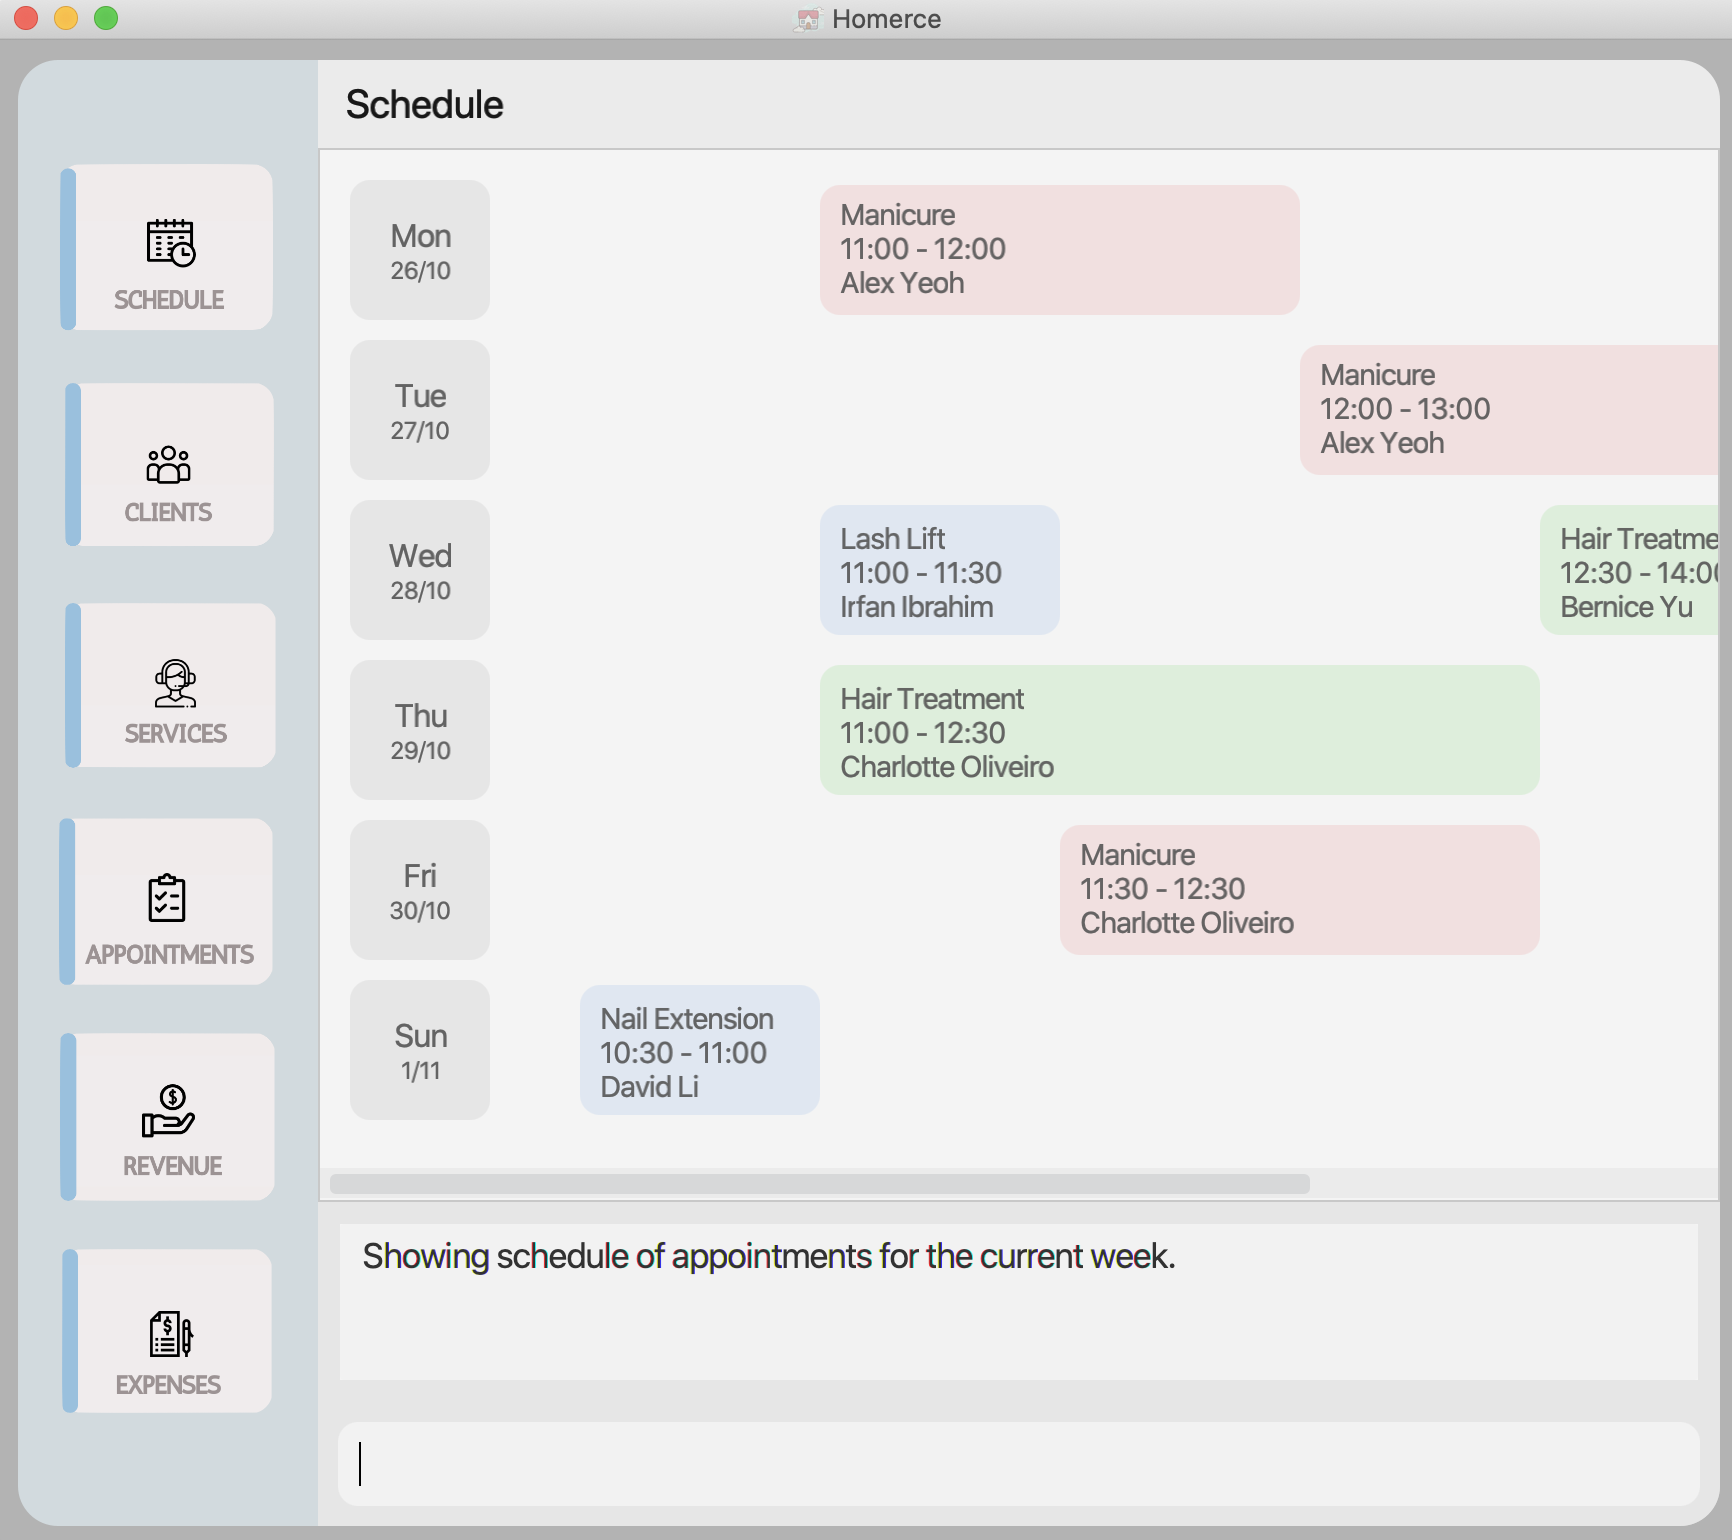 Figure 1 - GUI of Homerce
 -
Type your command into the command box at the bottom of the screen, and press
Enteron your keyboard to execute it. E.g. typinghelpand pressingEnterwill open a help window. -
Refer to Section 4 - Features for details on the commands you can use for each feature.
3. About
3.1. Structure of this document
We have structured this User Guide in a way to help you find what you need easily and quickly. In the next subsection, Section 3.2 - reading this document, you can find several useful tips on how to read this guide. The following section, Section 4 - Features, documents the seven main features in Homerce, namely:
-
Client Management
-
Service Management
-
Appointment Management
-
Revenue Tracking
-
Expense Tracking
-
Schedule Viewing
-
Finance Tracking
3.2. Reading this document
This section introduces you to some technical terms, symbols and syntax that are used throughout the guide. You may want to familiarize yourself with them before moving to the next section.
3.2.1. Terminology related to the GUI
Figure 2 shows the GUI of Homerce, annotated with a description of each GUI component.

Figure 2 - Annotated GUI of Homerce
3.2.2. General Symbols and Syntax
The table below explains the general syntax used throughout the user guide.
| Syntax | What it means |
|---|---|
command |
A grey highlighted block specifies a executable command that can be entered into the command box. |
| italics | Italicised text indicates that the text has a definition specific to Homerce, or it is a caption for a Figure in the guide. |
| An exclamation mark indicates that the following text is a tip. | |
| A warning sign indicates that the following text is important. |
3.2.3. Command Syntax and Usage
The table below explains some important technical terms to help you understand and use commands in Homerce.
| Technical Term | What it means |
|---|---|
| Command Word | The first word of a command. It determines the action that Homerce should perform. |
| Prefix | The characters at the start of a parameter. It distinguishes one parameter from another. |
| Parameter | The word following each prefix. They are values given to a command to perform the specified action. |
Example:
addexp d/DESCRIPTION f/IS_FIXED v/VALUE dt/DATE [t/TAG]
Breakdown:
- Command Word -
addexp
- Prefixes -
d/,f/,v/,dt/,t/
- Parameters -
DESCRIPTION,IS_FIXED,VALUE,DATE,TAG
The following points explain the format of a command. More examples will be provided for each command in Section 4 - Features.
- Words in
UPPER_CASEare the parameters to be supplied
- In
deletesvc s/SERVICE_CODE,SERVICE_CODEis a parameter and the command can be used asdeletesvc s/SC001.
- In
- Items in square brackets are optional.
-
v/VALUE [t/TAG]can be used asv/15.00 t/equipmentor asv/15.00.
-
- Items with
…after them can be used multiple times, including zero times.
-
[t/TAG]…can be used as ` ` (i.e. 0 times),t/blacklist,t/VIP t/friendetc.
-
- Parameters can be in any order.
- If the command specifies
d/DESCRIPTION dt/DATE,dt/DATE d/DESCRIPTIONis also acceptable.
- If the command specifies
- A series of parameters in square brackets with asterisks indicate that only exactly one parameter among them should be specified
- If the command specifies
[t/TITLE]* [s/SERVICE_CODE]*,t/nailis acceptable, but nott/nail s/sc000or ` ` (i.e. no parameters).
- If the command specifies
- If the same parameter is entered multiple times within the same command, only the last entry will be used. (excludes items with
…after them in Point #3)- If
v/20.00 v/25.00is entered, the value will be taken as 25.00.
- If
![]() Note:
Note:
- Since Homerce is optimized for CLI-based usage, it is recommended to rely purely on CLI commands rather than using a
mouse to navigate between the different managers of Homerce. For example, it is better to do
listaptrather than clicking on the appointments tab aslistaptwill sort appointments by chronological order if there are changes made by previous commands.
4. Features
This section contains all the information about the features of Homerce. You may enter a command into the Command Box to use each feature or sub-feature.
4.1 Client Manager (Done by Chang Rui Feng)
Homerce knows that managing the contacts of your clients is a must for any business. Thus, this feature allows you to keep track of all the relevant information needed about your clients.
4.1.1. Client Manager Command Parameters
Before you dive into using the feature, you may want to have a look at the common parameters used in this feature. The table below shows a list of command parameters that will be used.
| Parameter Name | Description | Example |
|---|---|---|
NAME |
The name of the client. It must be an alphanumeric word. |
E.g. Typing John Doe would represent the name of the client saved in the client manager. |
| The email of the client. Emails should be in local-part@domain format The local-part can only contain alphanumeric and special characters The domain can only contain Alphanumeric characters. A period(.) or a hyphen(-) for the characters in between, if any. The domain name must also have at least 2 characters and start and end with alphanumeric characters |
johnDoe97@example123.com | |
PHONE |
Phone is the contact number of the client and is the indicator used to uniquely identify a client. It must consist only of numeric characters, and be at least 3 digits long. |
E.g. 91234567 would represent the client's phone number.Another client with the same number 91234567 will not be allowed to get added into the client list. |
TAG |
The tag you want to attach to the client. It must be a single alphanumeric word. |
E.g. Typing friend would mean that friend is the additional information associated with the client. |
INDEX |
The index of the client in the displayed list. It must be a valid index number. |
E.g. Typing 2 would mean the client with index-2 in the displayed list. |
4.1.2. Add a client addcli
You can use this command to add a new client to the Client Manager.
Format : addcli n/NAME p/PHONE e/EMAIL [t/TAG]…
![]() Note:
Note:
- Refer to Client Manager Command Parameters for more details about each parameter.
Example :
Let’s say a new client just called in to make an appointment.
You can follow the steps below to add the client to the Client Manager.
Steps :
- Type
addcli n/John p/91234567 e/john@gmail.com t/newin the Command Box. - Press
Enterto execute.
Outcome :
- The Result Display will show a success message.
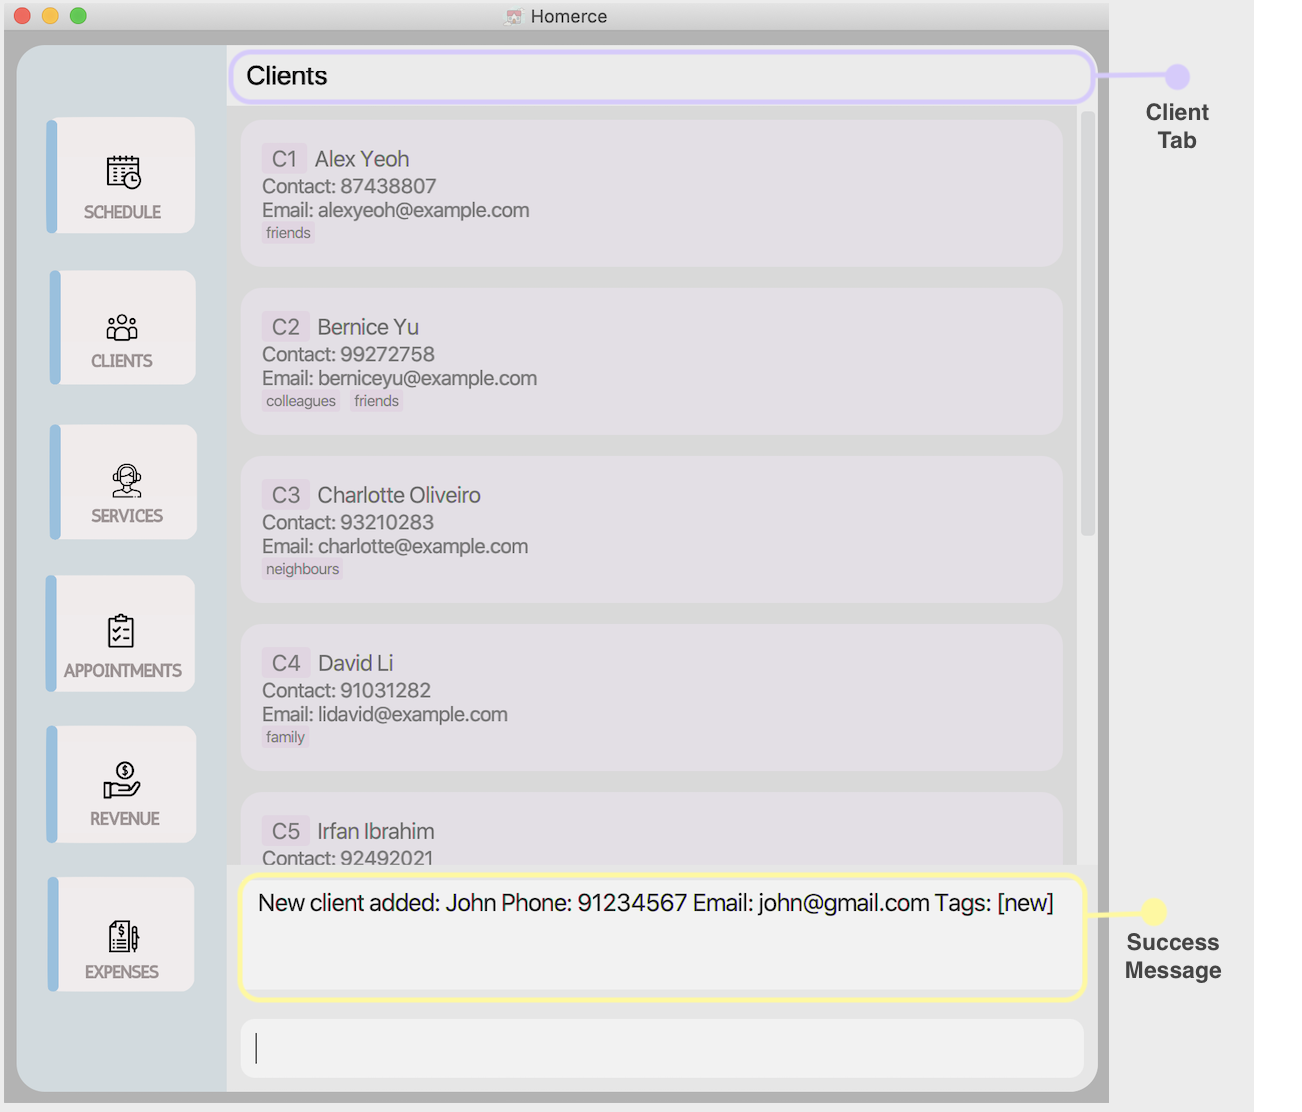
Figure 3 - GUI for addcli
4.1.3. Edit a client’s details editcli
You can use this command to edit a client in the Client Manager.
Format : editcli INDEX [n/NAME] [p/PHONE] [e/EMAIL] [t/TAG]…
![]() Notes:
Notes:
- You must enter at least one optional parameter.
- The new parameter entered will overwrite the existing parameter.
- When editing tags, the existing tags of the client will be removed i.e adding of tags is not cumulative.
- You can remove all the client’s tags by typing t/ without specifying any tags after it.
- Refer to Client Manager Command Parameters for more details about each parameter.
- Editing a client in the client manager will change the details of any appointments associated with that client.
Example :
Let’s say you misspelled the name of a client when adding it into the Client Manager and wish to change it to “Johnny”.
You can follow the steps below to edit the client.
Steps :
- Type
editcli 2 n/Johnnyin the Command Box. - Press
Enterto execute.
Outcome :
- The Result Display will show a success message.
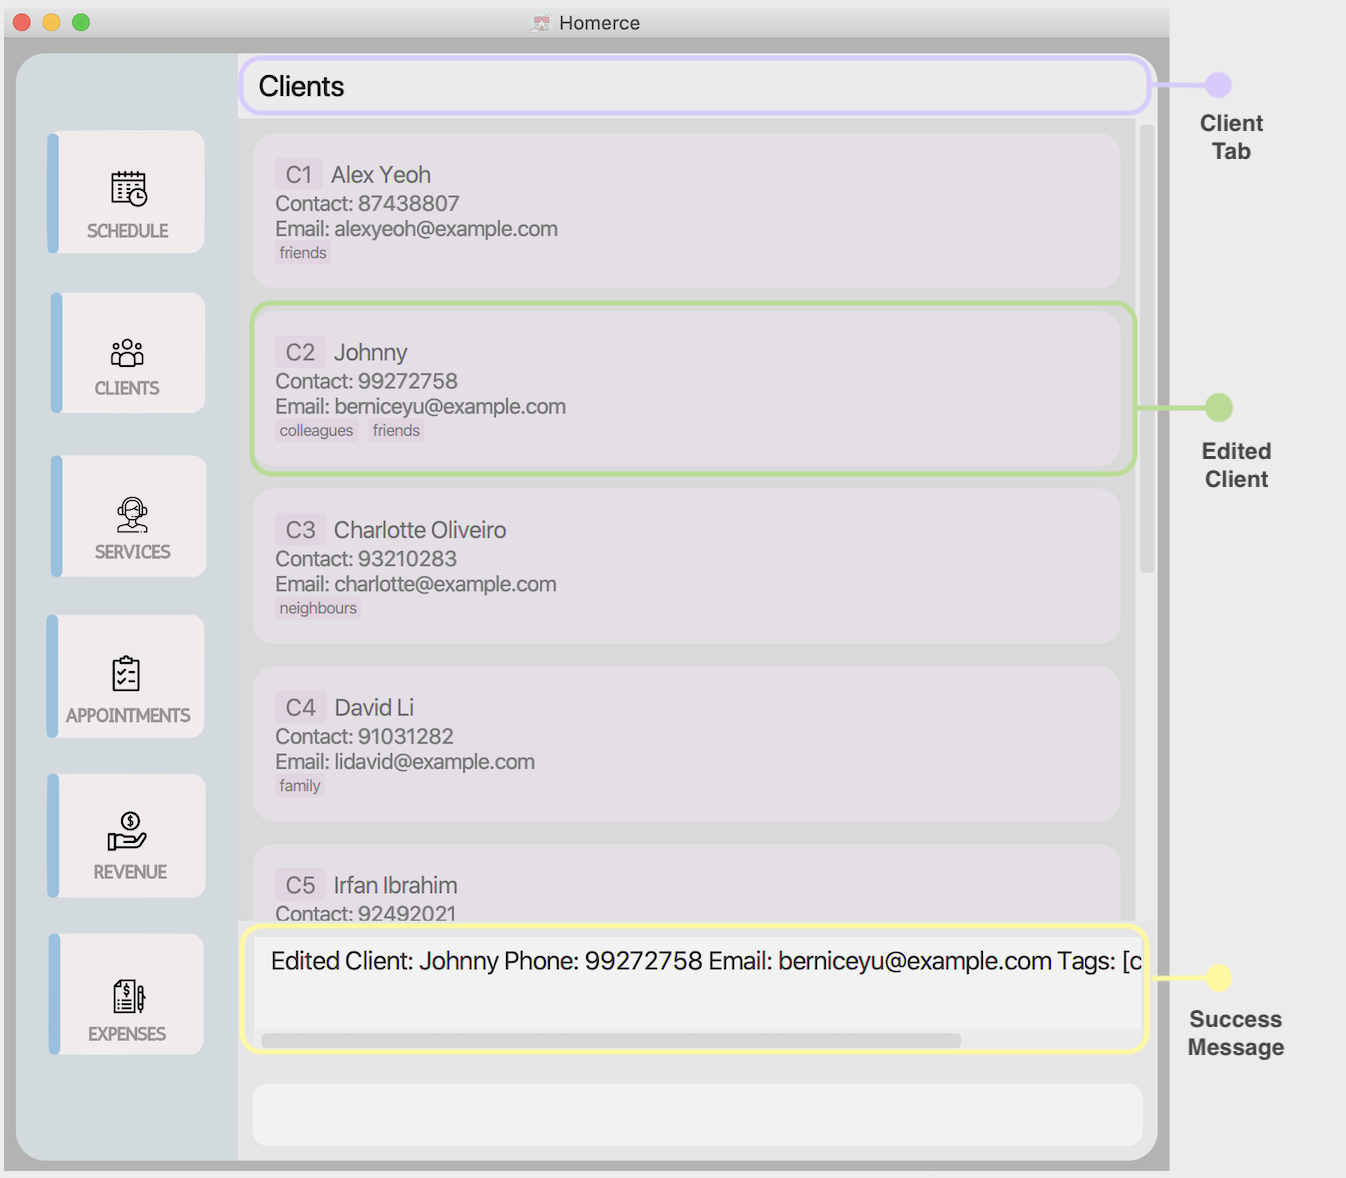
Figure 4 - GUI for editcli
4.1.4. Delete a client deletecli
You can use this command to delete a client in the Client Manager.
Format : deletecli INDEX
![]() Note:
Note:
- Refer to Client Manager Command Parameters for more details about each parameter.
![]() Warning:
Warning:
- A client will not be deleted if he/she is scheduled in an appointment happening today or at a later date.
Example :
Let’s say a client repeatedly fails to turn up for his appointments and you wish to delete his contact.
You can follow the steps below to delete the client.
Steps :
- Type
deletecli 6in the Command Box. - Press
Enterto execute.
Outcome :
- The Result Display will show a success message.
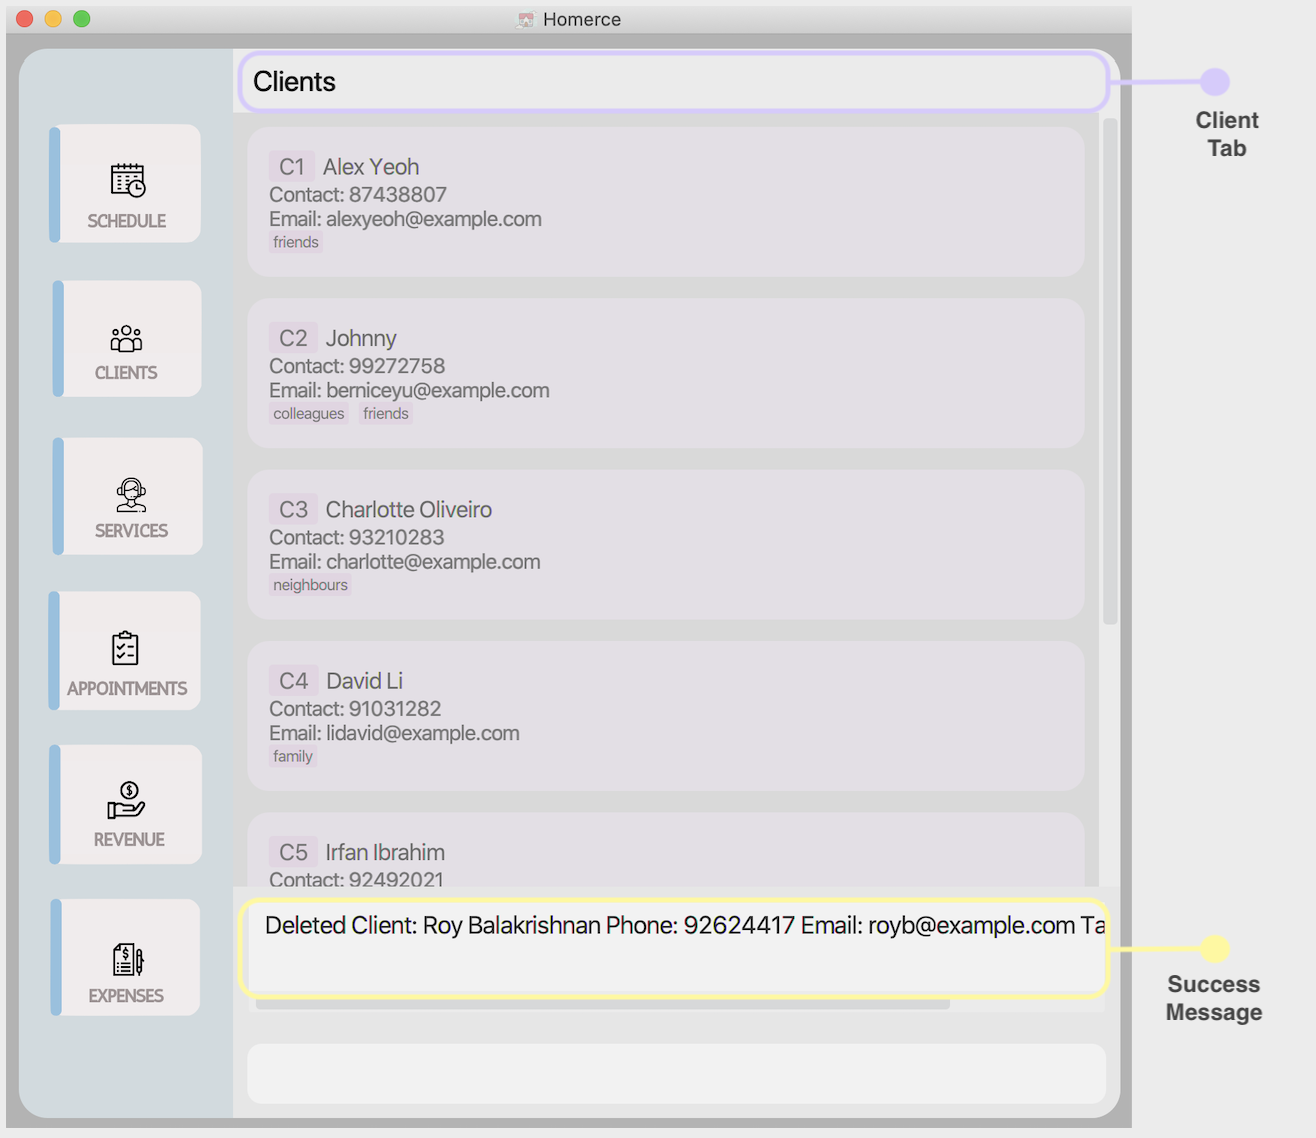
Figure 5 - GUI for deletecli
4.1.5. Find a client findcli
You can use this command to find a client in the Client Manager.
Format : findcli [n/NAME]* [p/PHONE]*
![]() Notes:
Notes:
- You must enter one of the optional parameter.
- The search using name is case-insensitive. e.g hans will match Hans.
- The order of the keywords does not matter. e.g. Hans Bo will match Bo Hans.
- Only full words will be matched e.g. Han will not match Hans.
- Clients matching at least one keyword will be returned (i.e. OR search). e.g. Hans Bo will return Hans Gruber, Bo Yang.
- The search using phone will match if the number sequence entered (at least 3 digits long) is part of a client’s phone number. e.g. 123 will return clients with phone number 91234567 and 98765123.
- Refer to Client Manager Command Parameters for more details about each parameter.
Example :
Let’s say you have many clients in your client list and wish to find more information on the client named David.
You can follow the steps below to get a list of clients named John
Steps :
- Type
findcli n/Davidin the Command Box. - Press
Enterto execute.
Outcome :
- The Result Display will show a success message.
- Homerce will list out all the clients with John in their name.
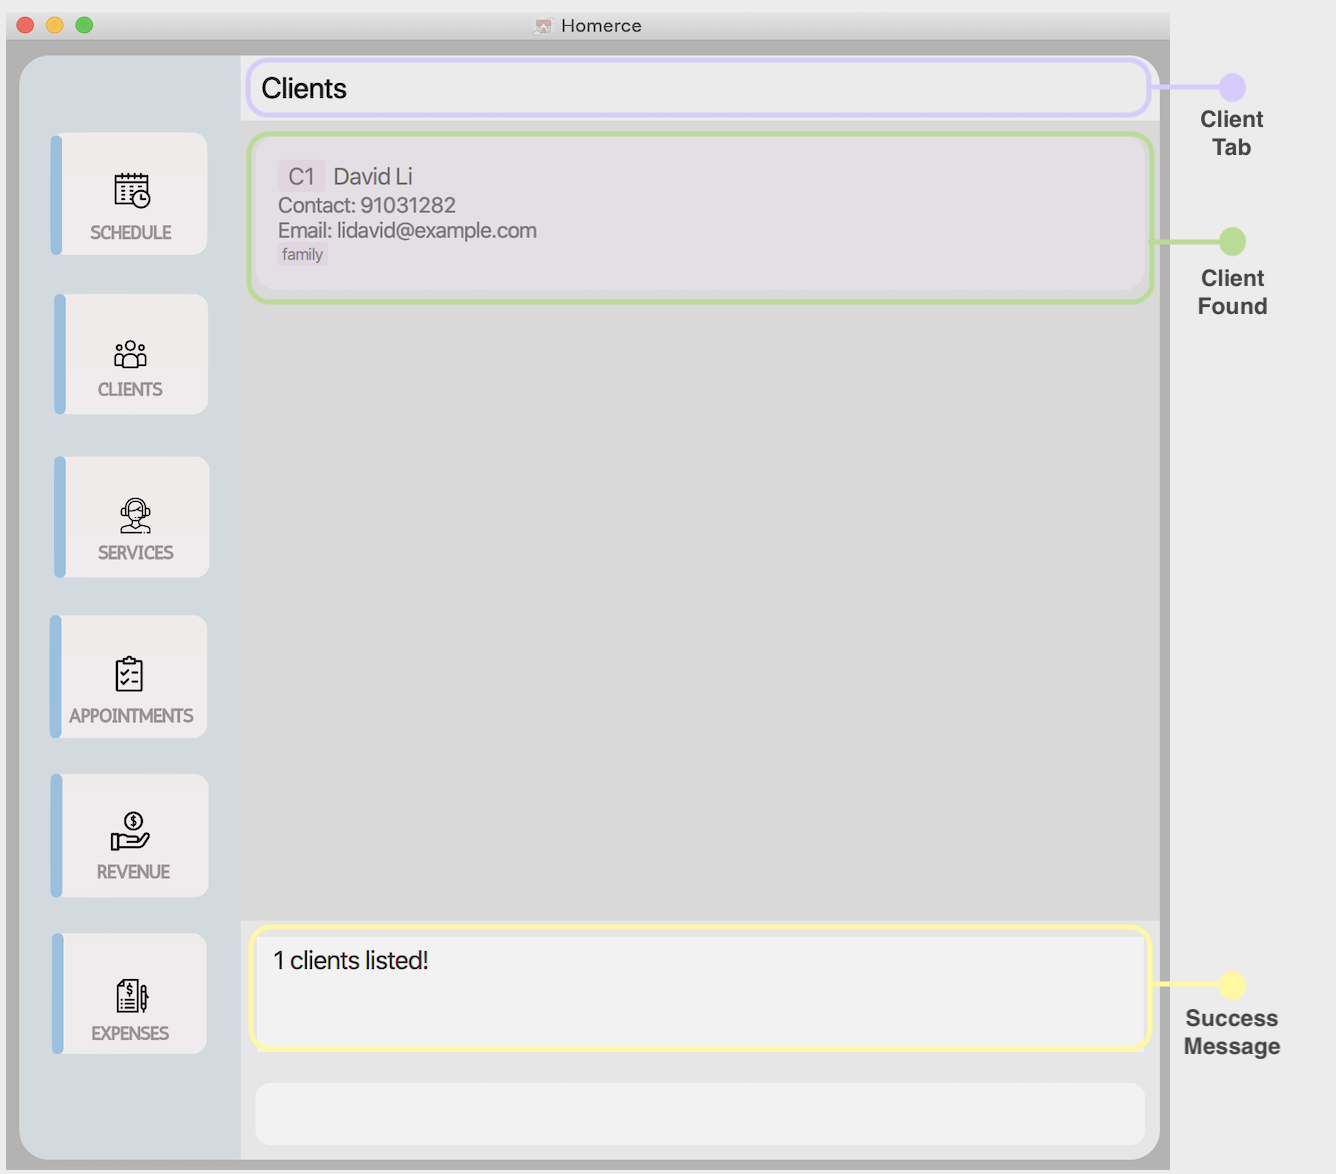
Figure 6 - GUI for findcli
4.1.6. List clients listcli
You can use this command to list all your clients in the Client Manager.
Format : listcli
Example :
Let’s say you wish to list your clients to view all the client entries that you currently have.
You can follow the steps below to list your clients.
Steps :
- Type
listcliin the Command Box. - Press
Enterto execute.
Outcome :
- The Result Display will show a success message.
- Homerce will list out all your clients.
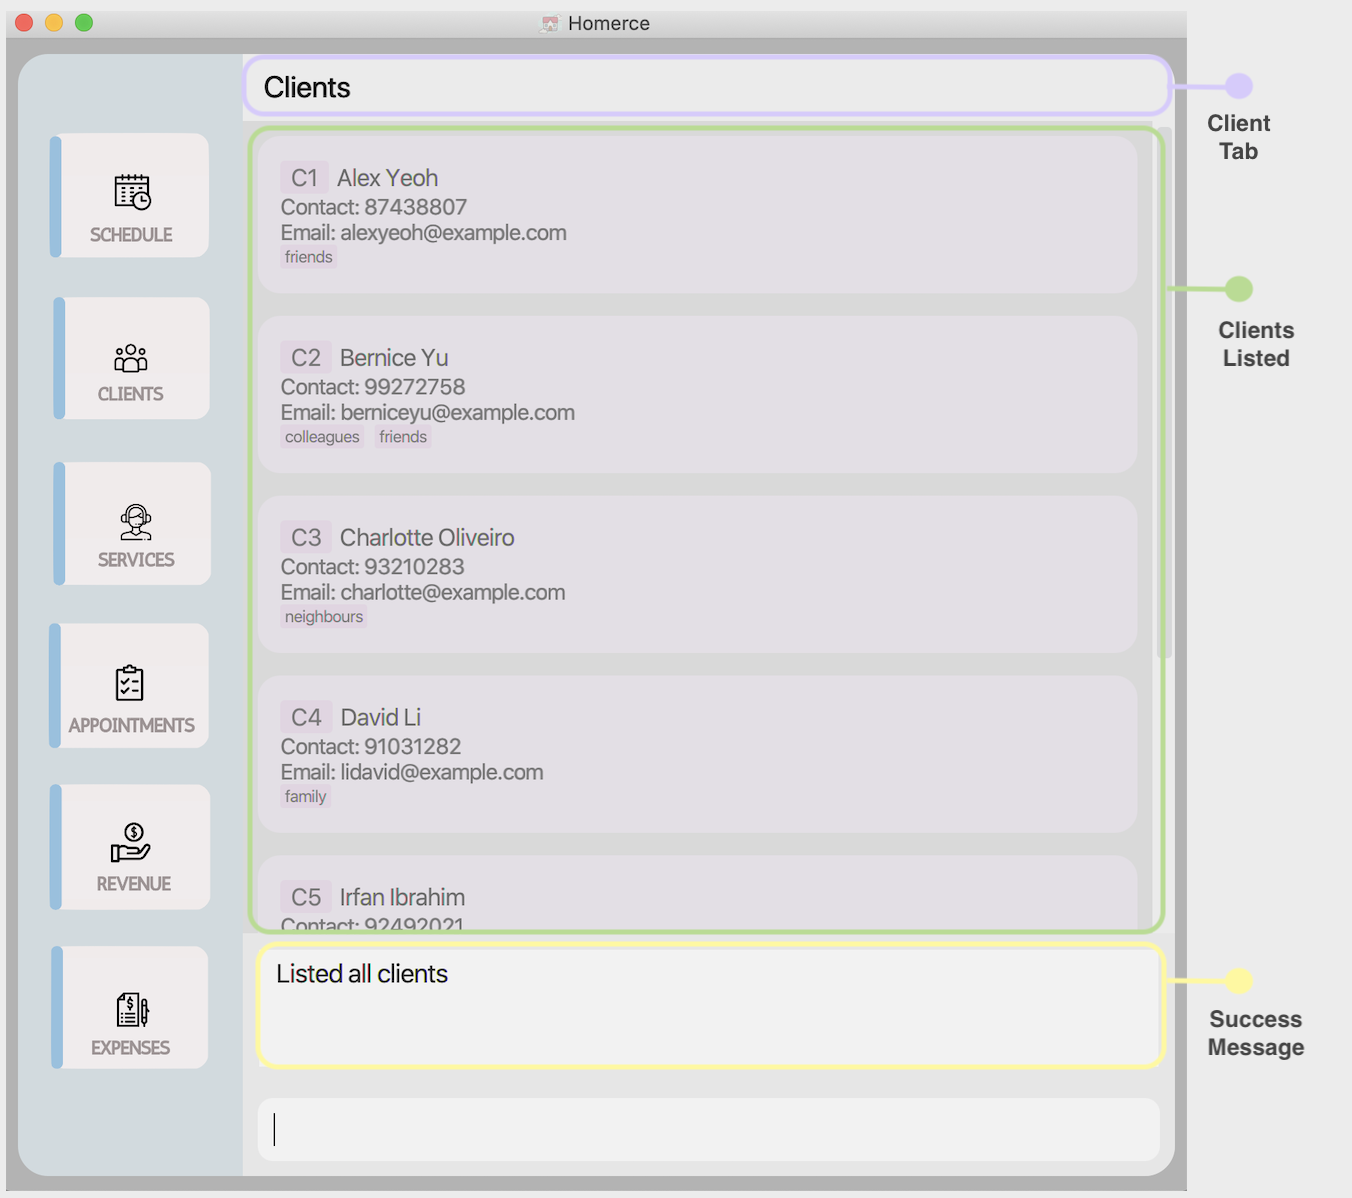
Figure 7 - GUI for listcli
4.1.7. Clear clients clearcli
You can use this command to clear all clients in the Client Manager.
Format : clearcli
![]() Warning:
Warning:
- The client list will not be cleared if there is at least one client scheduled in an appointment happening today or at a later date.
Example :
Let’s say you wish to remove all client entries in the Client Manager and restart your client management from scratch.
You can follow the steps below to clear all your clients.
Steps :
- Type
clearcliin the Command Box. - Press
Enterto execute.
Outcome :
- The Result Display will show a success message.
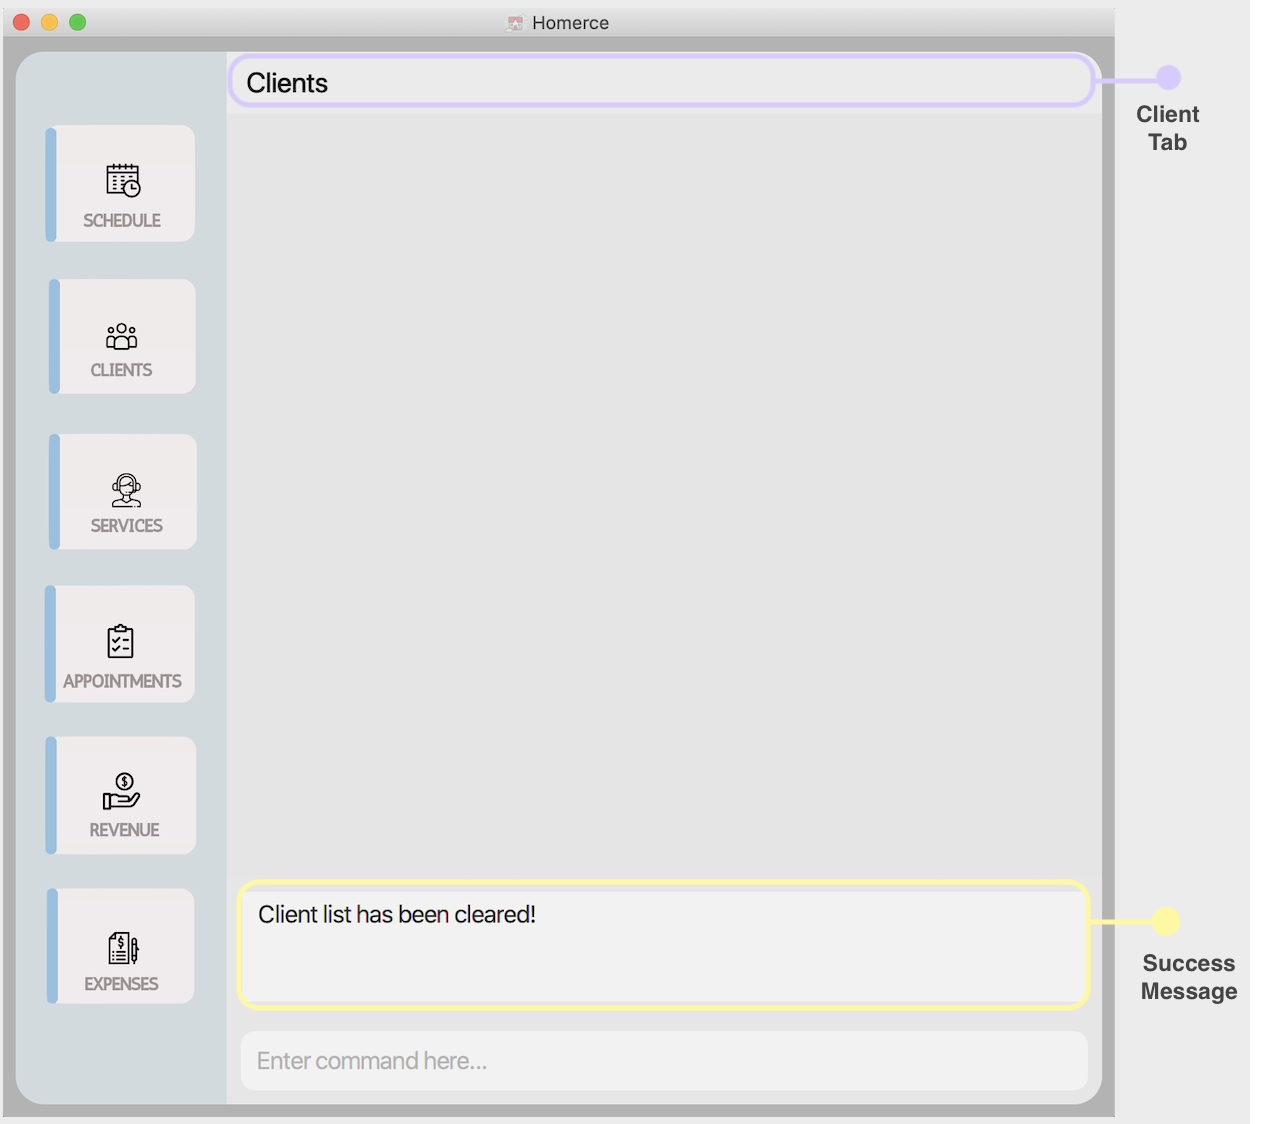
Figure 8 - GUI for clearcli
4.2. Service Manager (Done by Hans Sebastian Tirtaputra)
This feature allows you to manage the services that your home-based beauty salon provides. You can record the
following information about your services: TITLE, DURATION and PRICE.
4.2.1. Service Manager Command Parameters
Before you dive into using the feature, you may want to have a look at the common parameters used in this feature. The table below shows a list of command parameters that will be used in this feature.
| Parameter Name | Description | Example |
|---|---|---|
TITLE |
The title of the service you are providing. It must be alphanumeric words not more than 50 characters long. You can not have two services with the same title. | E.g Lash Lift
|
DURATION |
The duration of the service must be in half hour intervals between 0.5 and 23.5. | E.g 1.5
|
PRICE |
The revenue received from the service. It must be a positive number above 0.00 and below 1,000,000.00 and must have two decimal places. |
E.g 5.50
|
SERVICE_CODE |
The service code is the code that identifies a particular type of service provided. It must be an alphanumeric word of 5 characters long. |
E.g. If you have added an eyelash extension service into Homerce and its service code is SC001. Typing SC001 would refers to the eyelash extension service. |
INDEX |
The index number of the service in the displayed service list. The first entry of the list has an index number of 1 and all entries are listed in increasing index numbers. |
E.g Typing in 5 would refer to the fifth service in the displayed service list. |
4.2.2. Add a service: addsvc
You can use this command to add a new service into the Service Manager.
Format: addsvc t/TITLE du/DURATION p/PRICE
![]() Note:
Note:
- Refer to Service Manager Command Parameters for more details about each parameter.
Example: Let’s say you have a service with the following information you want to add into the Service Manager. You can follow these instructions.
Adding the above service:
- Type
addsvc t/Microdermabrasion du/2.0 p/68.00into the Command Box. - Press
Enterto execute.
Outcome:
- The Result Display will show success message.
- Homerce will switch to the Services Tab.
- You can now see all your services including the newly added service.
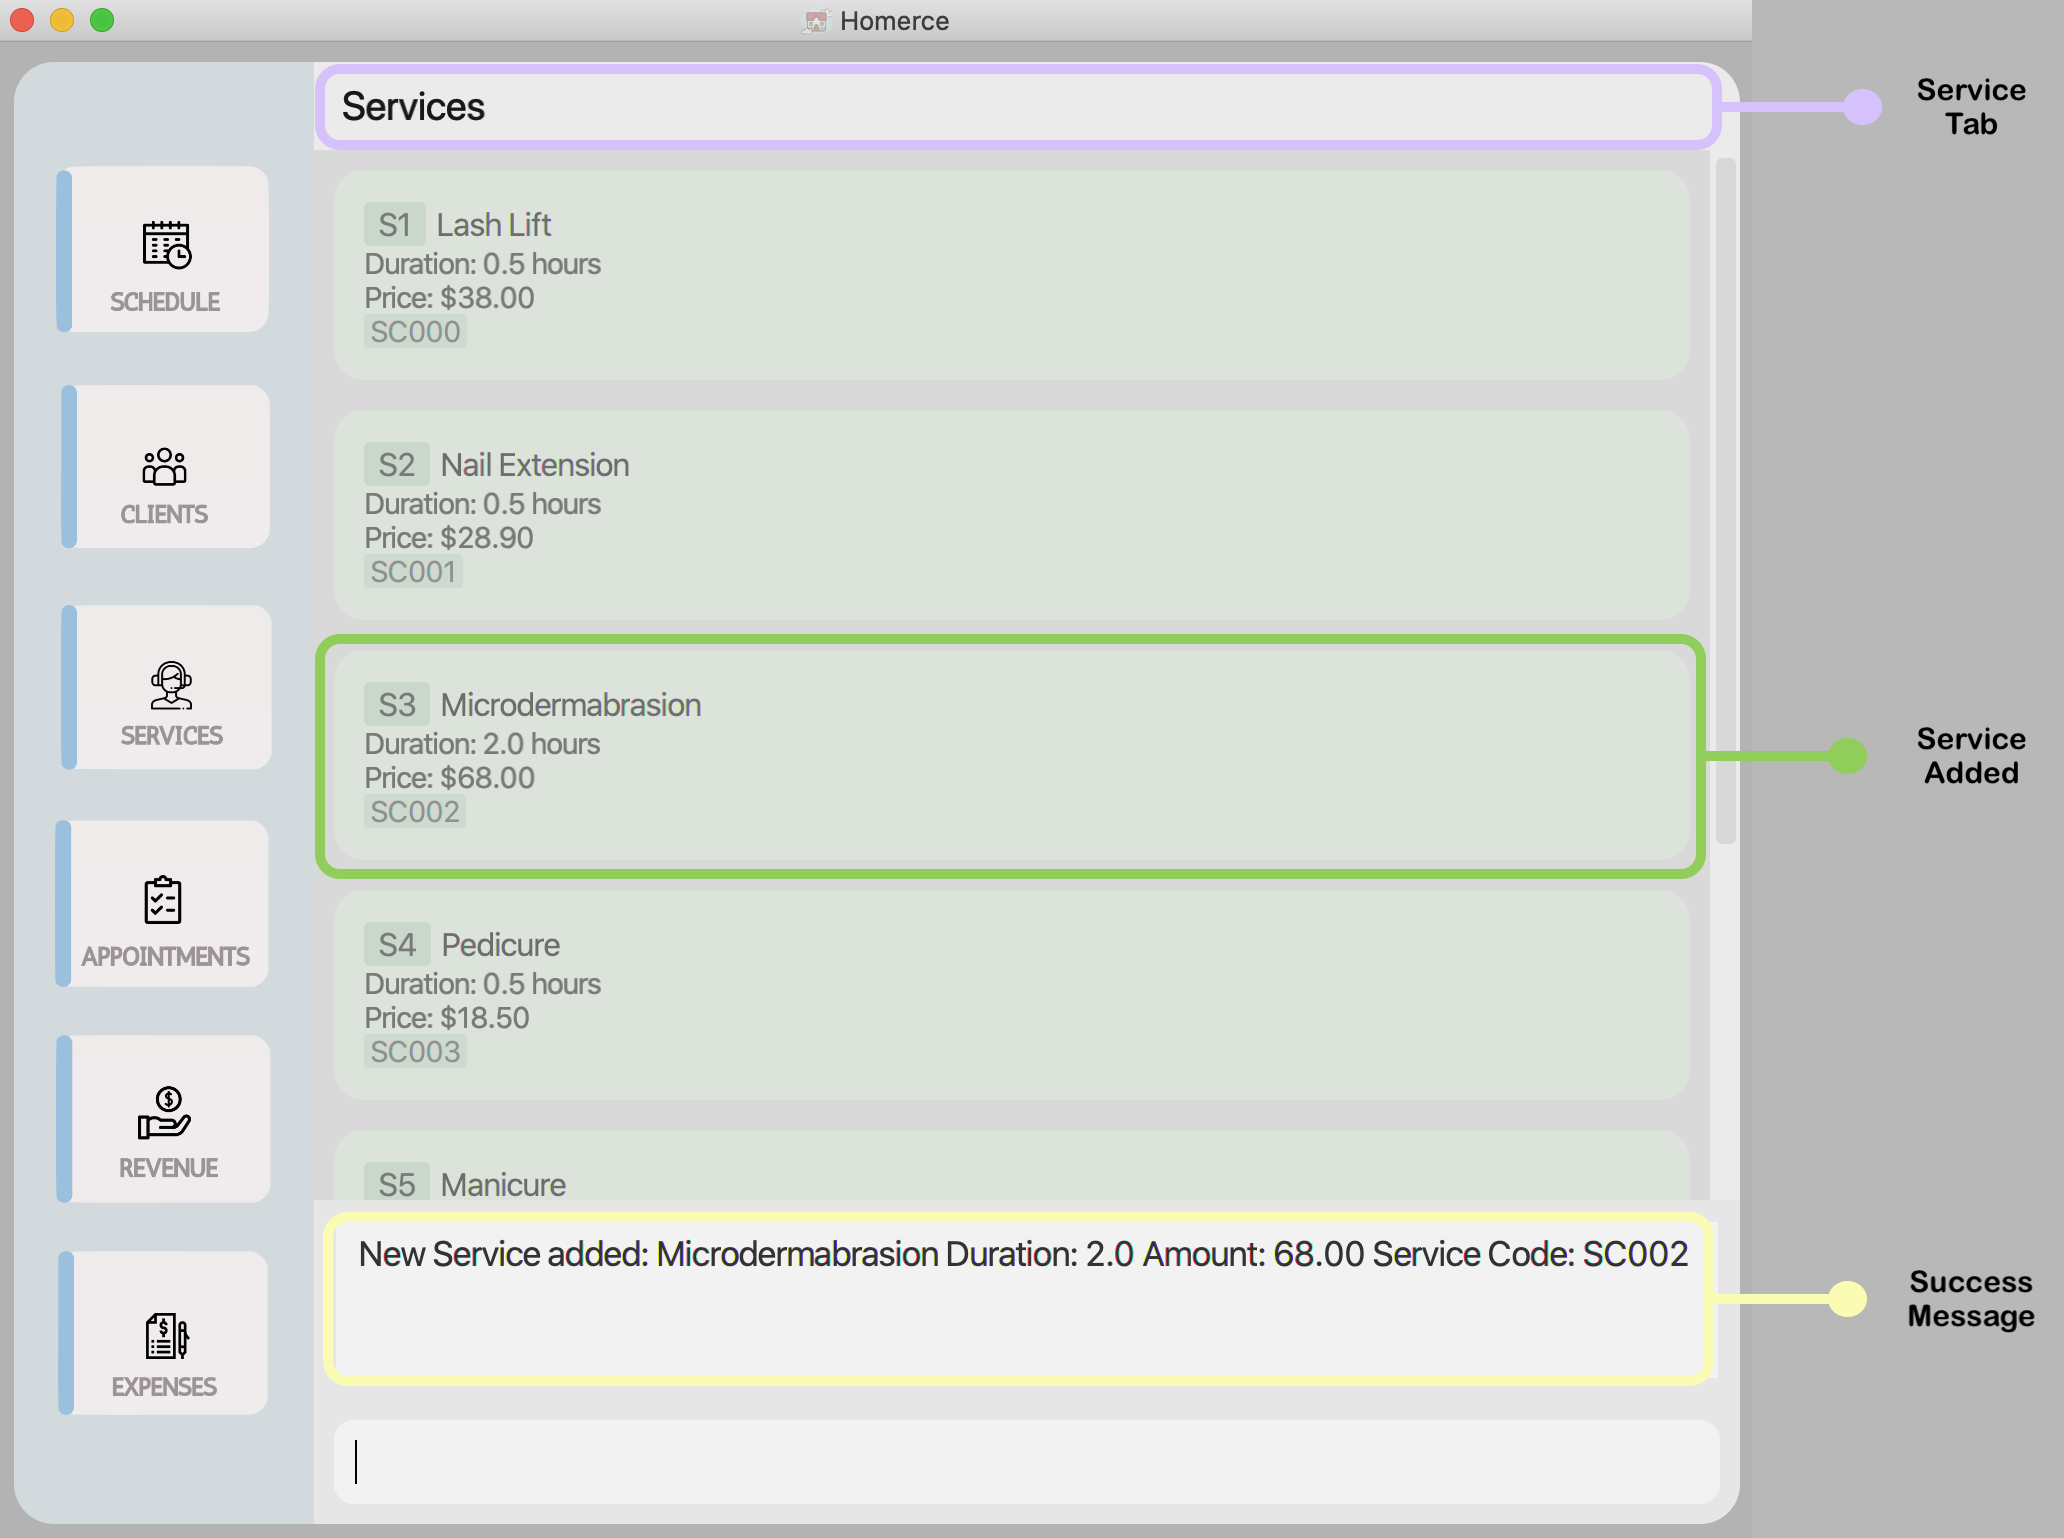
Figure 9 - GUI outcome for addsvc
4.2.3. Edit a service: editsvc
You can use this command to edit an existing service in the Service Manager.
Format: editsvc INDEX [t/TITLE] [du/DURATION] [p/PRICE]
![]() Note:
Note:
- You are unable to edit an existing service’s service code. Service codes are automatically generated by the Service Manager when adding a new service.
- Refer to Service Manager Command Parameters for more details about each parameter.
- Editing a service in the service manager will not change the details of any appointments associated with that service as they are kept as separate records and might result in unwanted side effects to the revenues and clients. Please edit the appointment after editing the service if you want the service’s edited details to be reflected.
Example: Let’s say you have entered the wrong title for an added service and want to change it to “Microderm Abarasion” instead its current service title. You can follow these instructions.
Editing an existing service:
- Type
editsvc 1 t/Microderm Abrasioninto the Command Box. - Press
Enterto execute.
Outcome:
- The Result Display will show a success message.
- Homerce will switch to the Services Tab.
- You can now see all your services including the edited service.
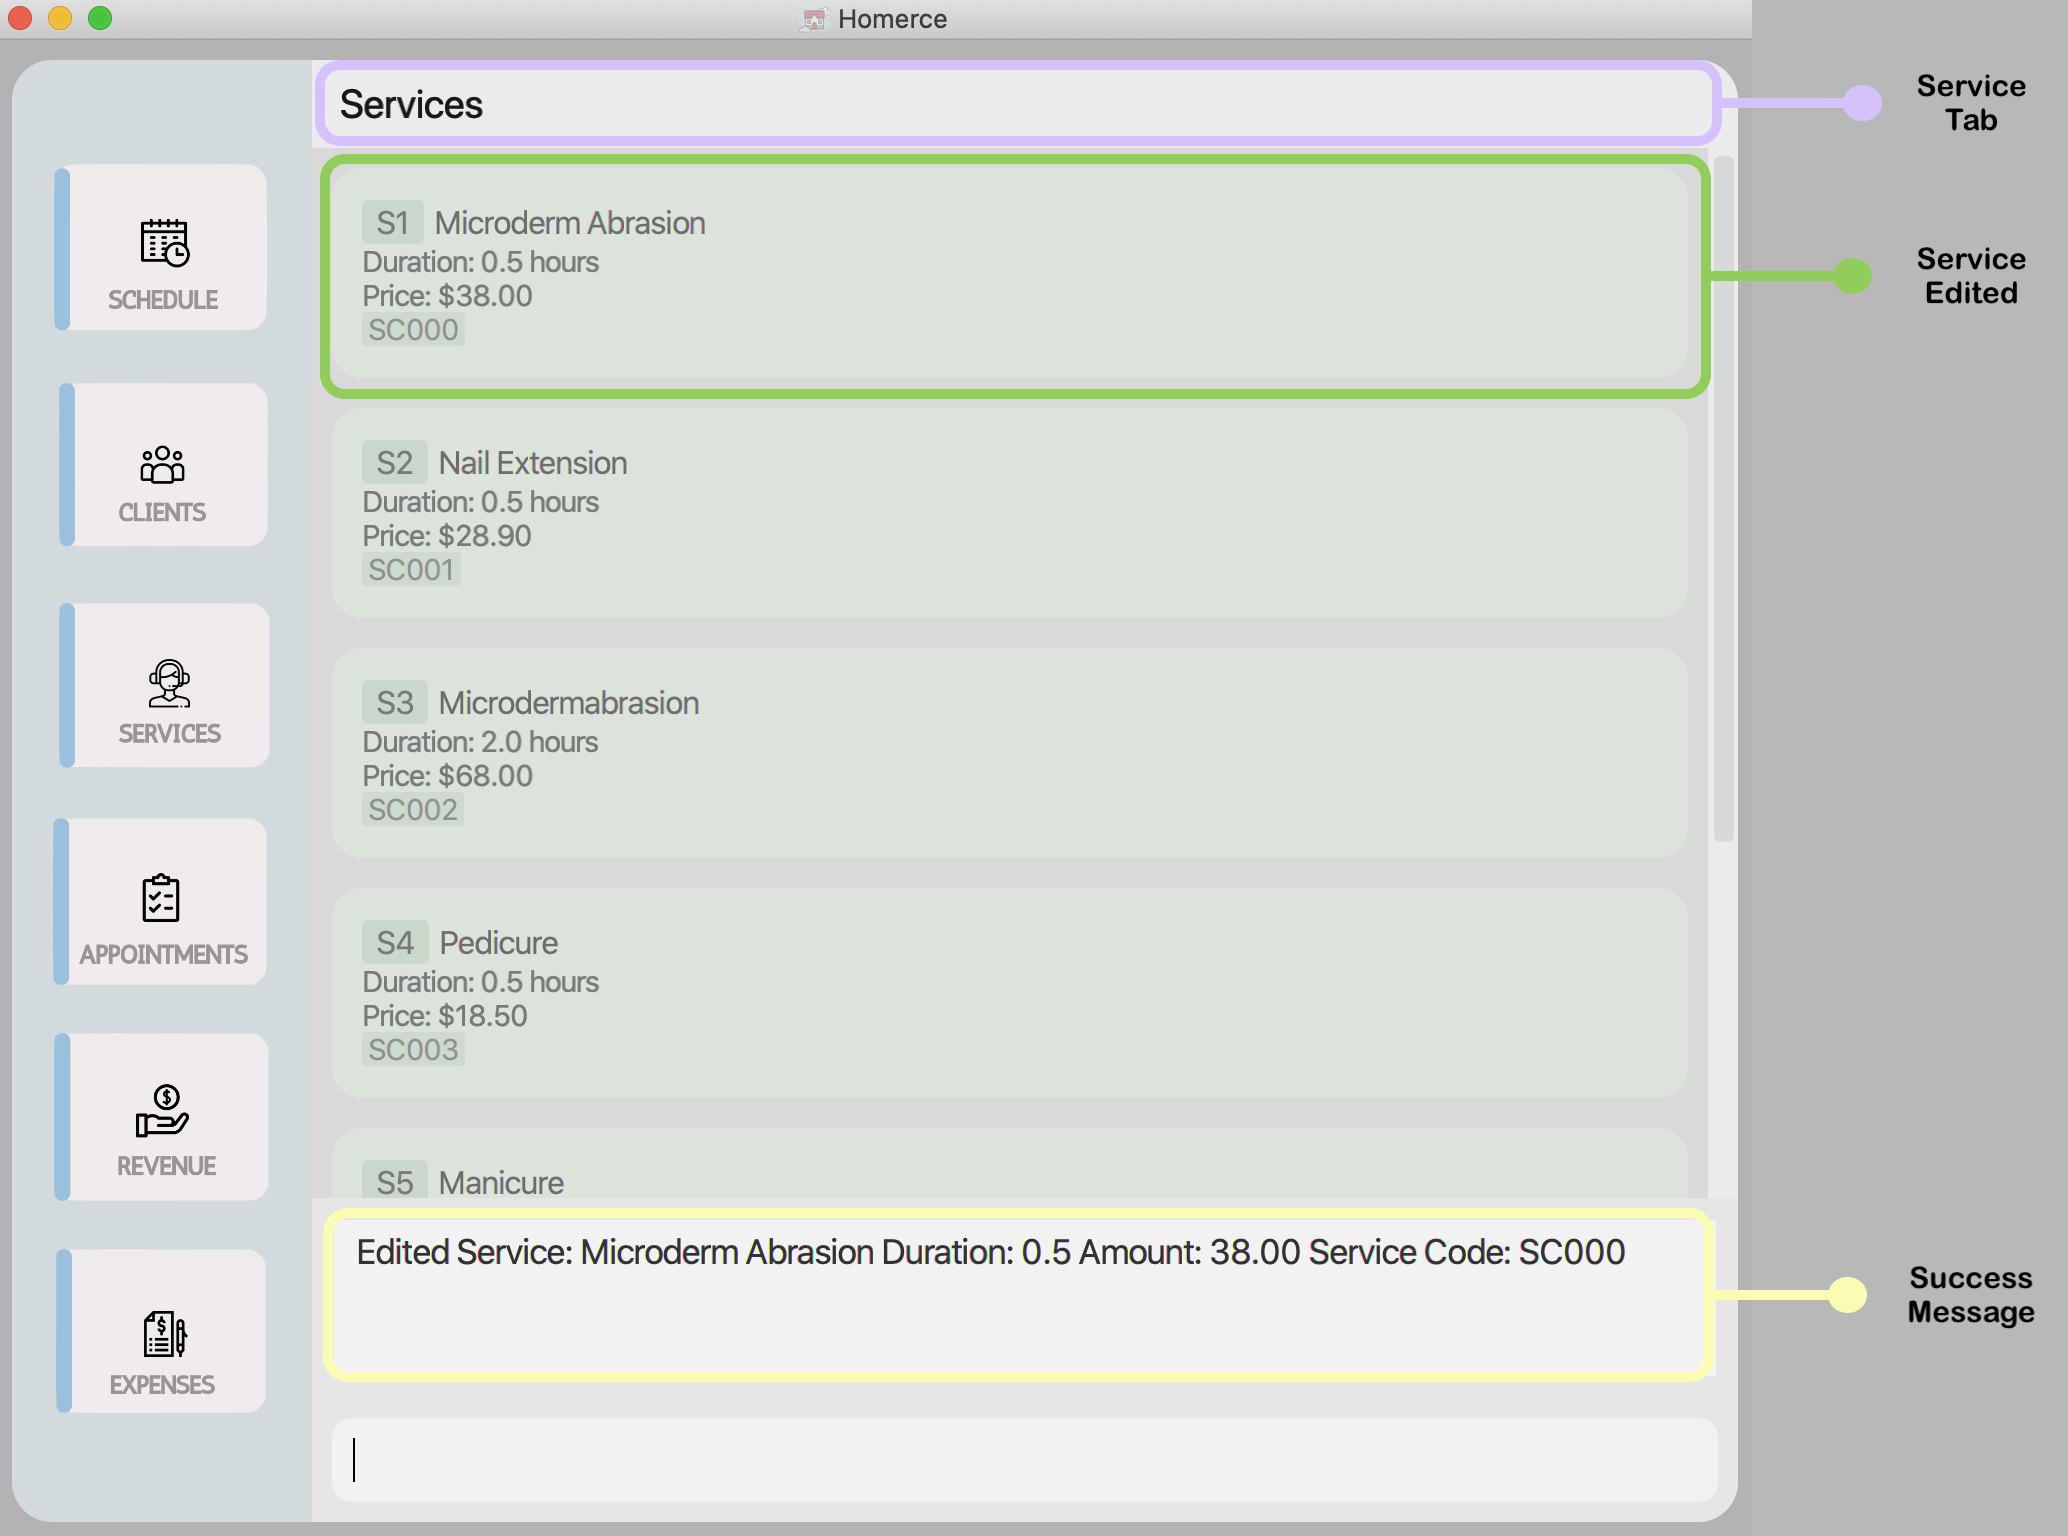
Figure 10 - GUI outcome for editsvc
4.2.4. Delete a service: deletesvc
You can use this command to delete an existing service in the Service Manager.
Format: deletesvc INDEX
![]() Warning:
Warning:
- Homerce will not allow the deletion of a service which is already scheduled for an upcoming appointment.
![]() Note:
Note:
- Refer to Service Manager Command Parameters for more details about each parameter.
Example: Let’s say you are no longer providing a particular service and want to delete it from the Service Manager. You can follow these instructions.
Deleting an existing service:
- Type
deletesvc 3into the Command Box. - Press
Enterto execute.
Outcome:
- The Result Display will show a success message.
- Homerce will switch to the Services Tab.
- You can now see that the service that was previously on the third index in the service list has been deleted from Homerce.
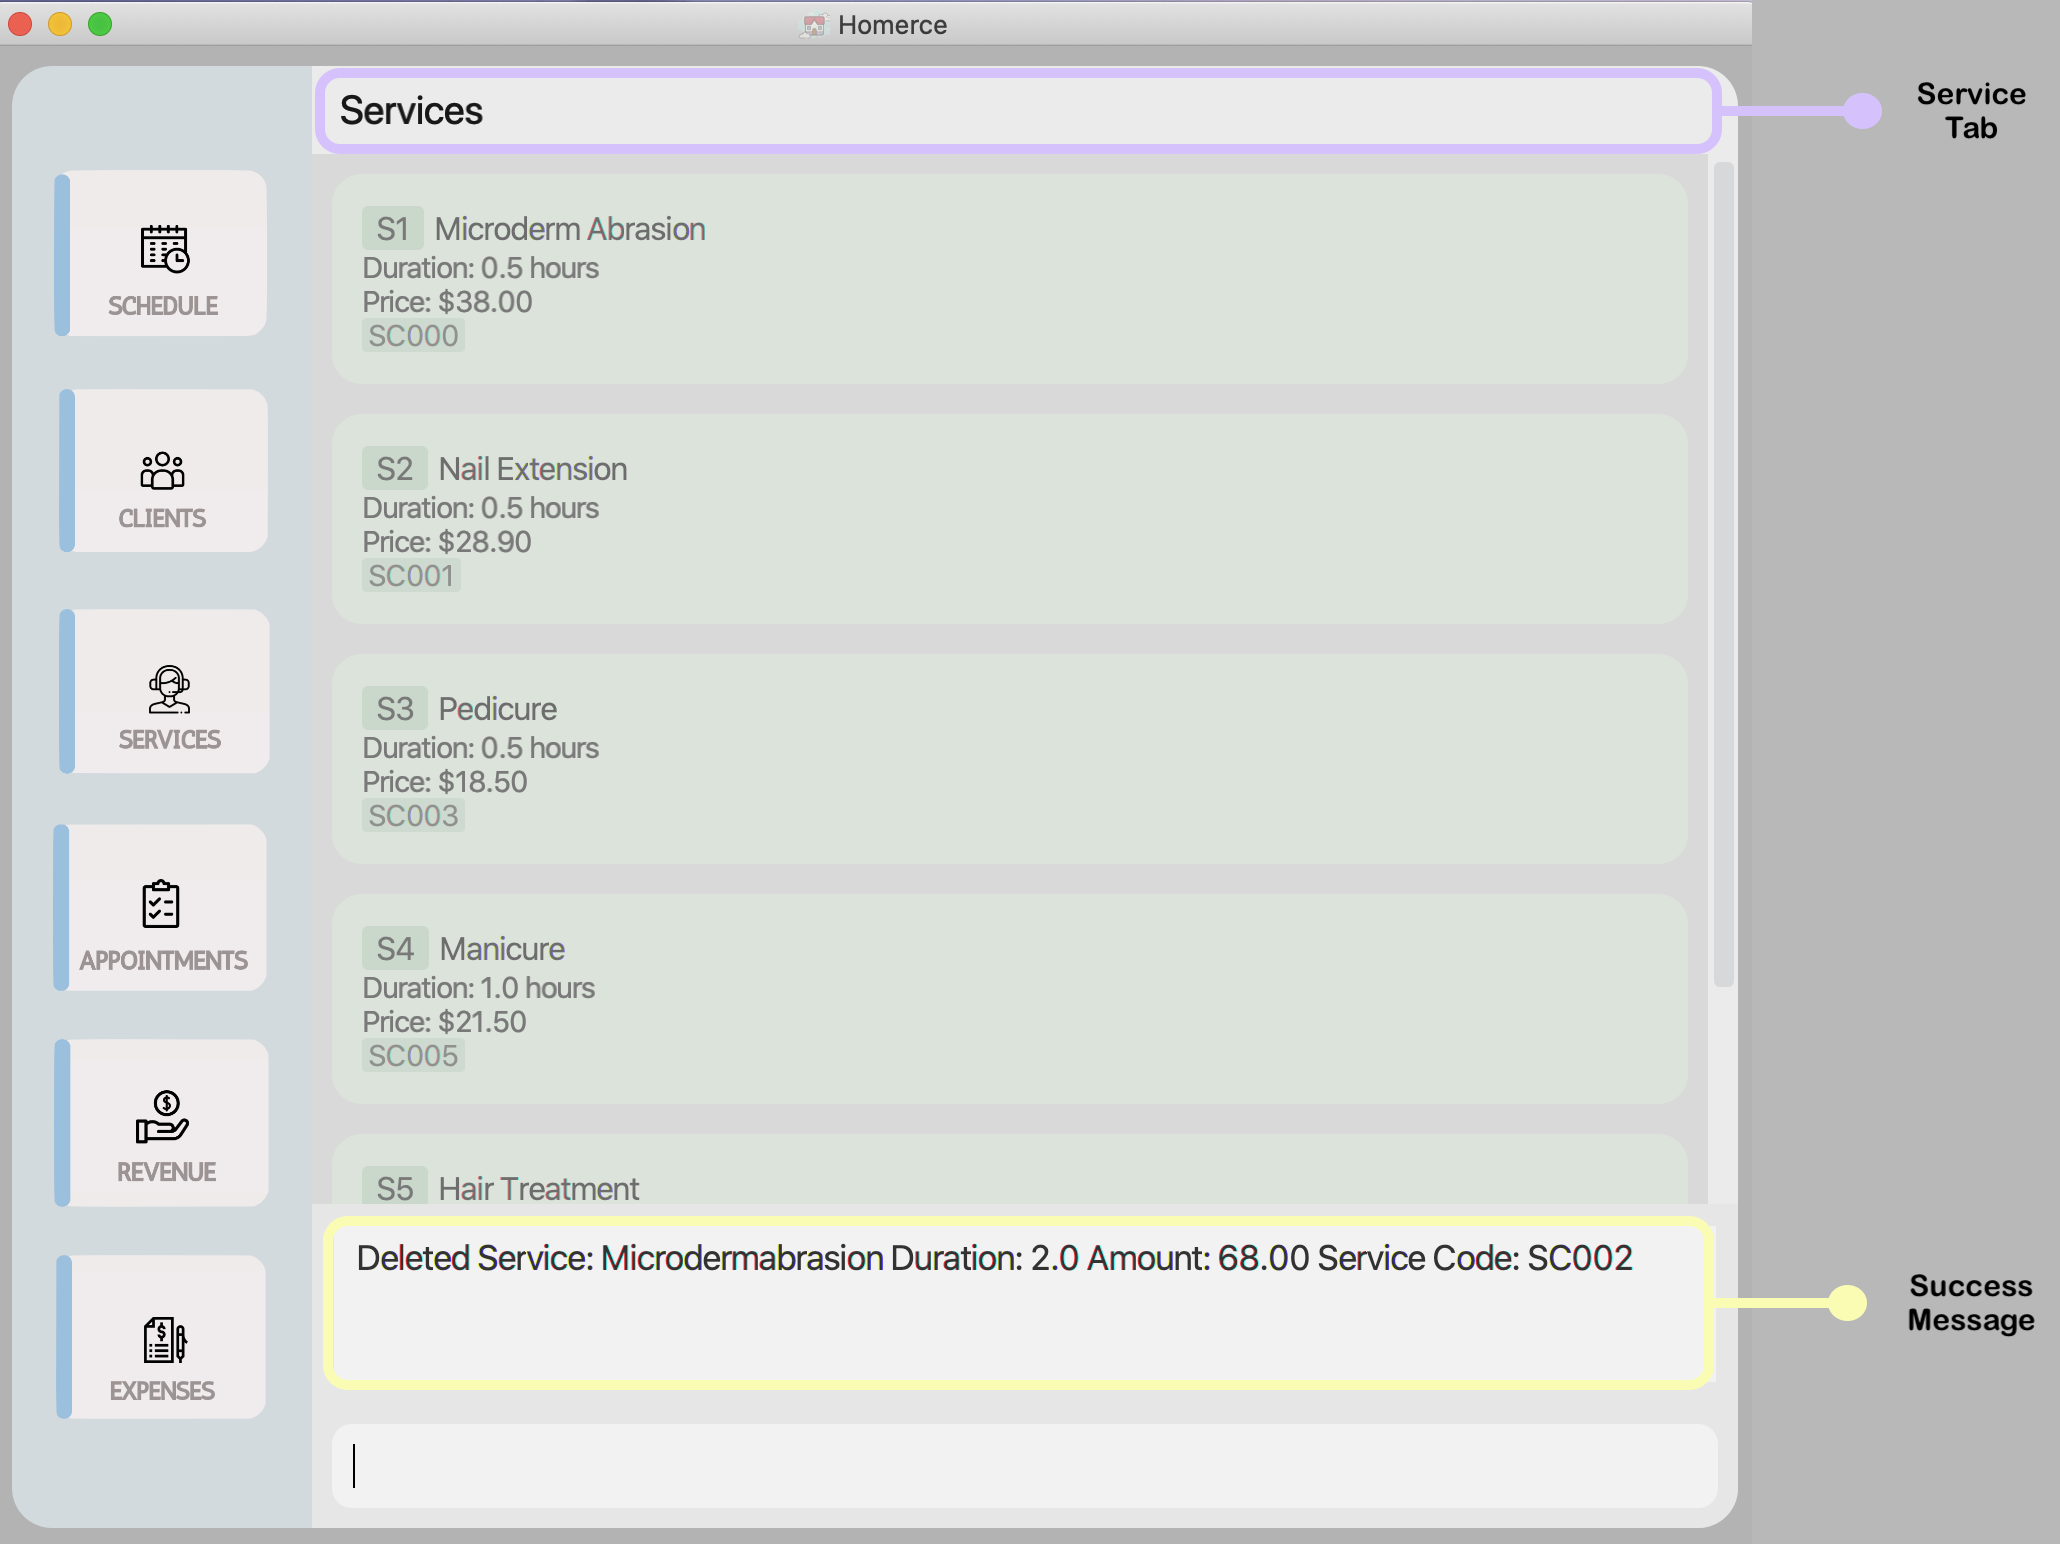
Figure 11 - GUI outcome for deletesvc
4.2.5. Find a service by keyword: findsvc
You can use this command to find specific services which matches either the title or service code that you provide.
Format: findsvc [t/TITLE]* [s/SERVICE_CODE]*
![]() Note:
Note:
- The search using title is case-insensitive. e.g nail will match Nail.
- The order of the keywords does not matter. e.g. Nail Hair will match Hair.
- Only full words will be matched e.g. Nail will not match Nails.
- Services matching at least one keyword will be returned (i.e. OR search). e.g. Hair Lash will return Lash Extension, Hair Coloring.
- Refer to Service Manager Command Parameters for more details about each parameter.
Example: Let’s say you want to find all the services that contain nail in its title from the list of services. You can follow these instructions.
Finding a service:
- Type
findsvc t/nailinto the Command Box. - Press
Enterto execute.
Outcome:
- The Result Display will show a success message.
- Homerce will switch to the Services Tab.
- You can now see the services in your list of services that contain nail in its title.
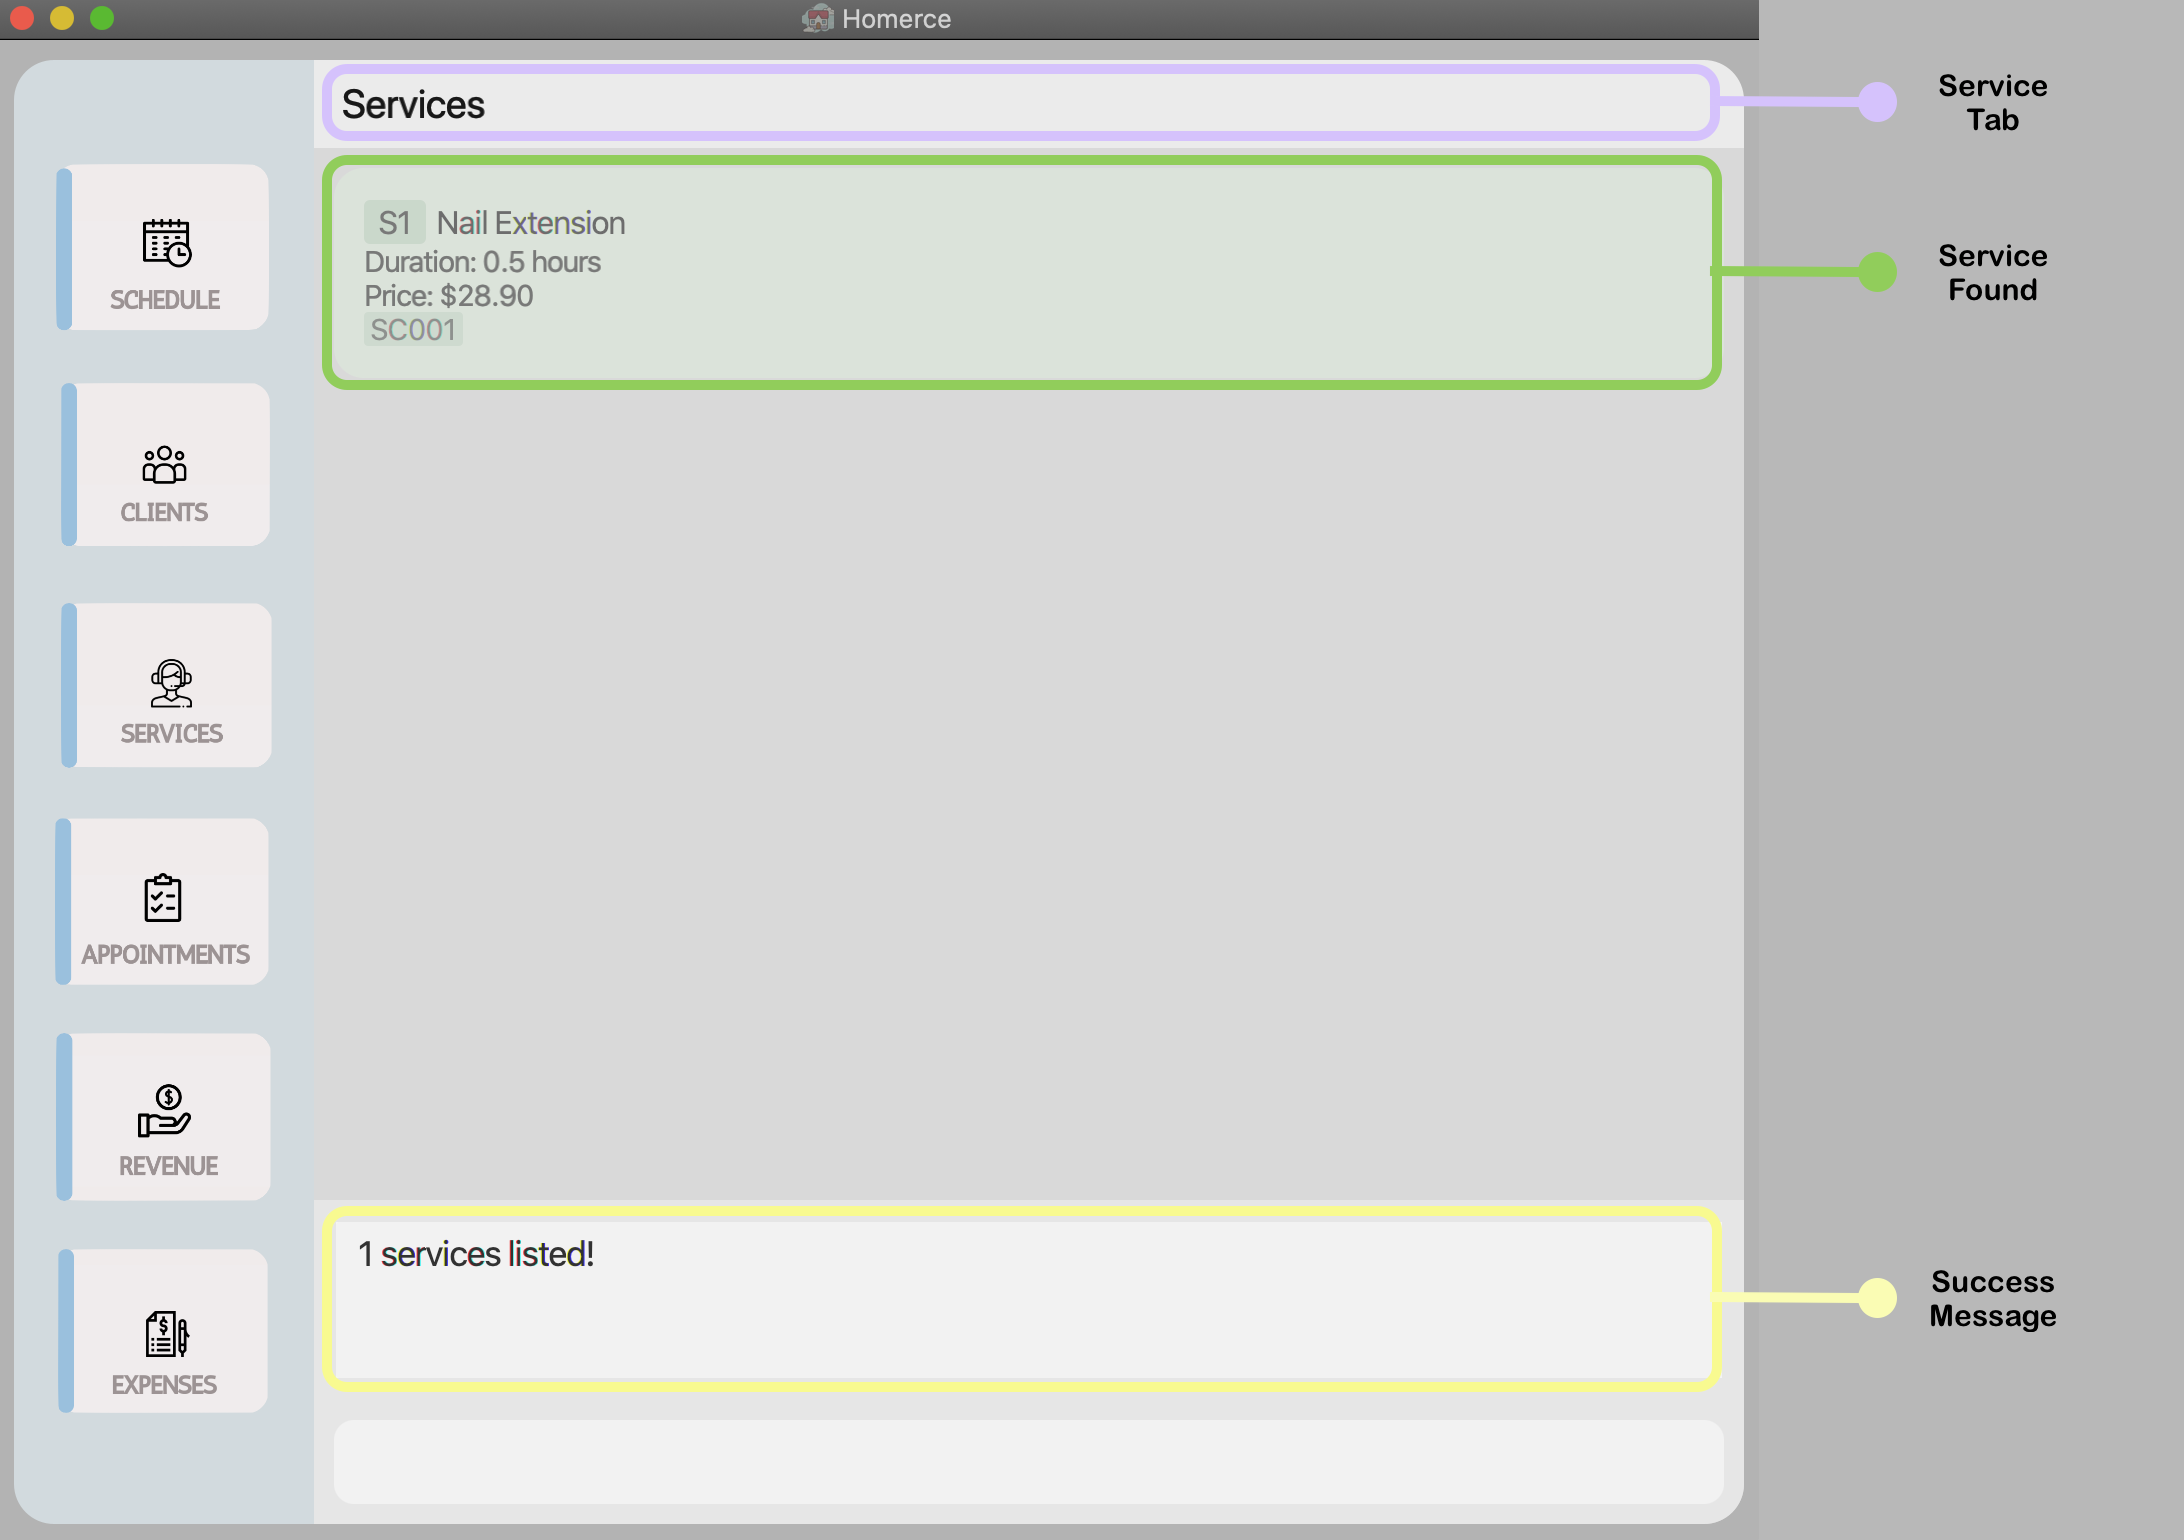
Figure 12 - GUI outcome for findsvc
4.2.6. List all services: listsvc
You can use this command to navigate to the Services Tab and display all your added services in the Service Manager.
Format: listsvc
Example: Let’s say you are in another tab and want to look at the list of all services. You can follow these instructions.
Listing all services:
- Type
listsvcinto the Command Box. - Press
Enterto execute.
Outcome:
- The Result Display will show a success message.
- Homerce will switch to the Services Tab.
- You can now see all your services.
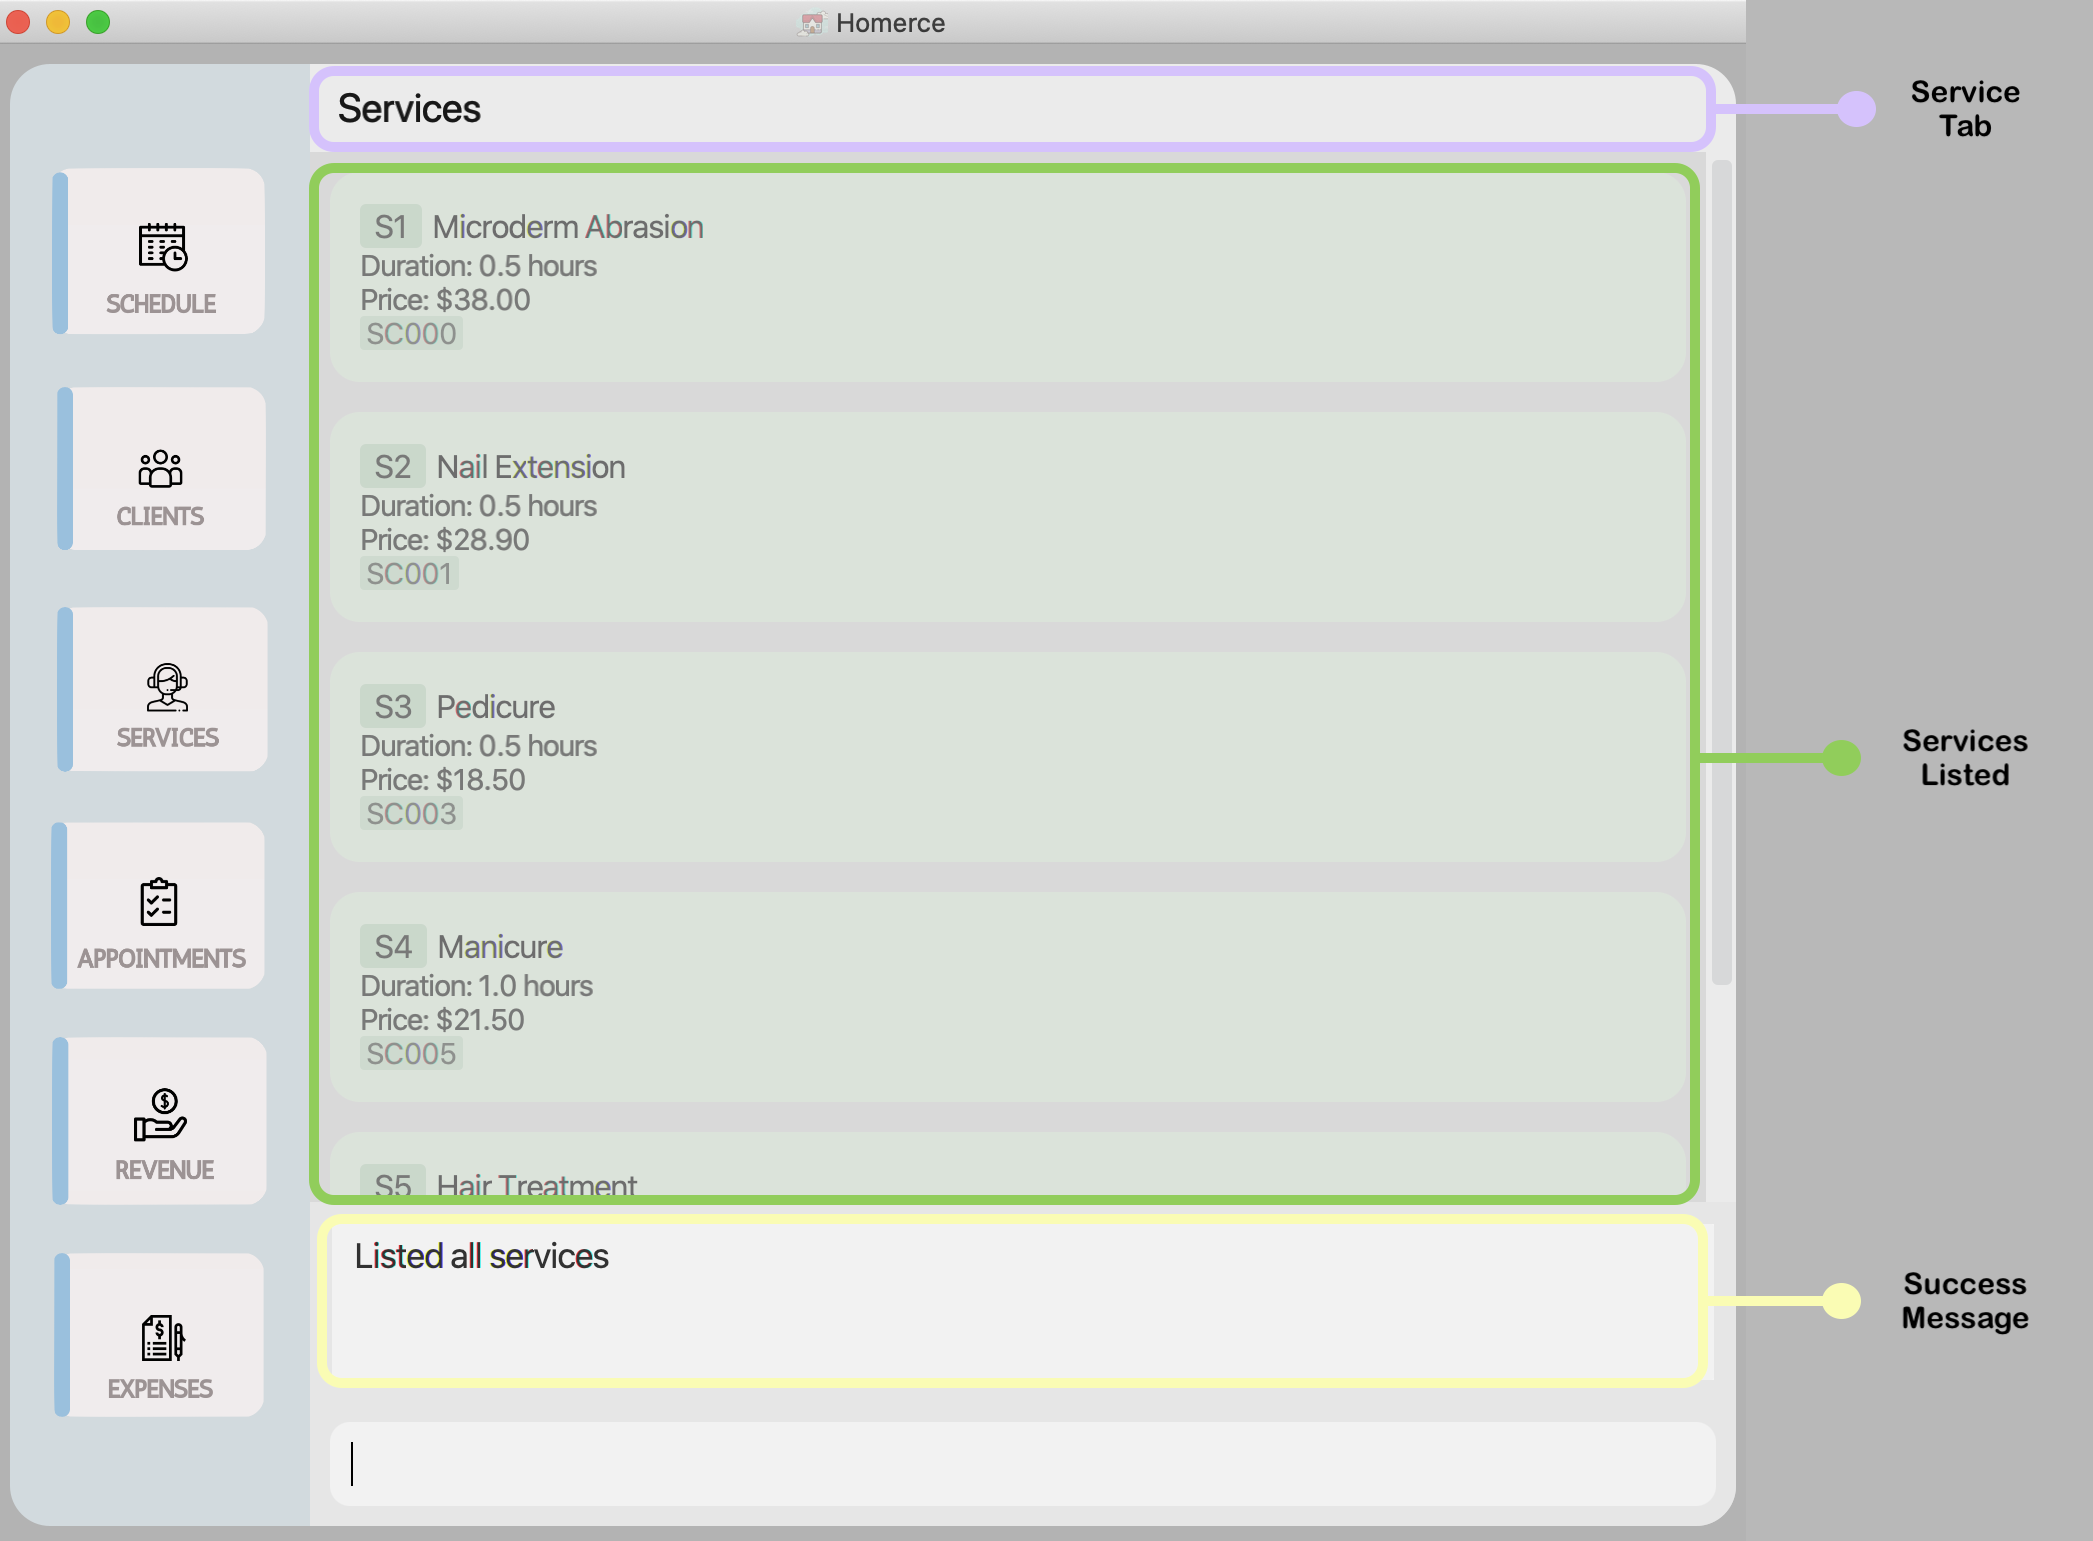
Figure 13 - GUI outcome for listsvc
4.2.7. Clear all services: clearsvc
You can use this command to clear and delete the all the services in the Service Manager.
Format: clearsvc
![]() Warning:
Warning:
- You are unable to clear services if there are any existing services that have been scheduled in your upcoming appointments. Please remove these appointments before proceeding to clear your services.
Example: Let’s say you want to delete all the services from your list of services and start from an empty list of services. You can follow these instructions.
Clearing all services:
- Type
clearsvcinto the Command Box. - Press
Enterto execute.
Outcome:
- The Result Display will show a success message if you have no services scheduled in your upcoming appointments.
- Homerce will switch to the Services Tab.
- You can see that the list of services is now empty.
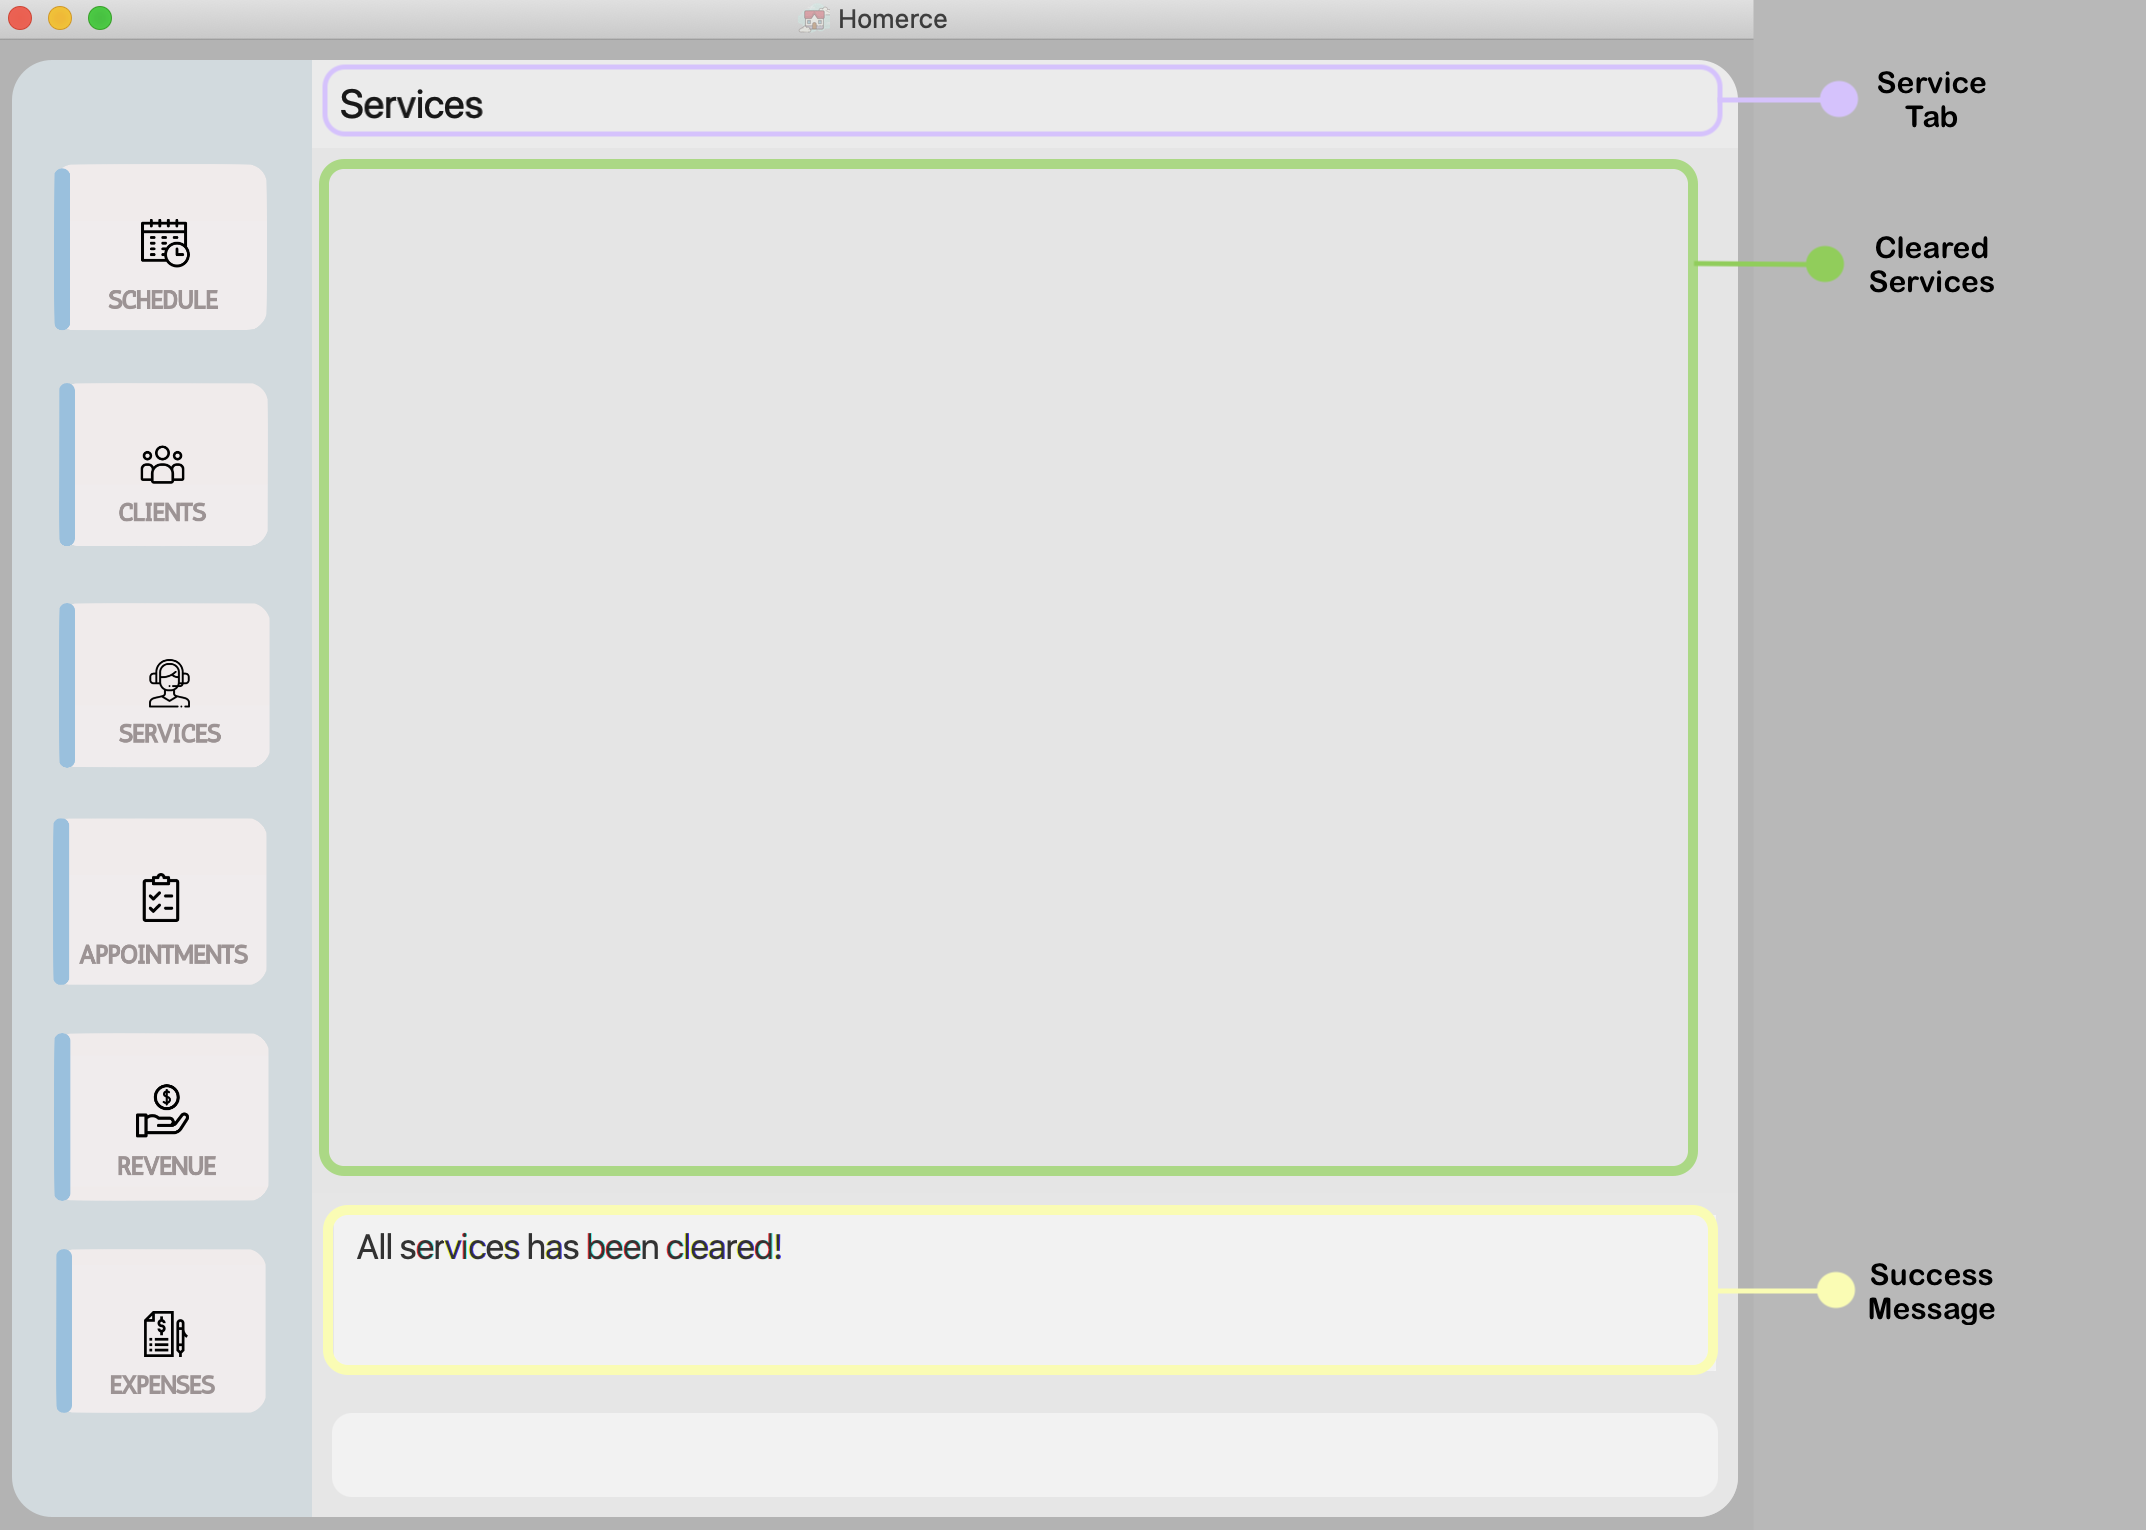
Figure 14 - GUI outcome for clearsvc
4.3. Appointment Manager (Done by Khoong Wei Kit)
Scheduling appointments is an essential part of your beauty salon and Homerce makes it easy to keep track of your appointments with your customers. You can add appointments for a particular service and client, mark it as done, and Homerce will automatically credit the revenue into the revenue tracker.
4.3.1. Appointment Manager Command Parameters
This feature uses a number of parameters, which are detailed below.
| Parameter Name | Description | Example |
|---|---|---|
DATE |
The date of the appointment. It must be in the format of dd-MM-yyyy. |
E.g. Typing 28-09-2020 would mean 28 September 2020. |
TIME |
The time of the appointment. It must be in the format of HHMM and the appointment cannot be conducted past midnight. |
E.g. Typing 1730 would mean 5:30 PM. E.g. Typing 0900 would mean 9:00 AM. |
SERVICE_CODE |
The service code is the code that identifies the type of service provided. It must be alphanumeric words of 5 characters long which corresponds to an existing service. |
E.g. If you have added an eyelash extension service into Homerce and its service code is SC001. Typing SC001 would refer to the eyelash extension service. |
PHONE_NUMBER |
The phone number of the client. It must be at least 3 digits which corresponds to the phone number of an existing client. |
E.g. Typing 81281234 or 91235678 is a valid phone number. E.g. Typing 99 would not be a recognised number. |
NAME |
The name of the client booking the appointment. It must be a alphanumeric word and incomplete words are not accepted. |
E.g. If a client with the name Hartin Menz called to book an appointment, the word Hartin would be accepted as a parameter for NAME but not Hart. |
INDEX |
The index of the appointment in the displayed list. It must be a valid index number. |
E.g. Typing 2 would mean the appointment with index-2 in the displayed list. |
4.3.2. Add an appointment: addapt
When a new or existing client calls to make a booking for your services, use this command to add details of the appointment into the appointment manager.
Format : addapt dt/DATE t/TIME s/SERVICE_CODE p/PHONE_NUMBER
![]() Note:
Note:
- Refer to Appointment Manager Command Parameters for more details about each parameter.
Example:
Let’s say your client called to make an appointment. You can follow these instructions to add his/her appointment details into Homerce.
Steps:
- Type
addapt dt/28-10-2020 t/1300 s/SC001 p/87438807in the Command Box. - Press
Enteron your keyboard.
Outcome:
- The Result Display will show a success message.
- Homerce will switch to the Appointment Tab.
- You can now see all your appointments including the newly added appointment.
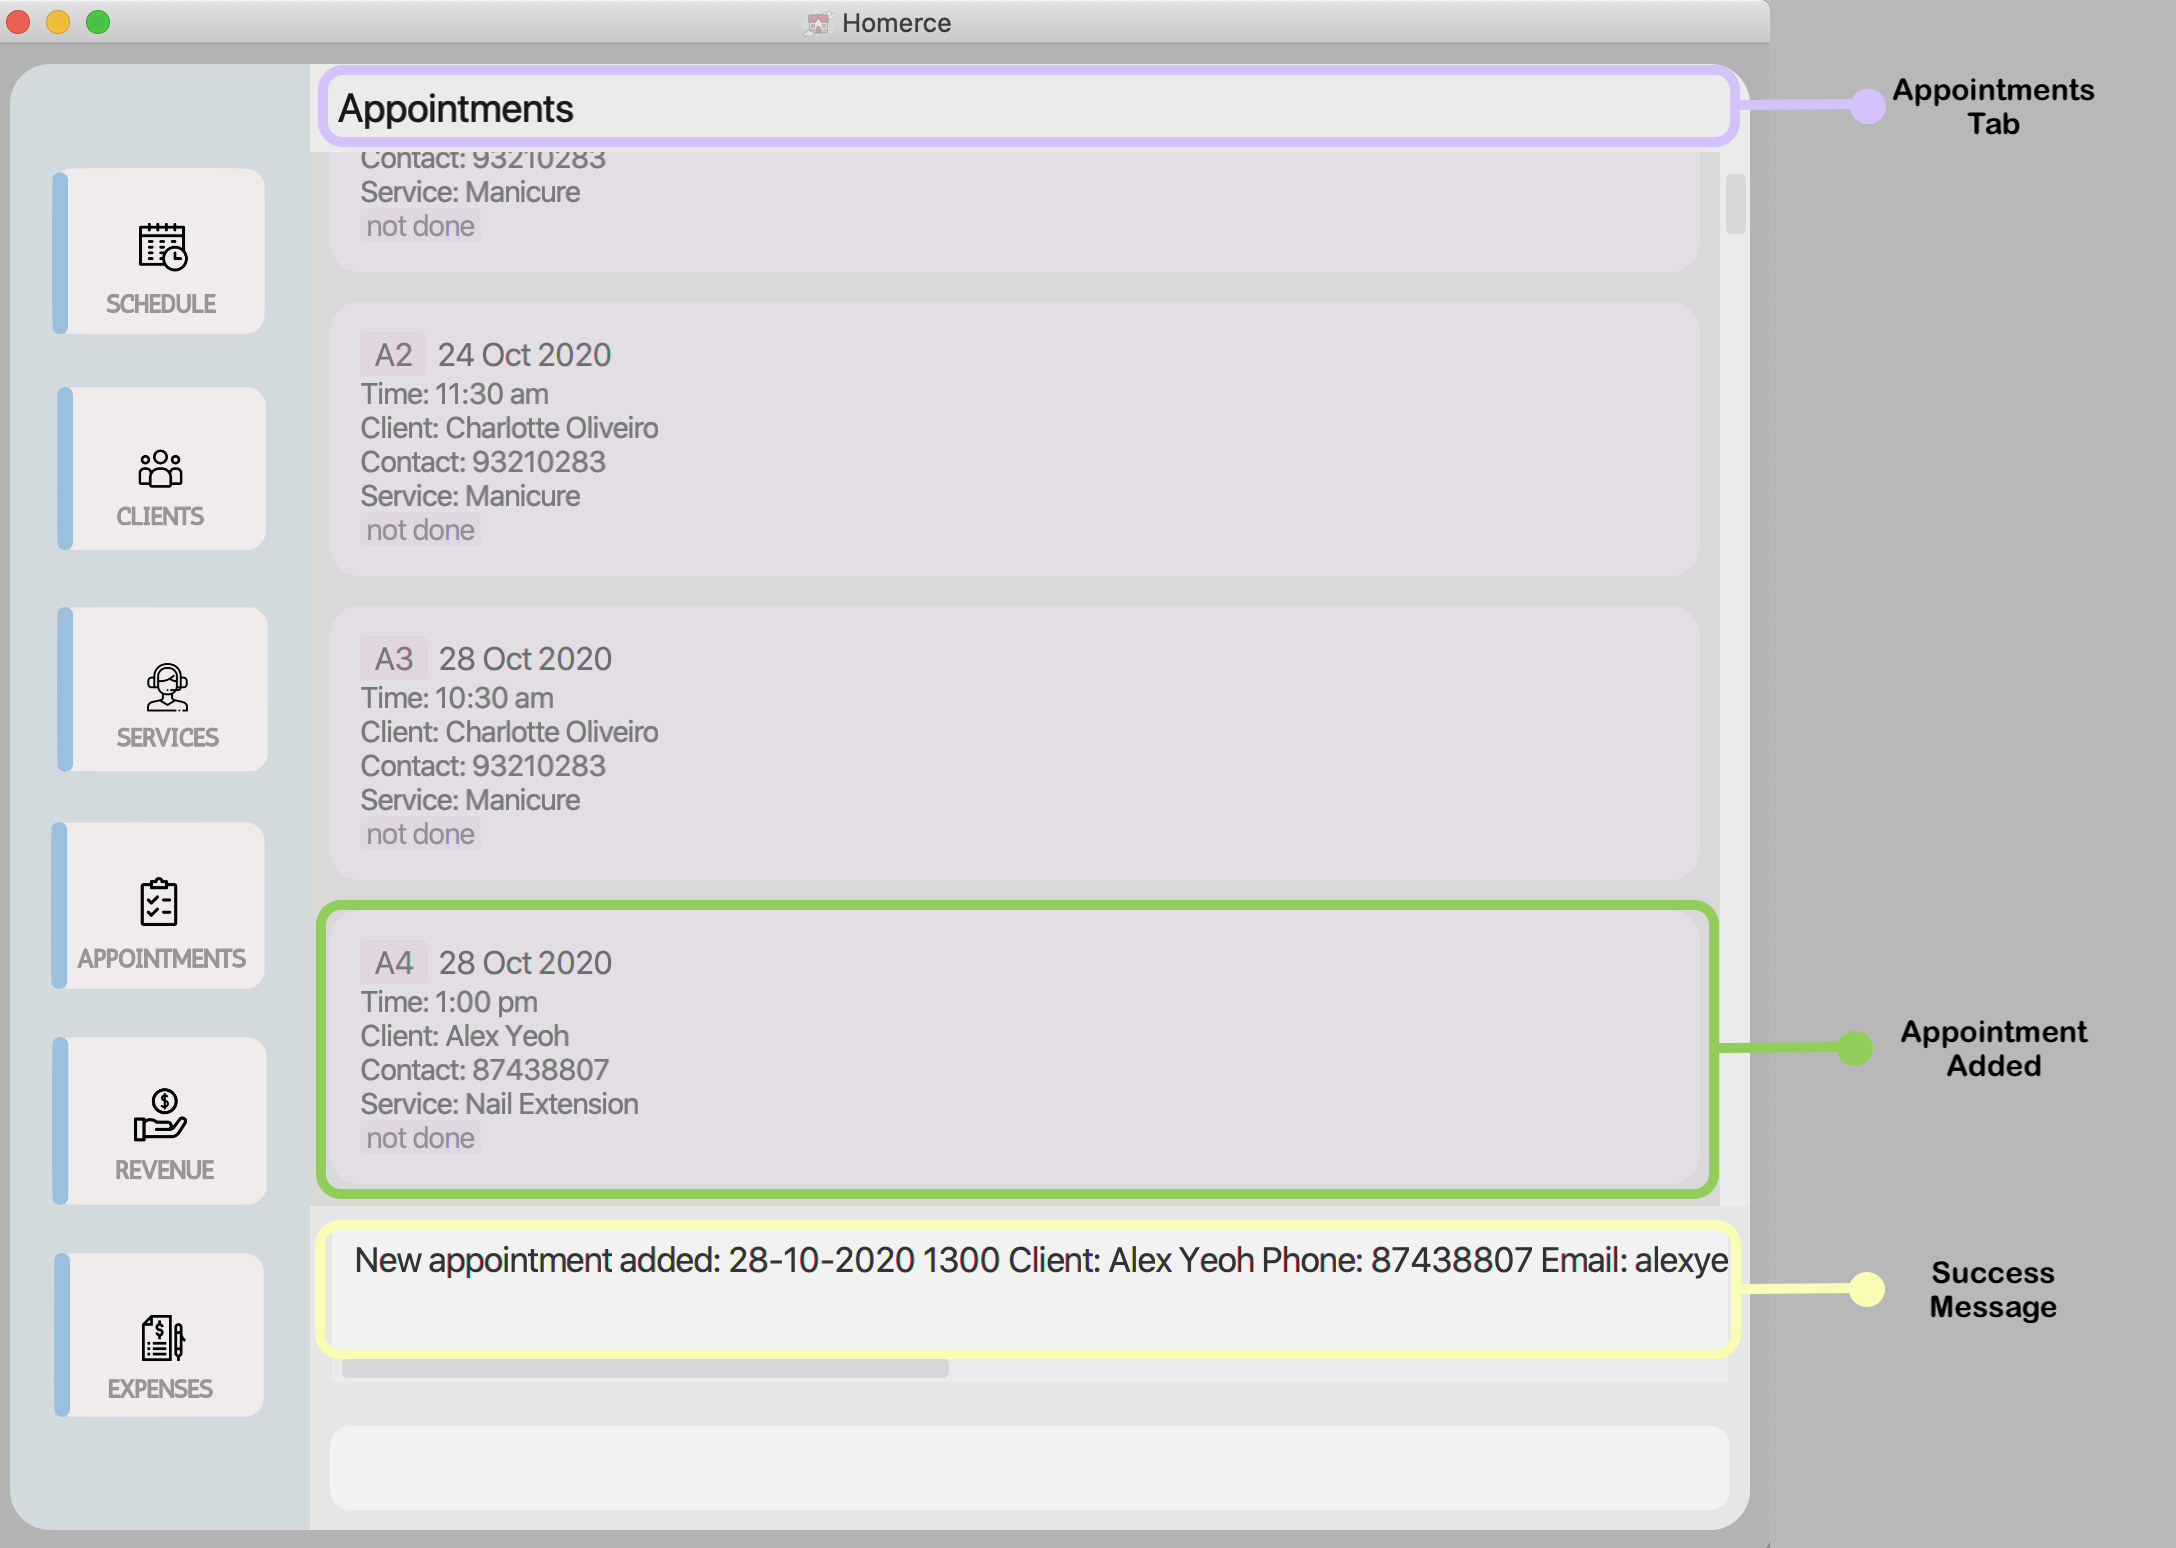
Figure 15 - GUI outcome for addapt
4.3.3. List all appointments: listapt
Use this command to see your list of all your appointments, sorted by chronological order.
Format : listapt
Example:
Let’s say you want to list all your appointments stored in Homerce. You can follow these instructions.
Steps:
- Type
listaptin the Command Box. - Press
Enteron your keyboard.
Outcome:
- The Result Display will show a success message.
- Homerce will switch to the Appointment Tab.
- You can now see all your appointments stored in Homerce.
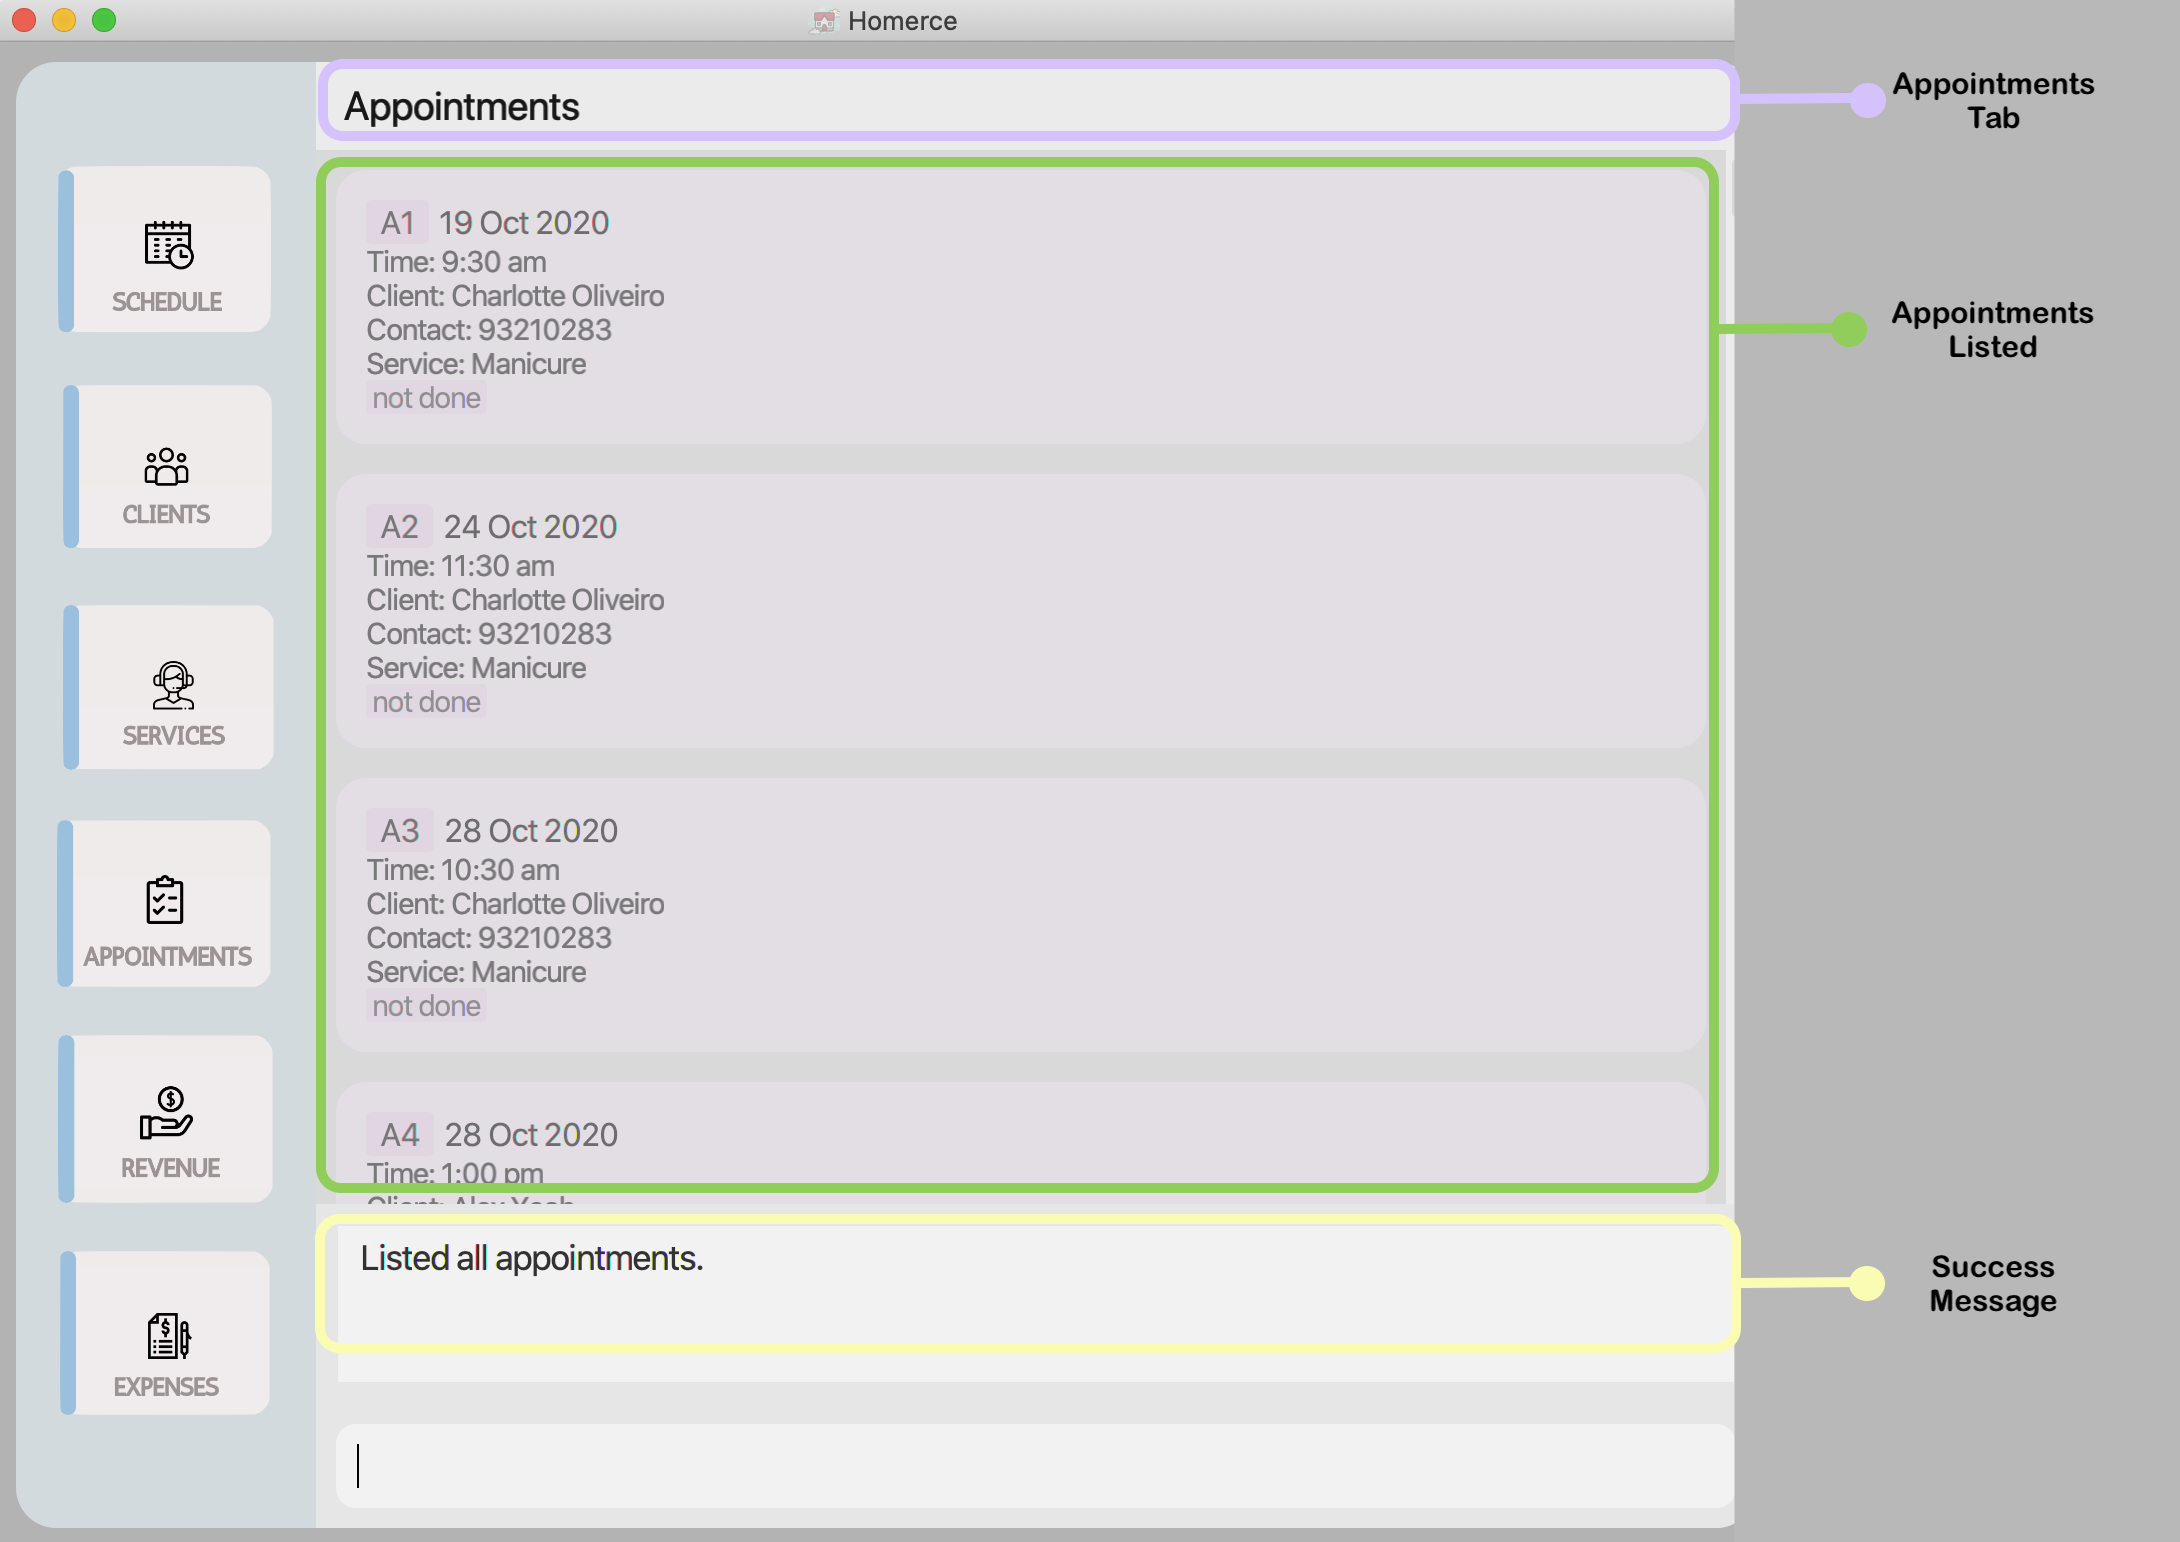
Figure 16 - GUI outcome for listapt
4.3.4. Find an appointment: findapt
Use this command to find a specific appointment which matches the description you provide
to Homerce. To find all the appointments belonging to a particular week, use the schedule
command instead.
Format : findapt [p/PHONE_NUMBER]* [n/NAME]* [dt/DATE]* [s/SERVICE_CODE]*
![]() Note:
Note:
- The search using name is case-insensitive. e.g hans will match Hans.
- The order of the keywords does not matter. e.g. Hans Bo will match Bo Hans.
- Only full words will be matched e.g. Han will not match Hans.
- Clients matching at least one keyword will be returned (i.e. OR search). e.g. Hans Bo will return Hans Gruber, Bo Yang.
- The search using phone will match if the number sequence entered (at least 3 digits long) is part of a client’s phone number. e.g. 123 will return clients with phone number 91234567 and 98765123.
- Refer to Appointment Manager Command Parameters for more details about each parameter.
Example:
Let’s say you have a number of appointments stored in Homerce and you want to search for those booked by the phone number 87438807. You can follow these instructions to list all the appointments which match your search criteria.
Steps:
- Type
findapt p/87438807in the Command Box. - Press
Enteron your keyboard.
Outcome:
- The Result Display will show a success message.
- Homerce will switch to the Appointment Tab.
- You can now see all your appointments made by the number
87438807.
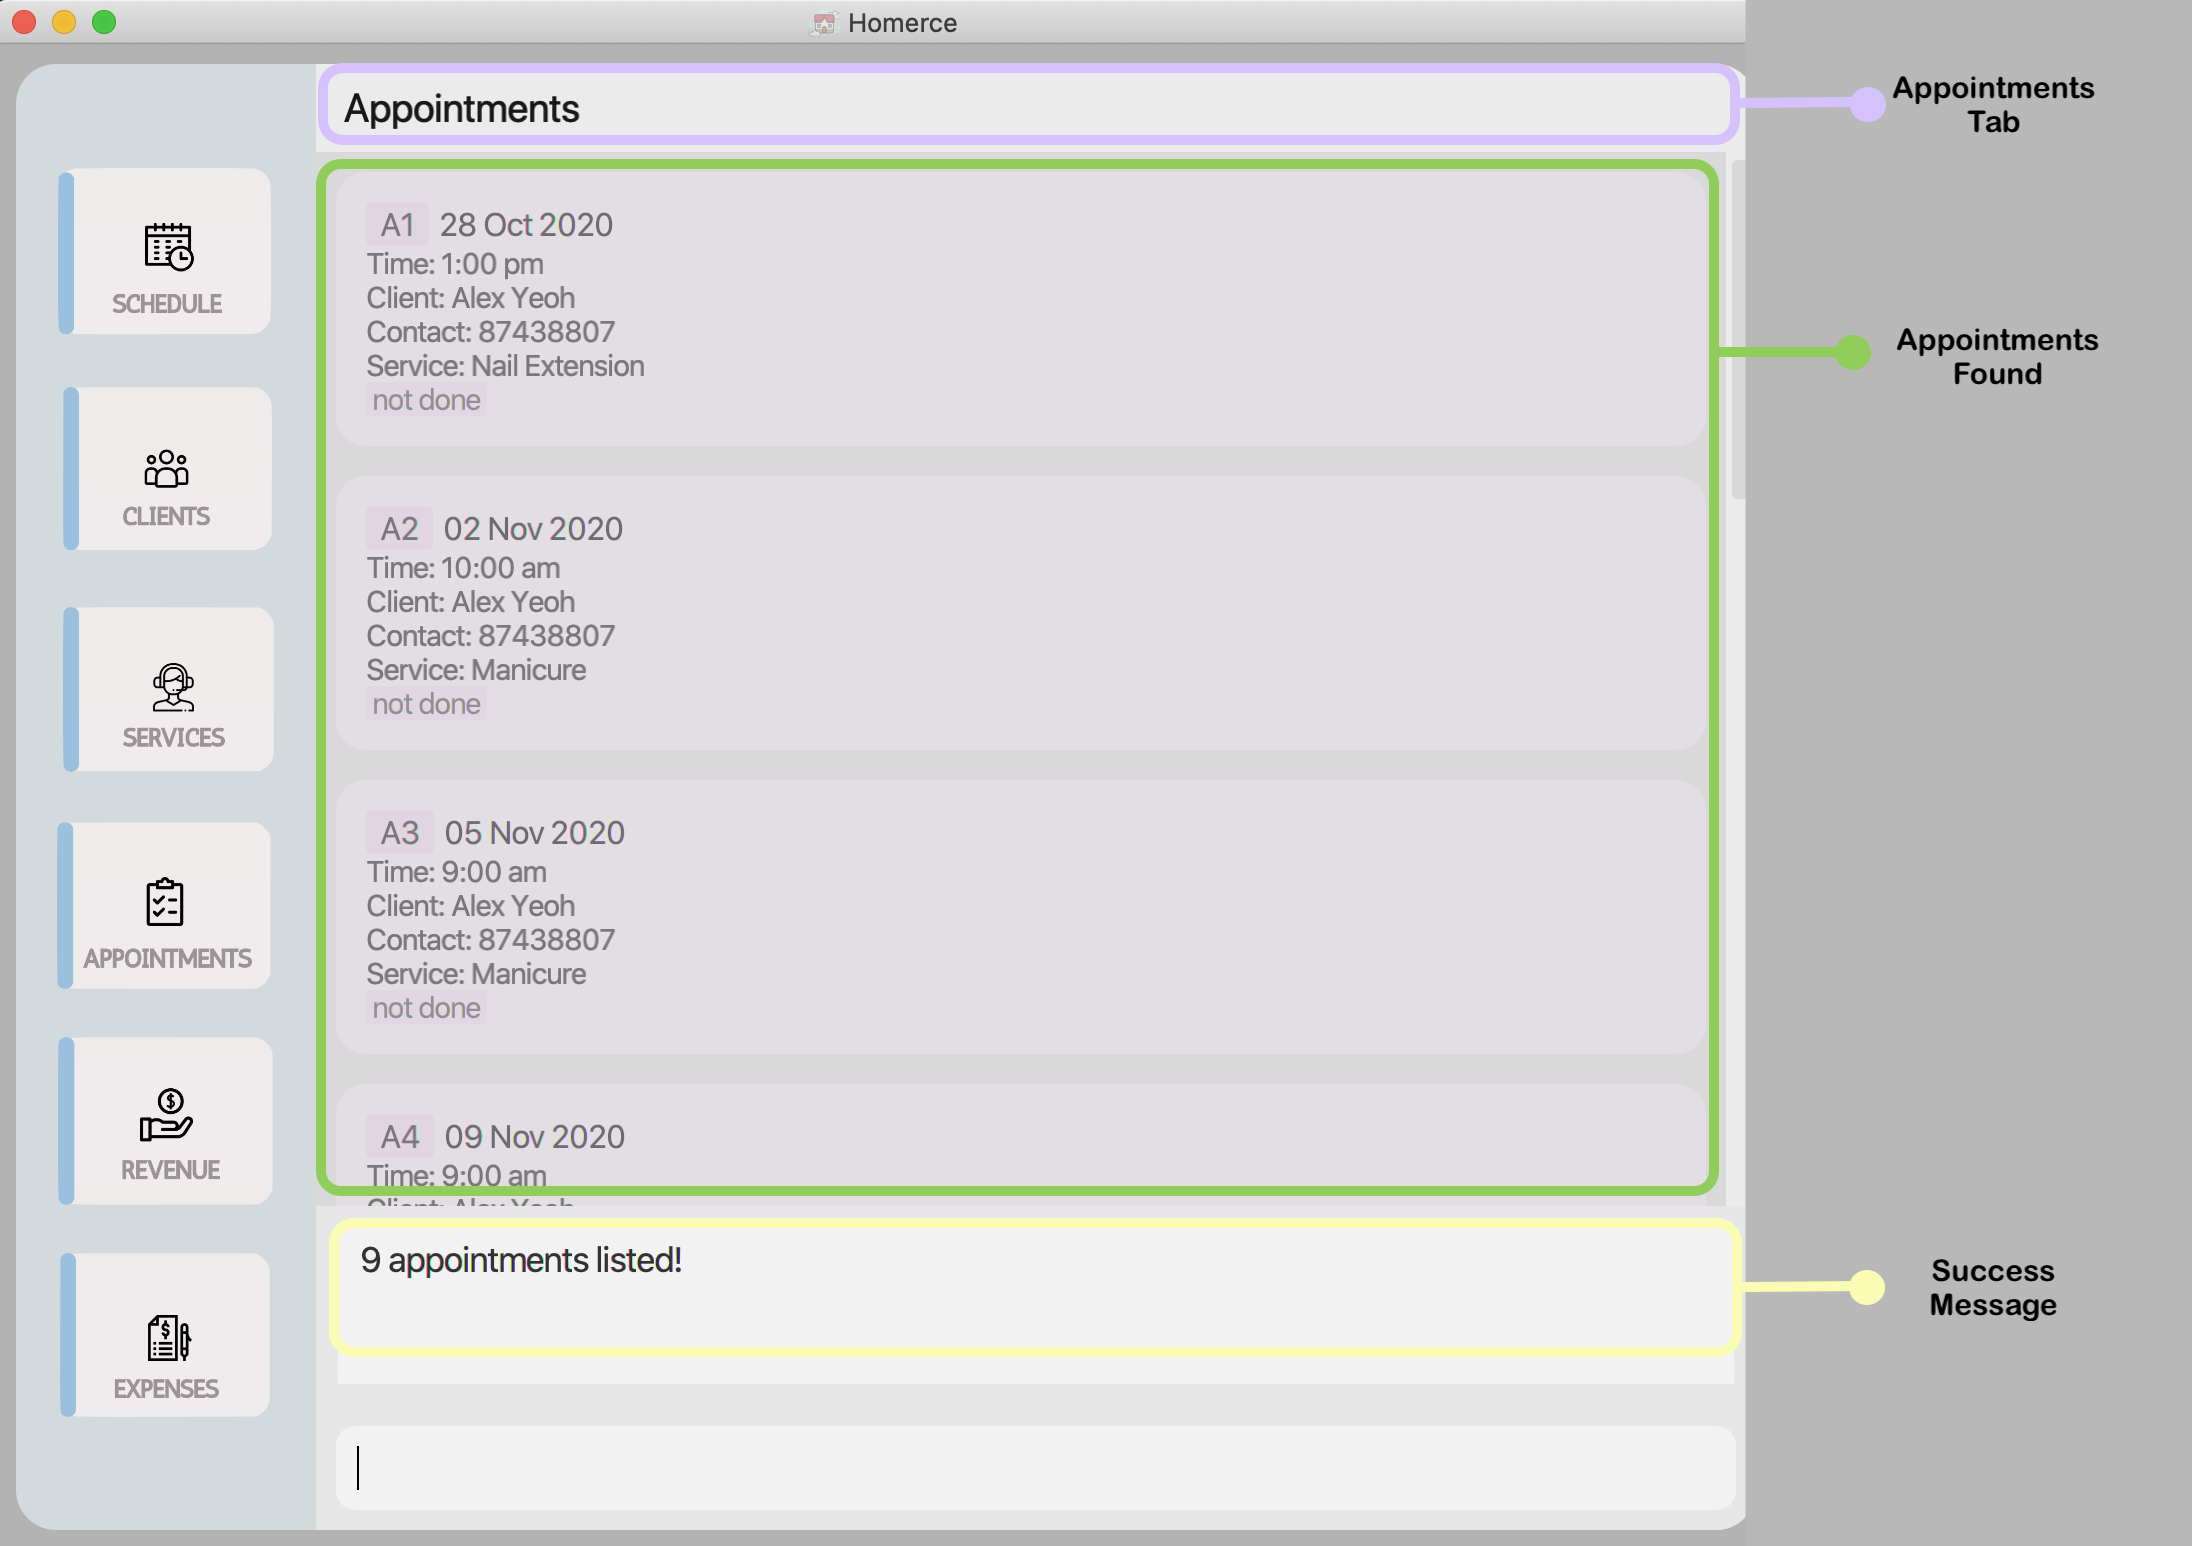
Figure 17 - GUI outcome for findapt
4.3.5. Edit an appointment: editapt
When a new or existing client calls to edit a booking he or she had made, use this command to edit details of the appointment.
Format : editapt INDEX [dt/DATE] [t/TIME] [p/PHONE_NUMBER] [s/SERVICE_CODE]
![]() Note:
Note:
- Refer to Appointment Manager Command Parameters for more details about each parameter.
Example:
Let’s say you searched for the appointment which you want to edit in Homerce.
You searched for the appointment in Homerce with listapt or findapt, see that it’s index is 1,
and you want to edit it with the following details:
Steps:
- Type
editapt 1 dt/30-10-2020 t/1030in the Command Box. - Press
Enteron your keyboard.
Outcome:
- The Result Display will show a success message.
- Homerce will switch to the Appointment Tab.
- You will see your edited appointment displayed alongside other appointments in your list of appointments.
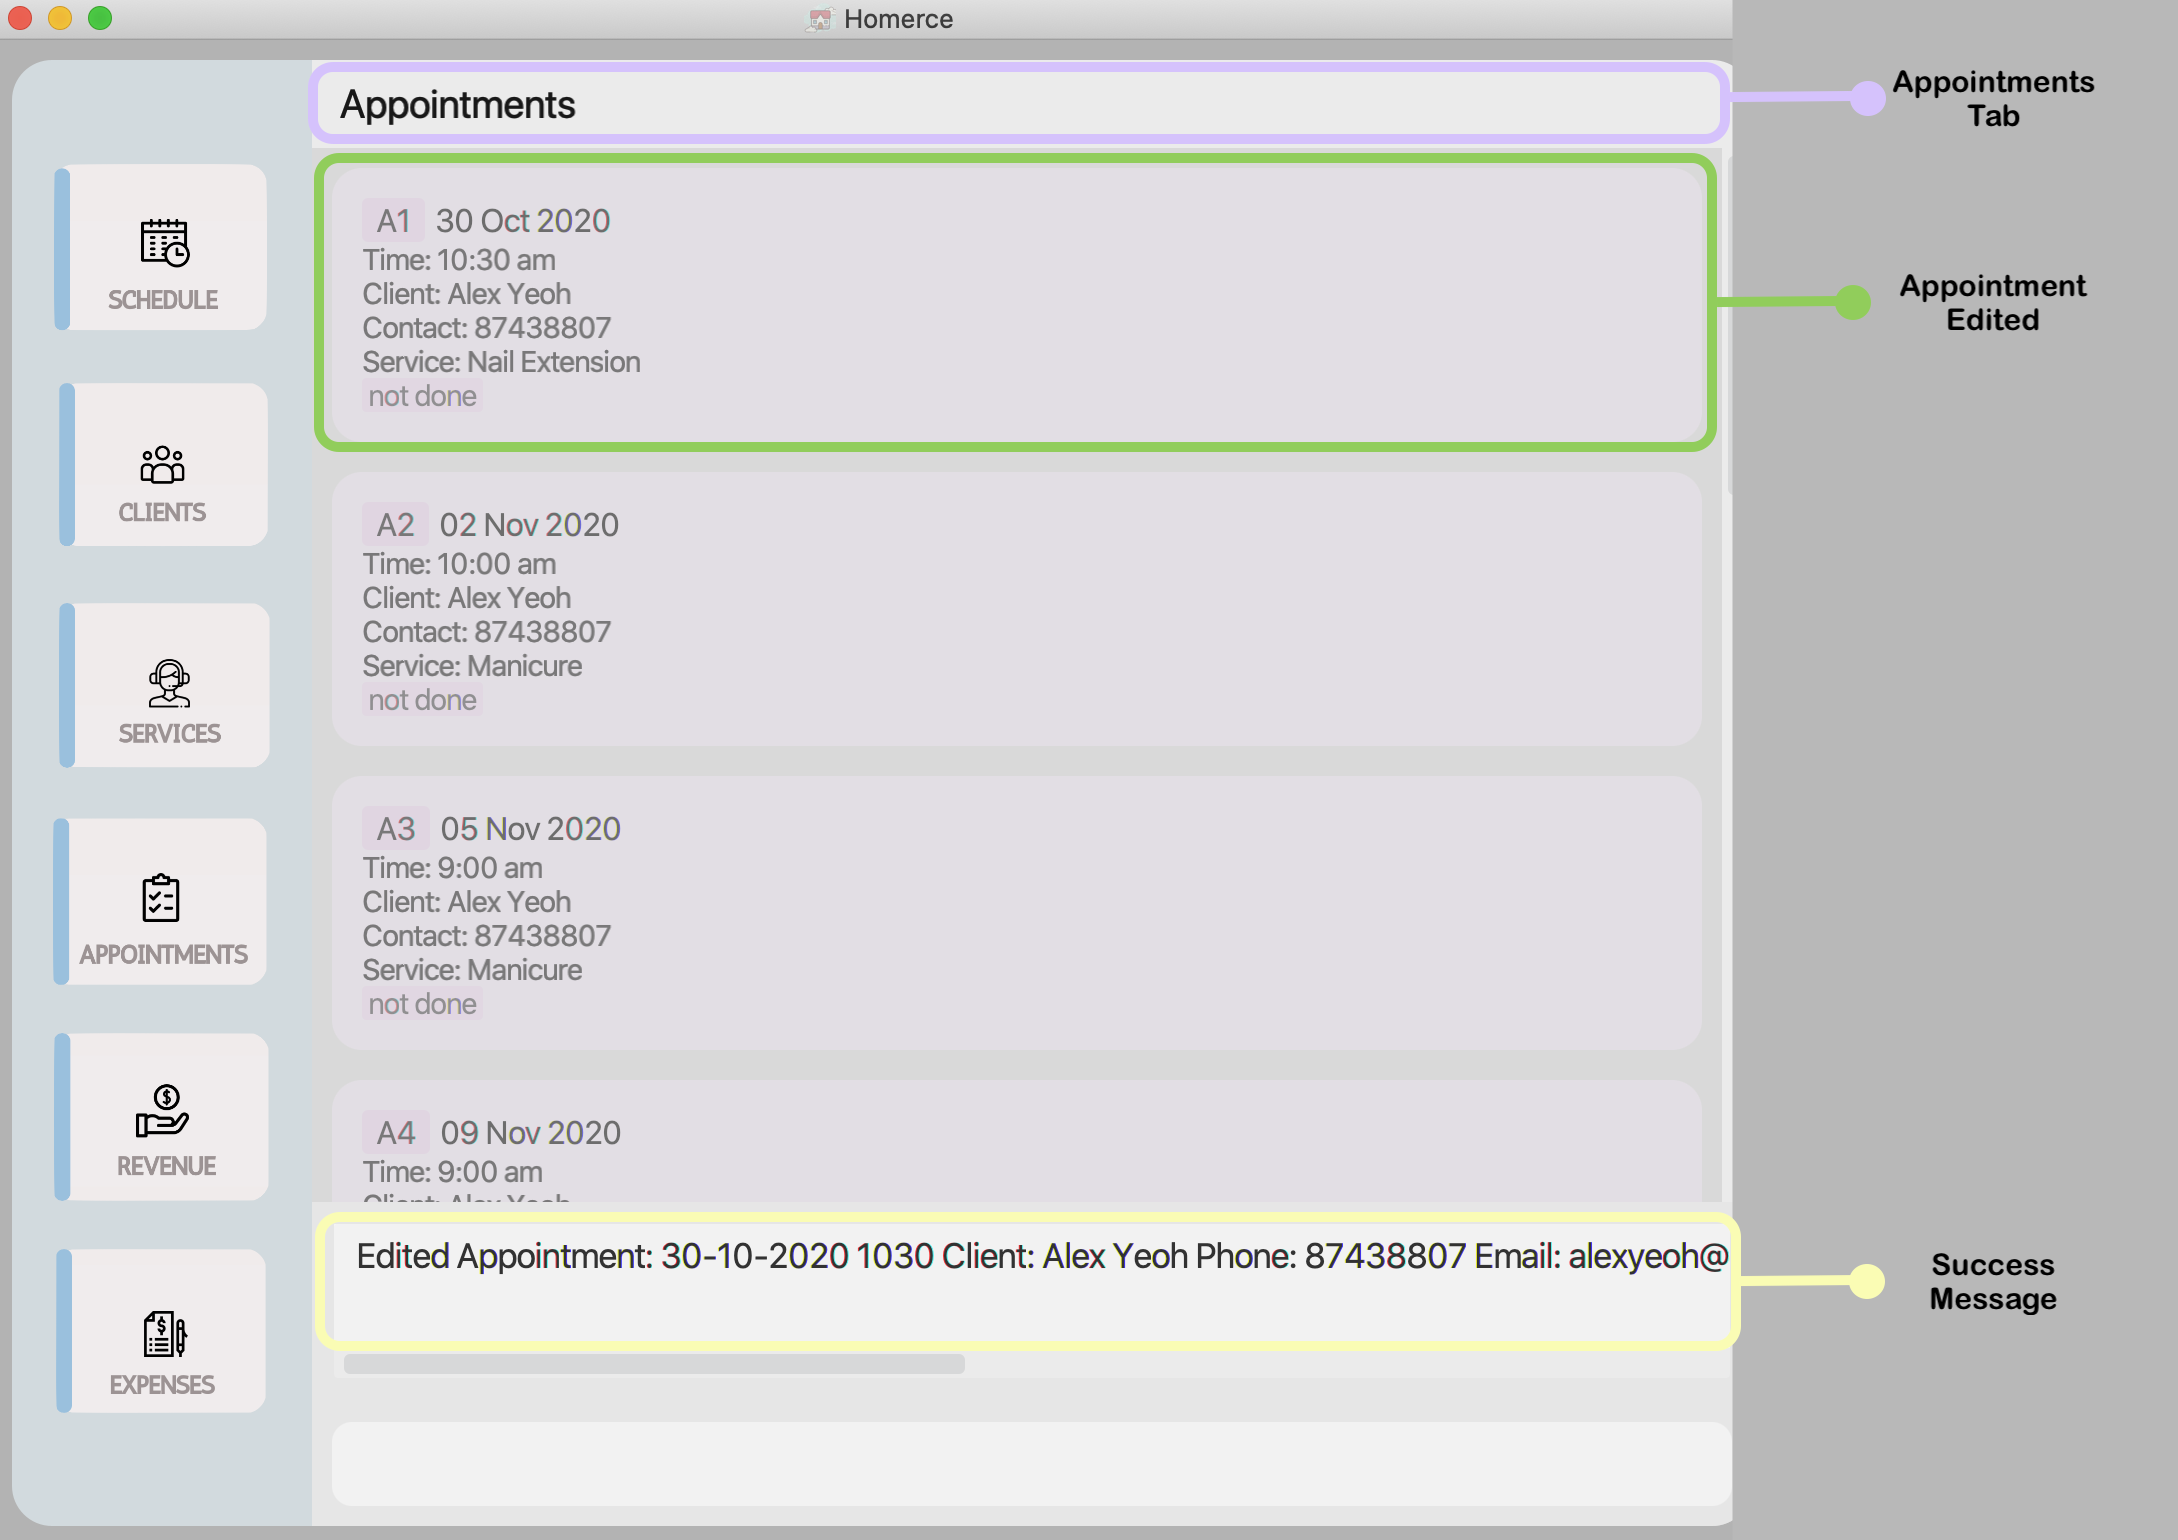
Figure 18 - GUI outcome for editapt
4.3.6. Mark an appointment as done: done
After an appointment with a client has been completed, use this command to credit the revenue from the service and mark the appointment as done.
Format : done INDEX
![]() Note:
Note:
- Refer to Appointment Manager Command Parameters for more details about each parameter.
Example:
Let’s say you just finished an appointment with a client. After finding the appointment in Homerce
with listapt or findapt, you see that the appointment has index 1. You can follow these instructions
to mark that appointment as done.
Steps:
- Type
done 1in the Command Box. - Press
Enteron your keyboard.
Outcome:
- The Result Display will show a success message.
- Homerce will switch to the Appointment Tab.
- You will see your appointment marked as done, displayed alongside other appointments in your list of appointments.
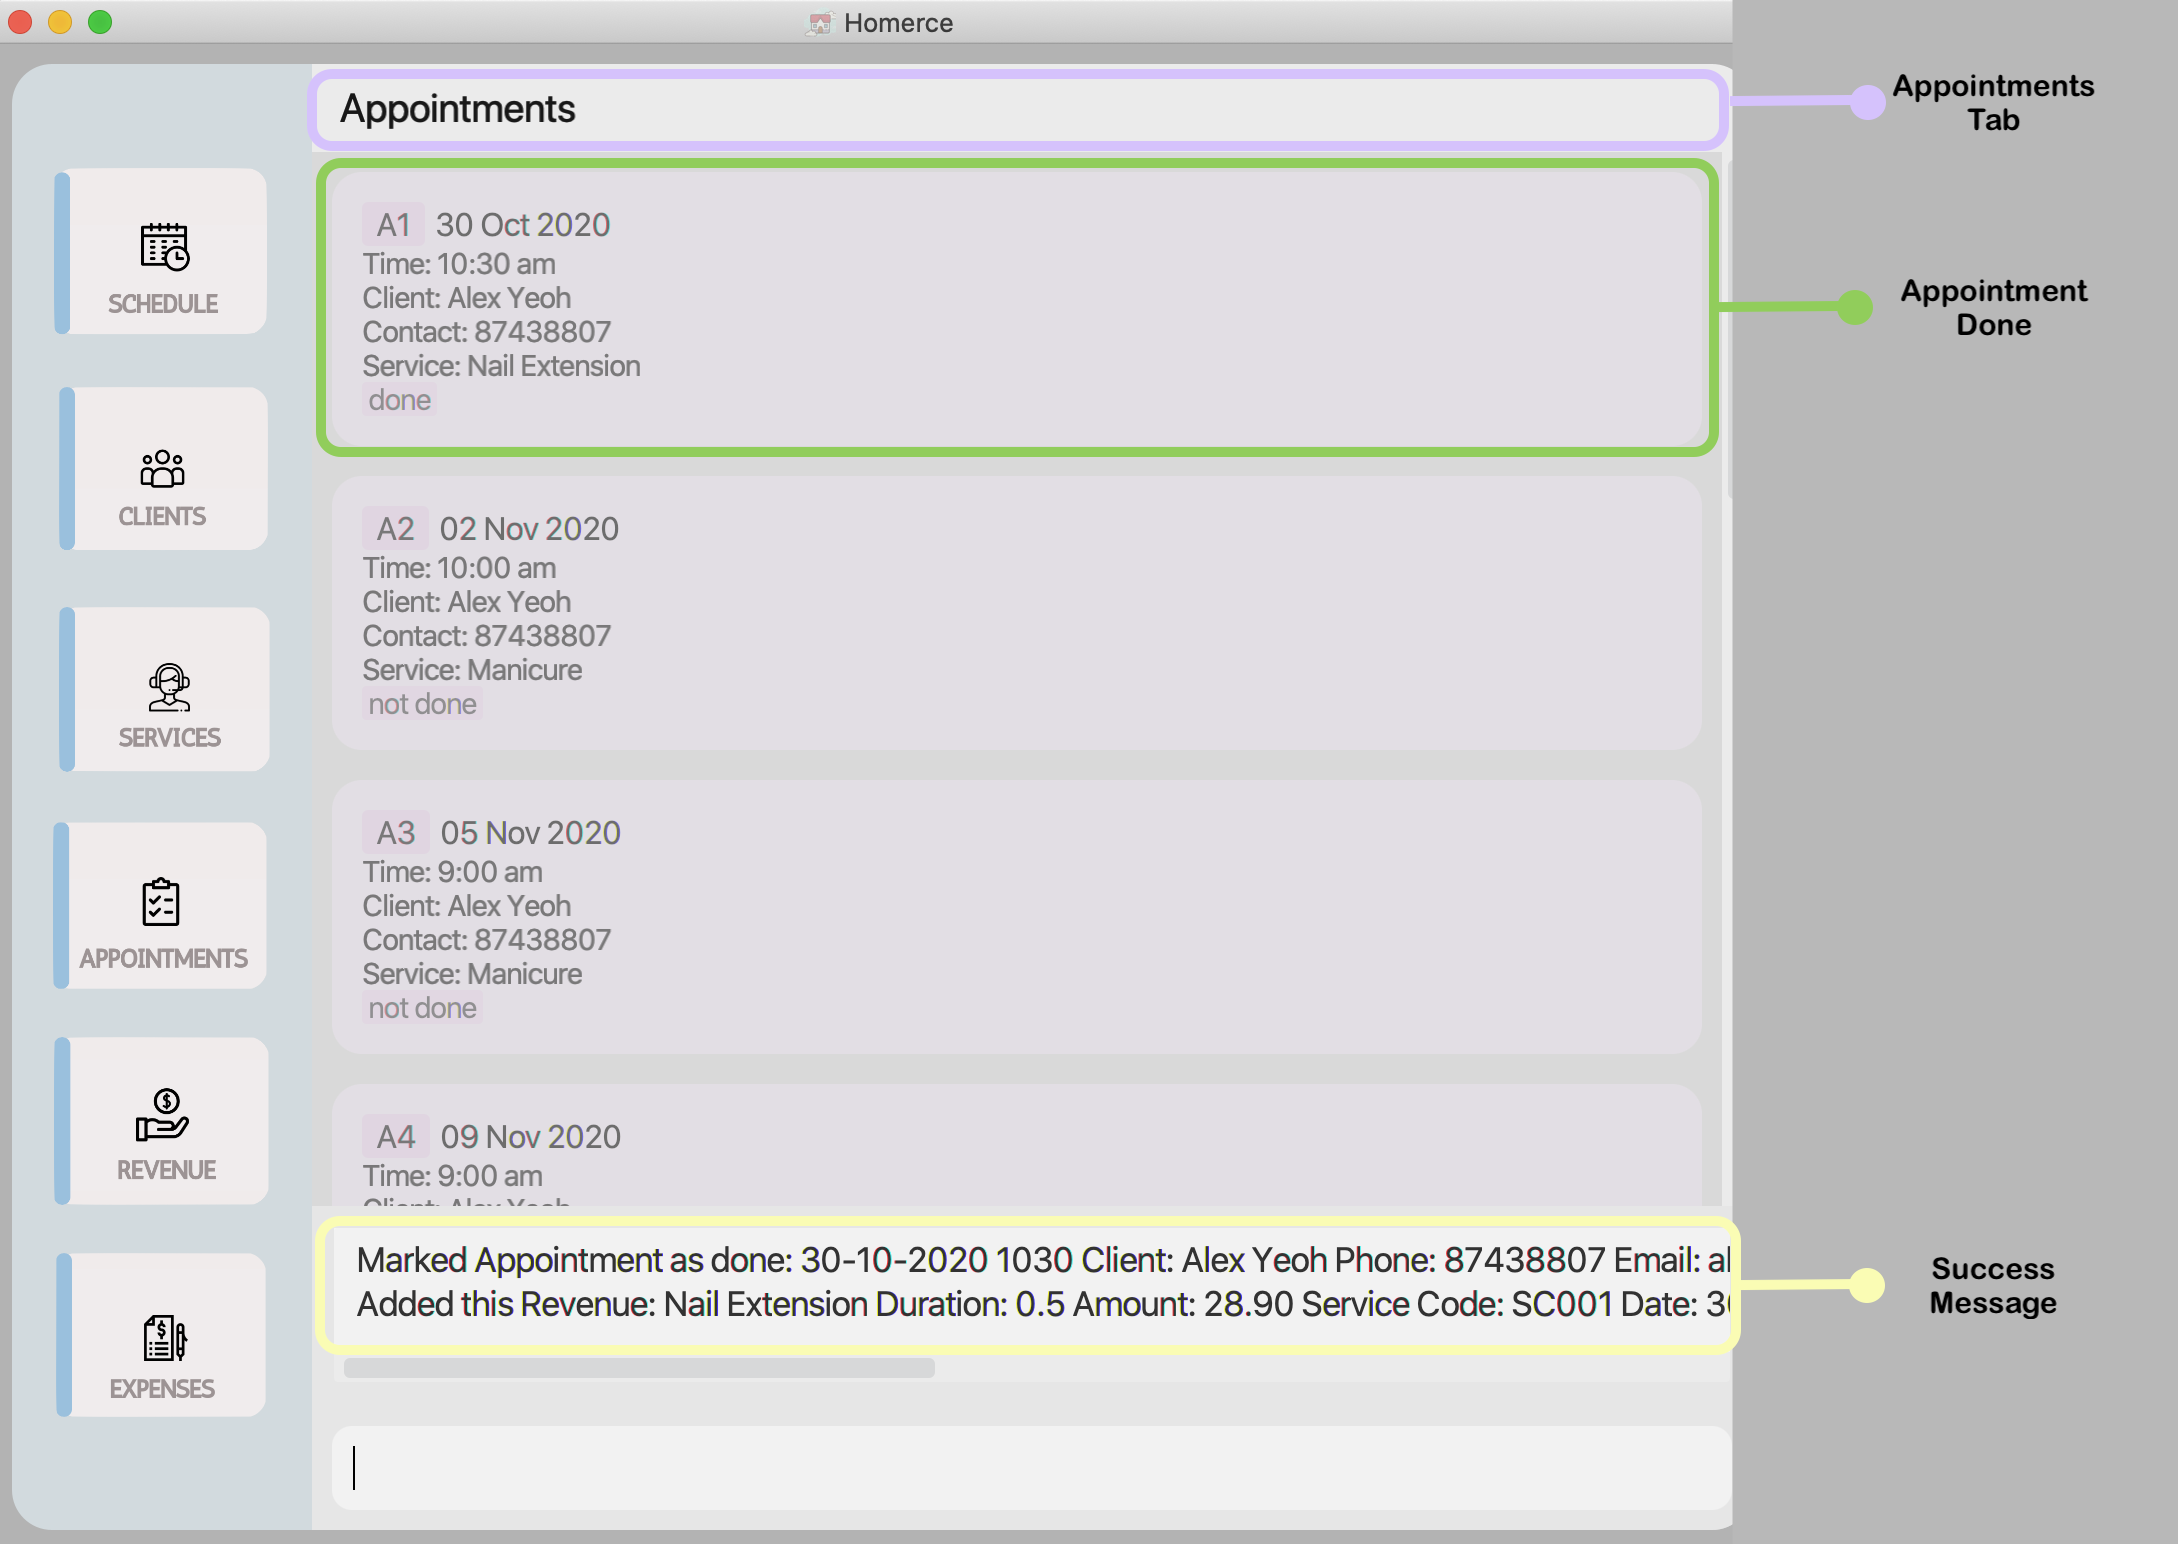
Figure 19 - GUI outcome for done
4.3.7. Mark an appointment as not done: undone
In the event that an appointment was marked as done by accident, you can use this command to revert this and ensure your appointment is still scheduled to take place.
Format : undone INDEX
![]() Note:
Note:
- Refer to Appointment Manager Command Parameters for more details about each parameter.
![]() Warning:
Warning:
- If the revenue tracker was cleared, Homerce will display a warning to say that the revenue associated with this appointment cannot be deleted. Nonetheless, the appointment will still be marked as undone.
Example:
Let’s say you just marked an appointment as done by accident. You searched for that
appointment with listapt or findapt and the one you want to change has index 1.
You then follow these instructions to undo it.
Steps:
- Type
undone 1in the Command Box. - Press
Enteron your keyboard.
Outcome:
- The Result Display will show a success message.
- Homerce will switch to the Appointment Tab.
- You will see your appointment marked as not done, alongside other appointments in your list of appointments.
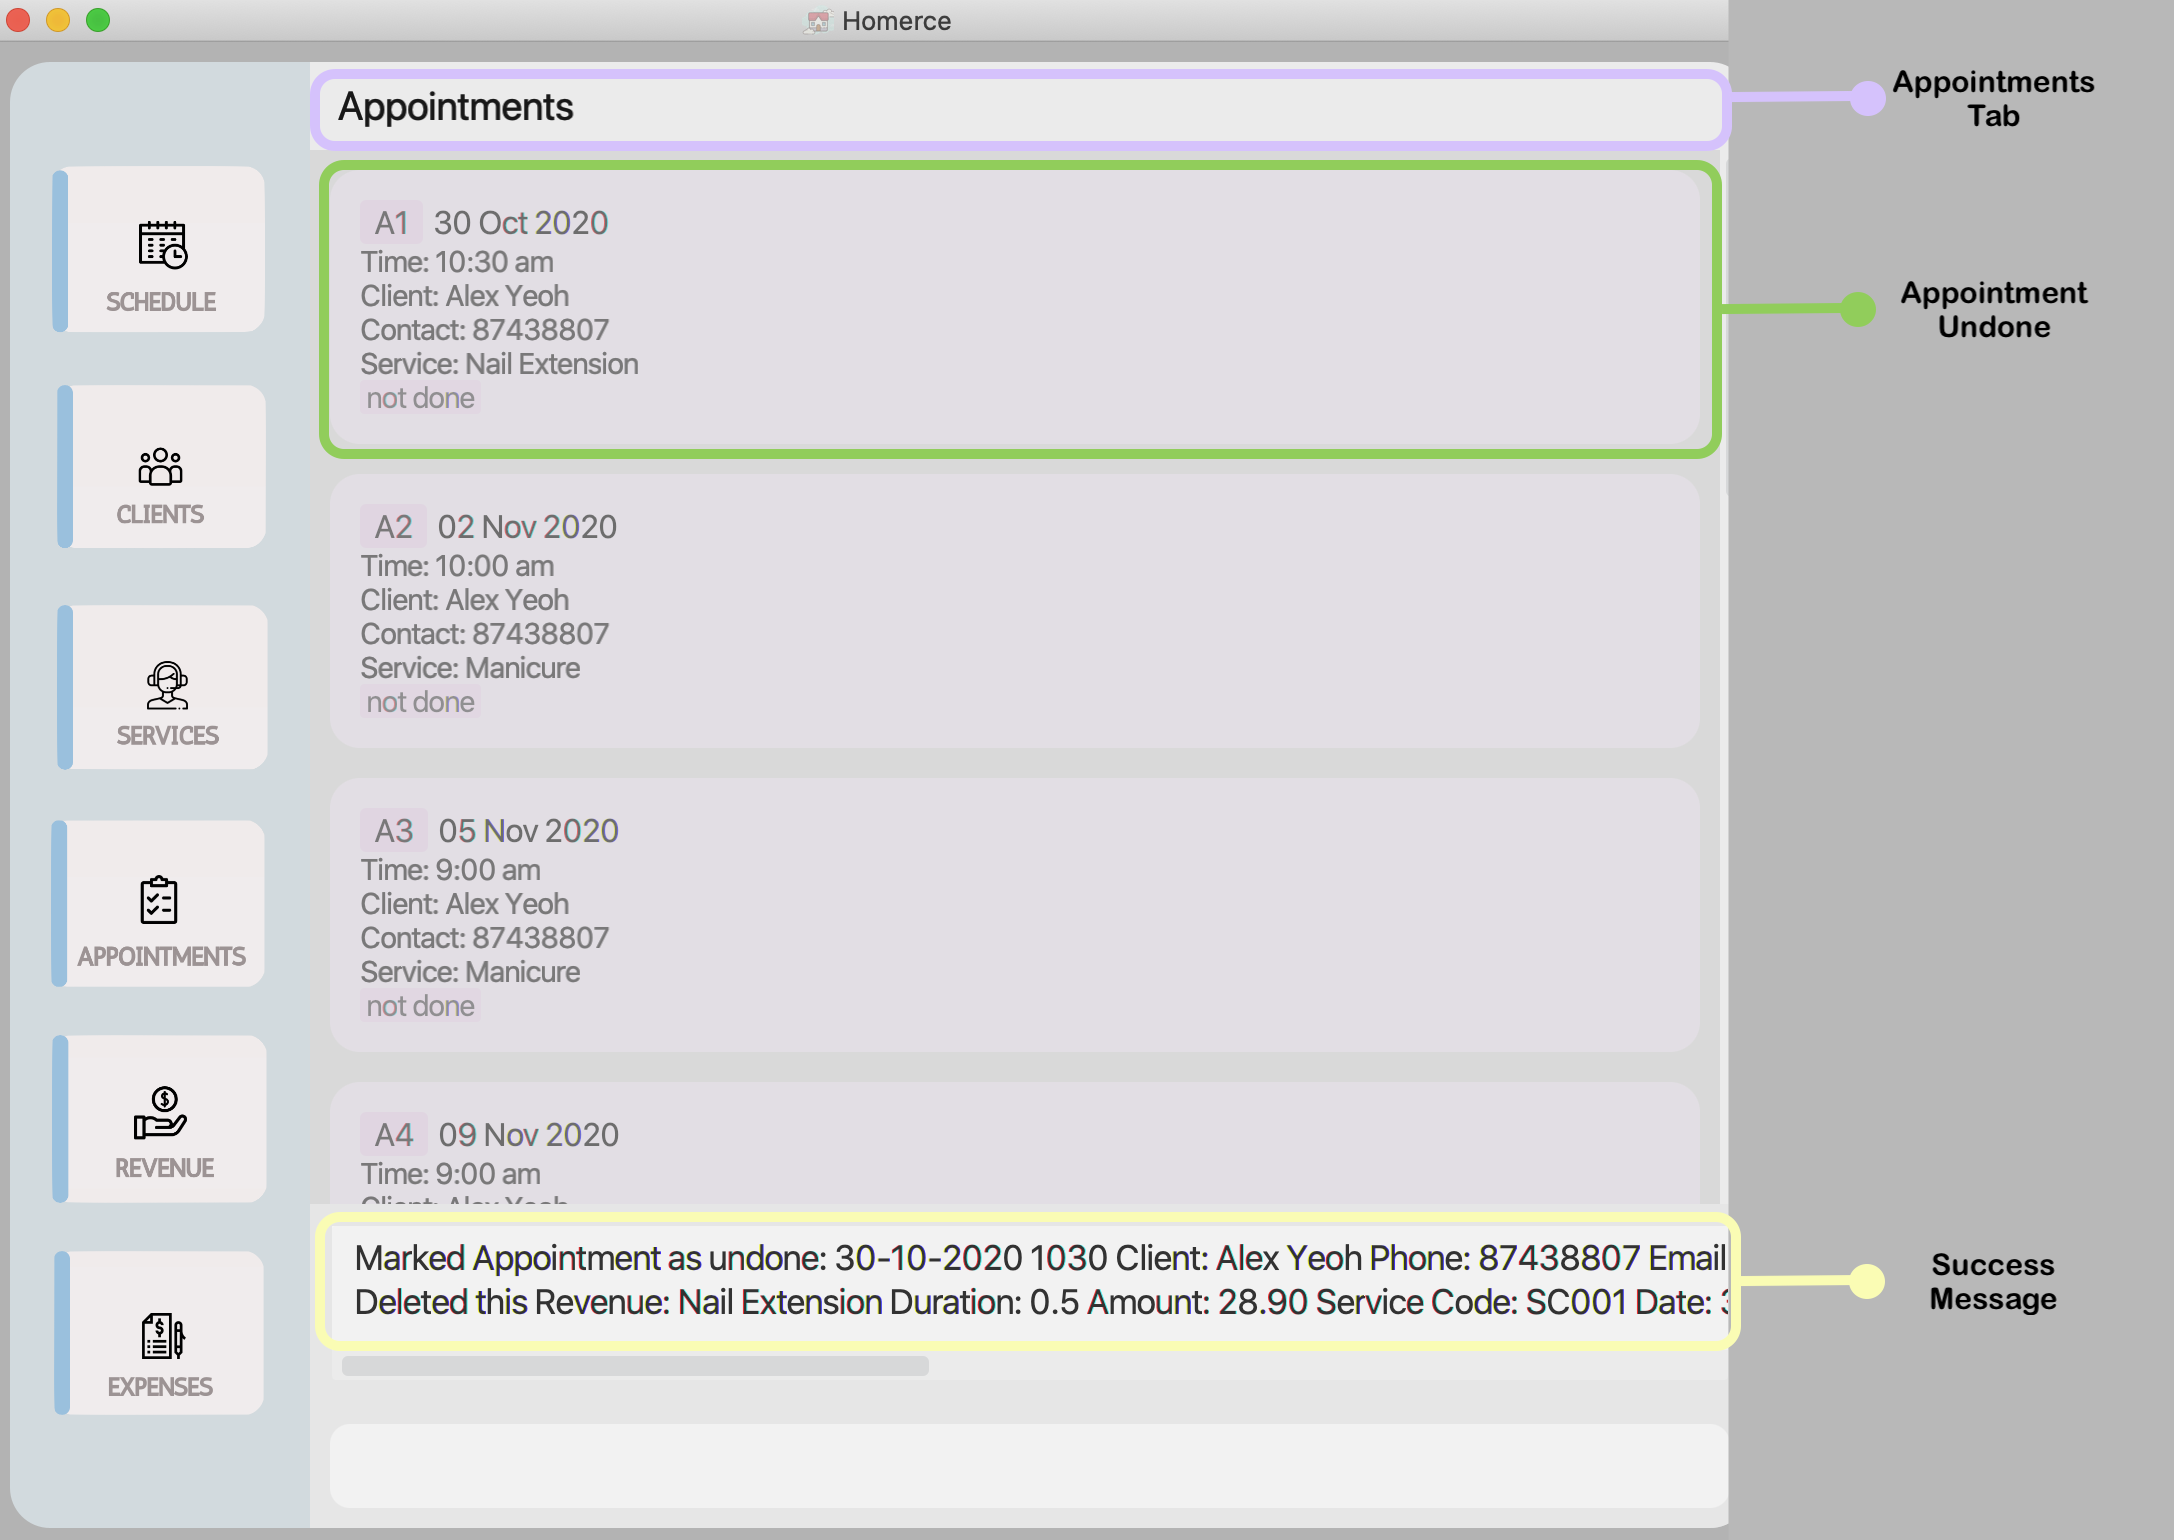
Figure 20 - GUI outcome for undoneapt
4.3.8. Delete an appointment: deleteapt
If a client informs you that he or she wants to cancel an appointment, you can use this command to delete that particular command from the appointment manager.
Format : deleteapt INDEX
![]() Note:
Note:
- Refer to Appointment Manager Command Parameters for more details about each parameter.
Example:
Let’s say your client called to cancel his/her appointment. After finding the appointment in Homerce
with listapt or findapt, you see that the appointment to delete has index 2. You can follow these instructions
to delete that appointment.
Steps:
- Type
deleteapt 2in the Command Box. - Press
Enteron your keyboard.
Outcome:
- The Result Display will show a success message.
- Homerce will switch to the Appointment Tab.
- You will see the rest of your appointments in your list of appointments, with the one with index 2 removed.
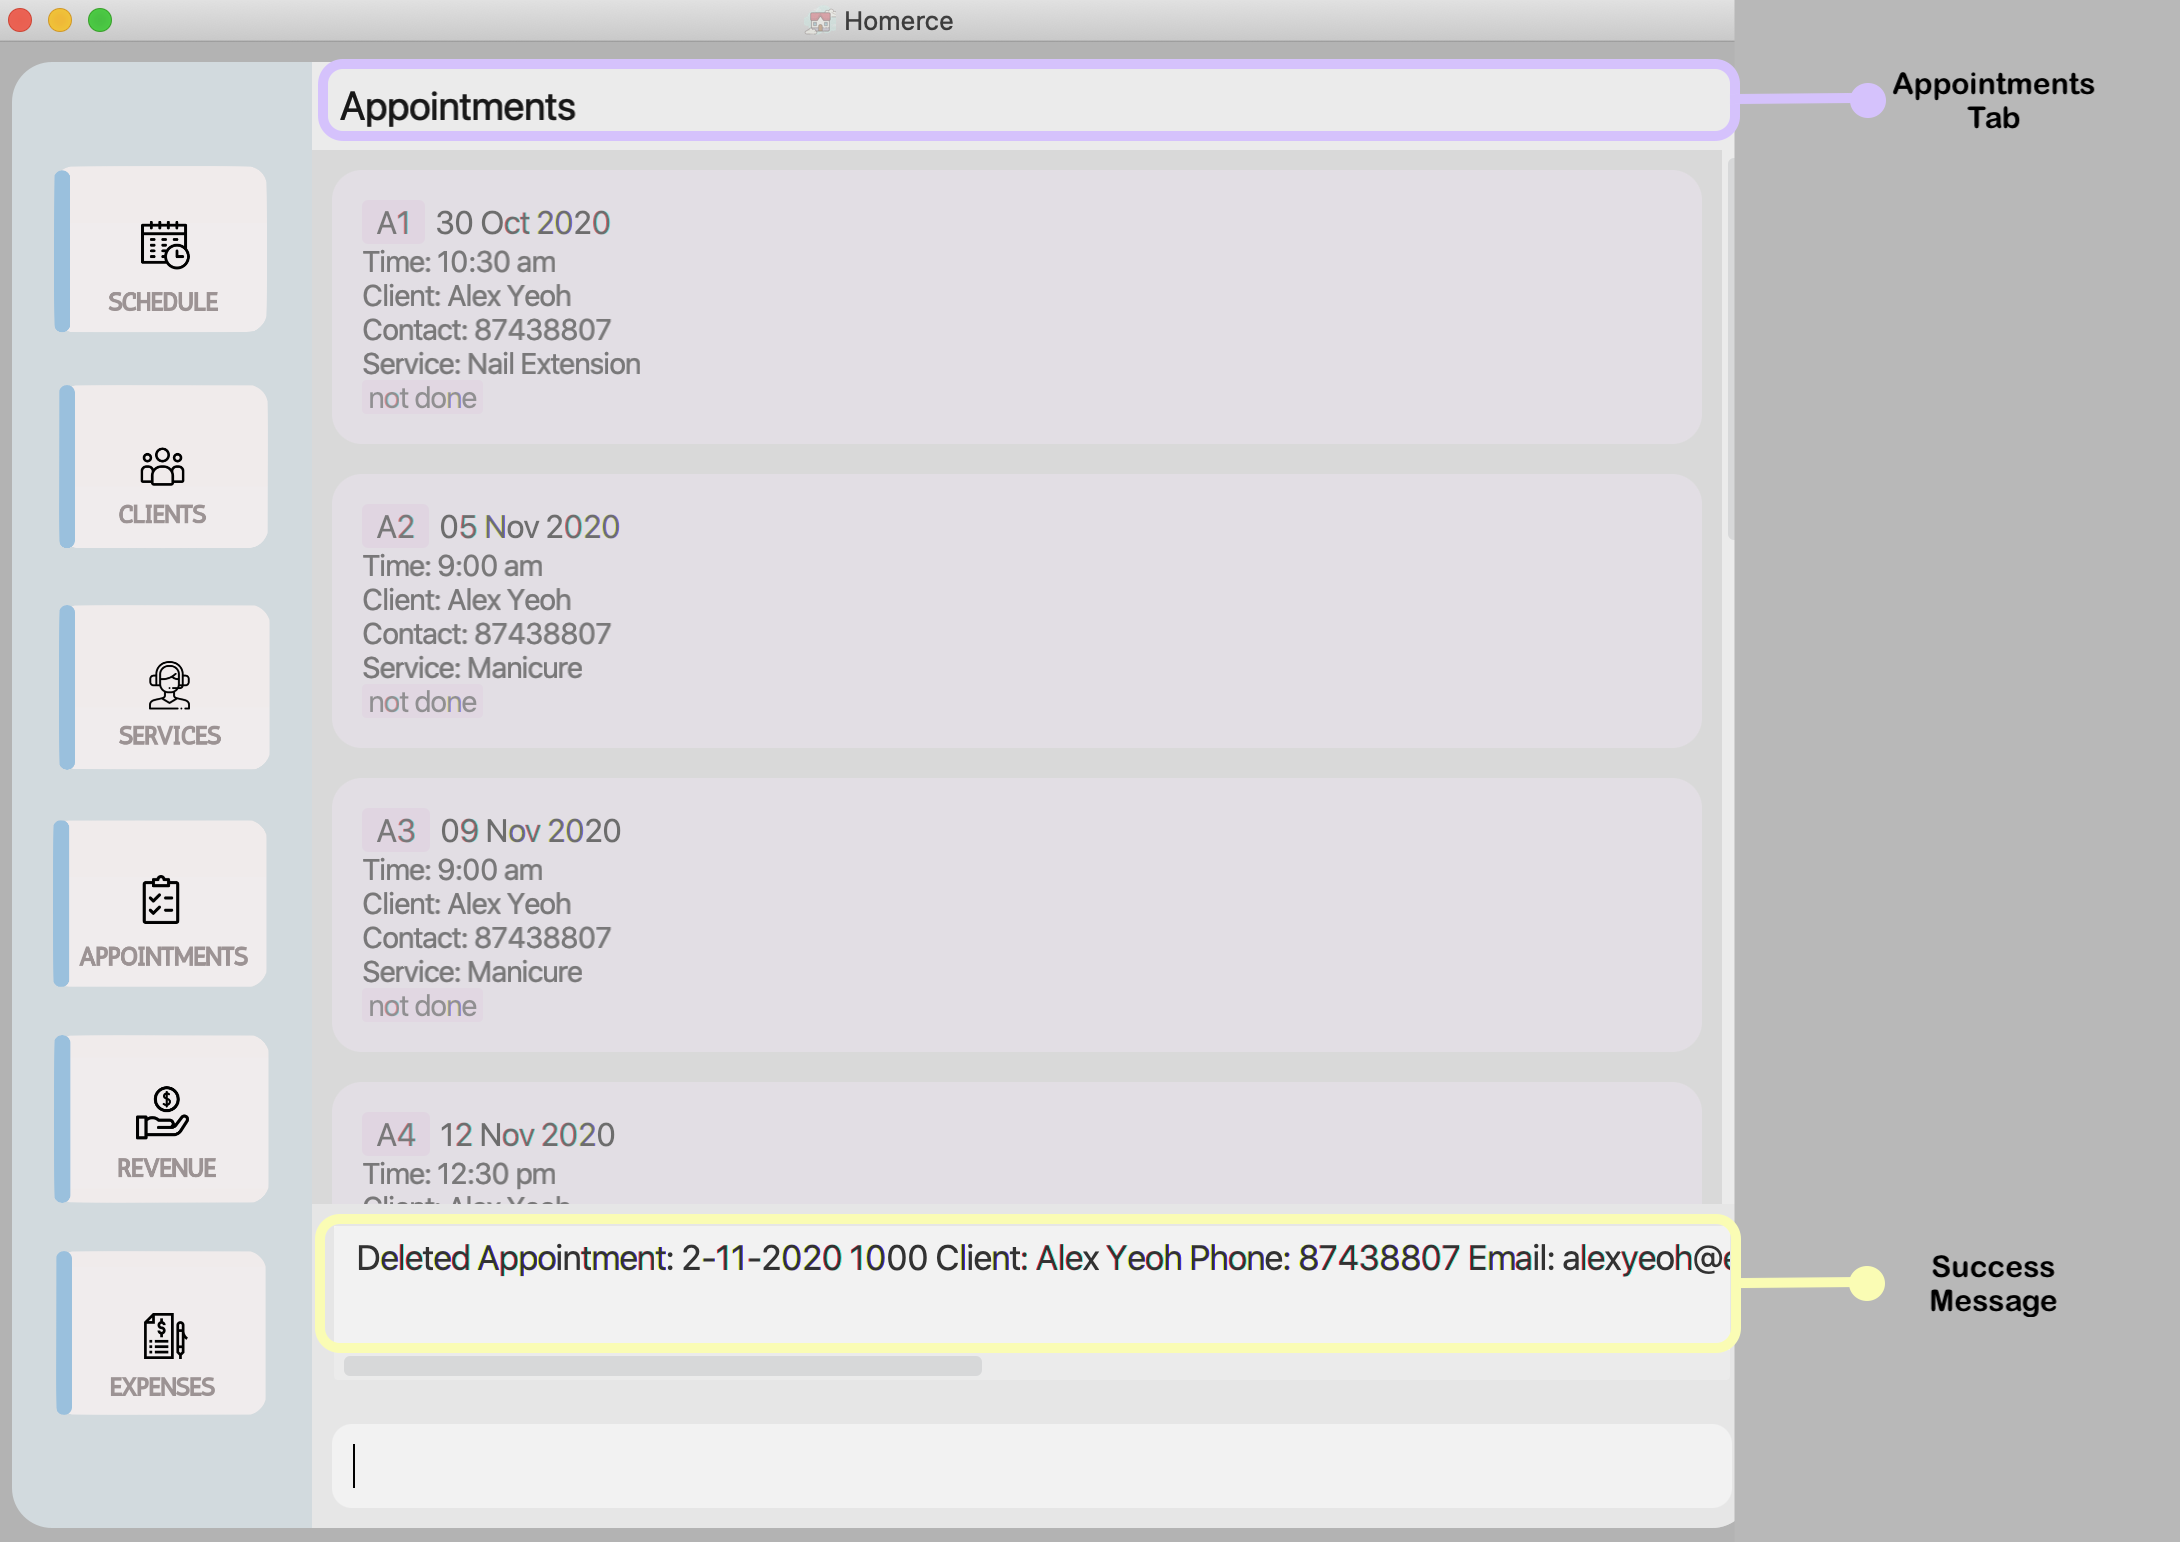
Figure 21 - GUI outcome for deleteapt
4.3.9. Clear all appointments: clearapt
In the event that you want to reset the entire list of appointments in Homerce, you may use this command to delete all prior and upcoming appointments with your clients.
Format : clearapt
Example:
Let’s say you want to clear all appointments stored in Homerce. You can follow these instructions to do so.
Steps:
- Type
clearaptin the Command Box. - Press
Enteron your keyboard.
Outcome:
- The Result Display will show a success message.
- Homerce will switch to the Appointment Tab.
- You will no appointments listed in the list of appointments.
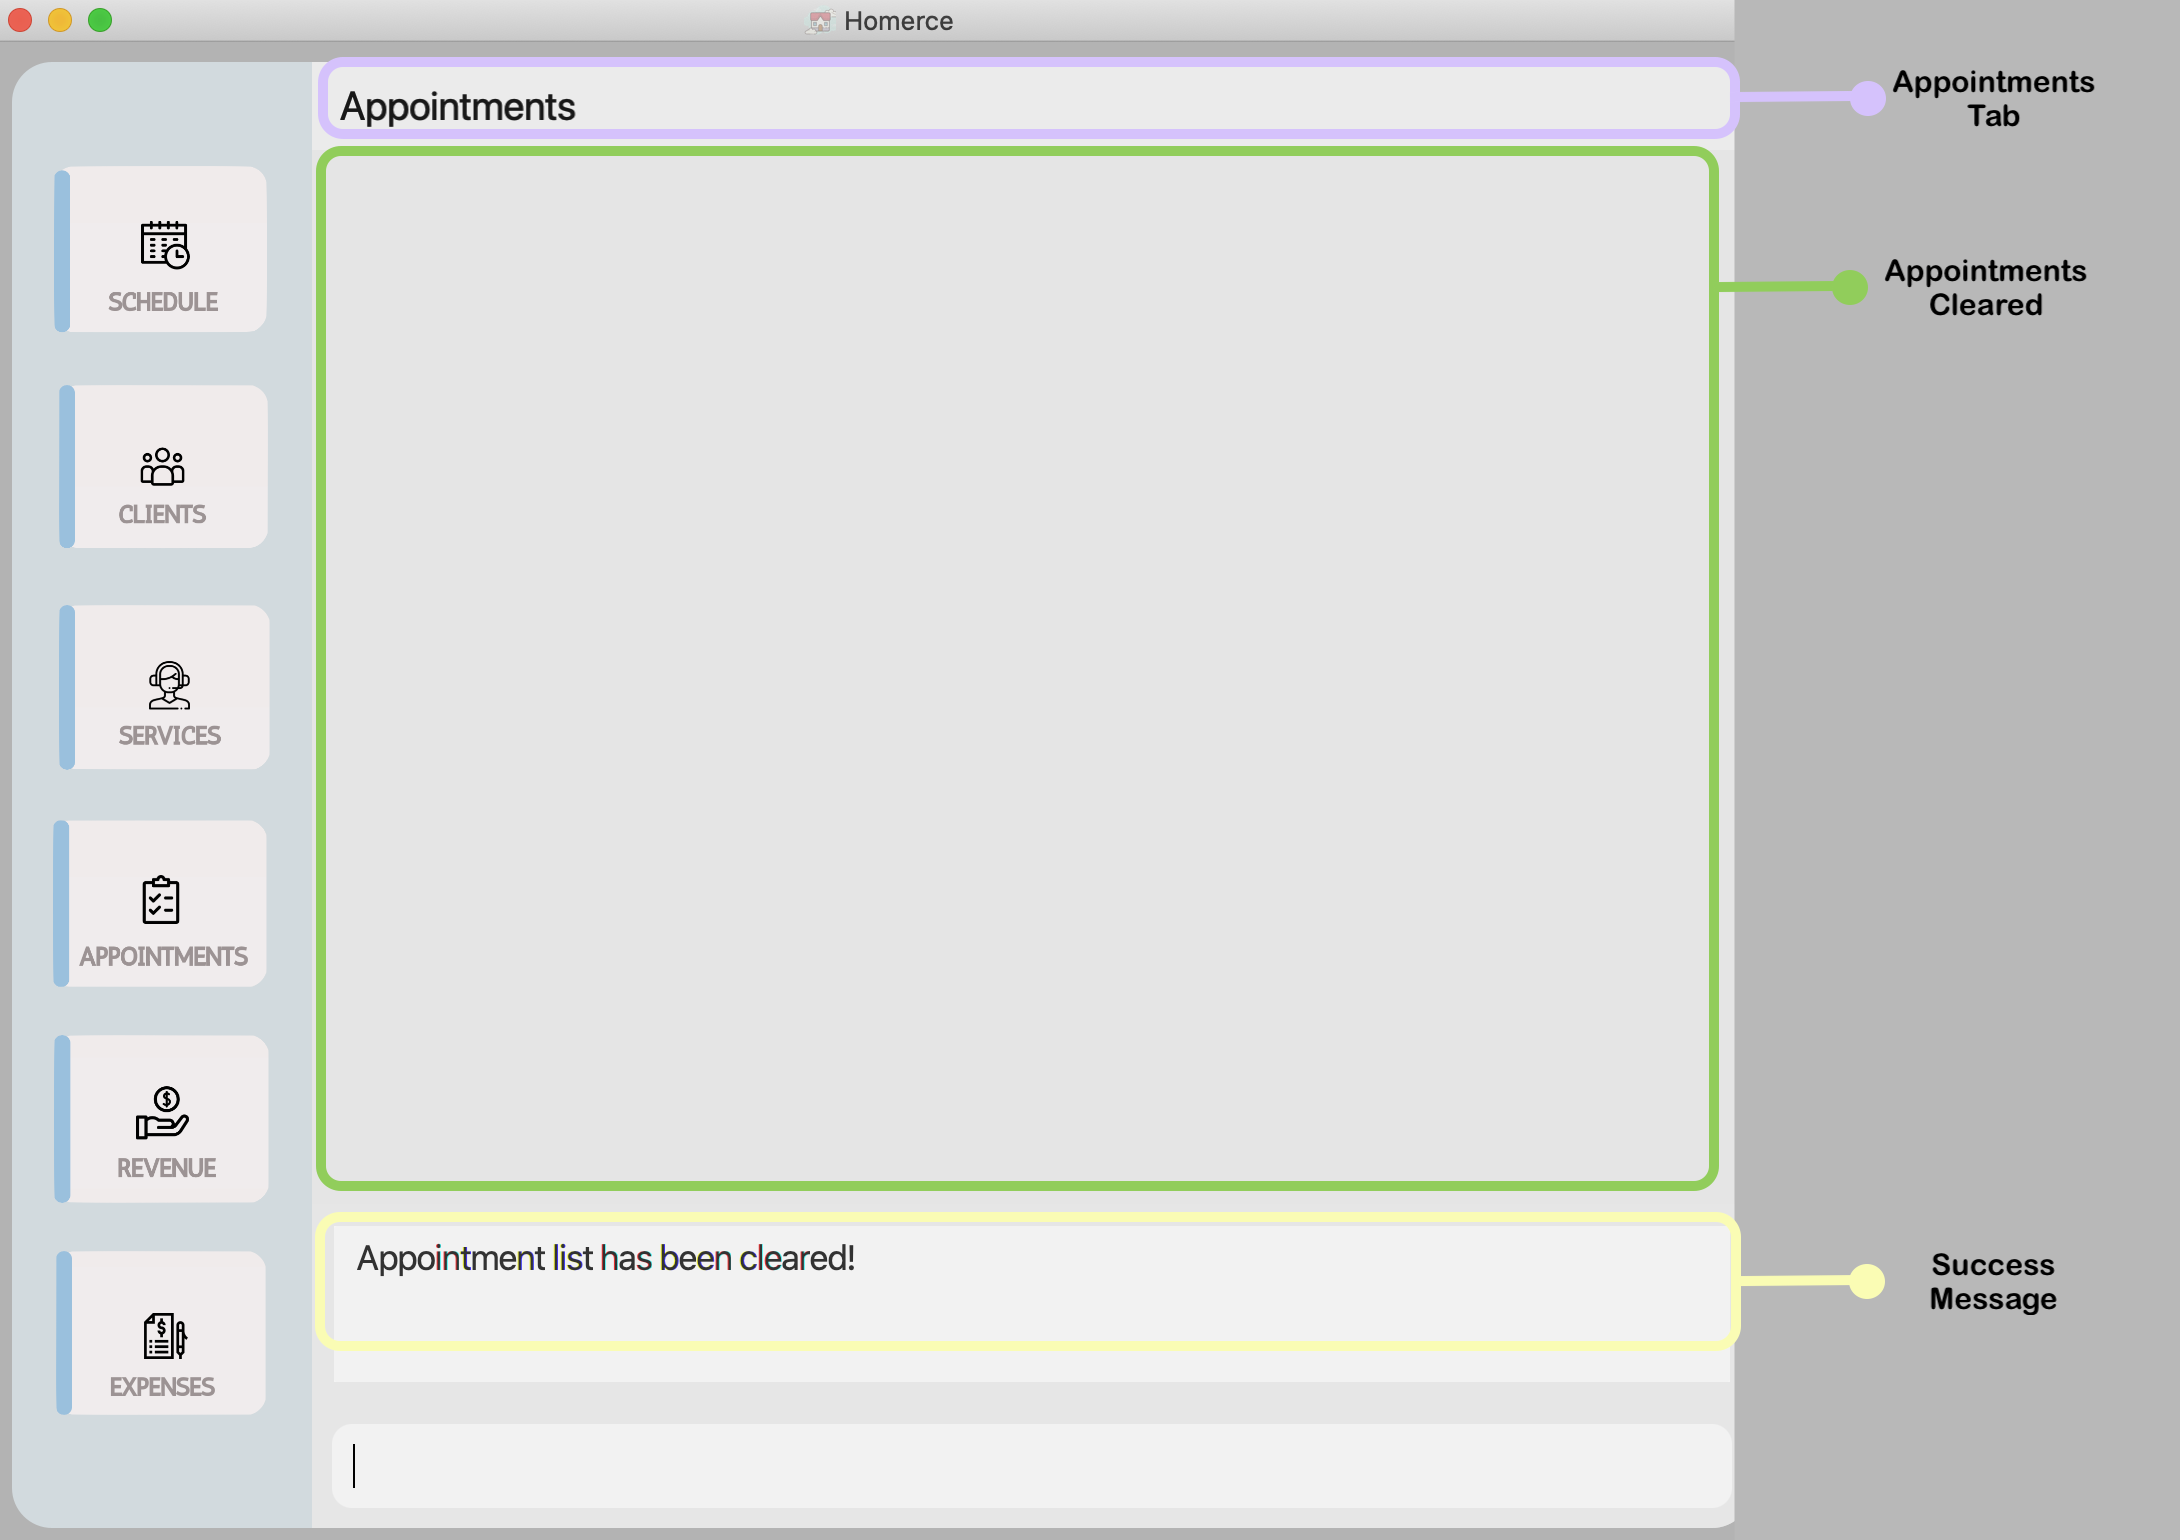
Figure 22 - GUI outcome for clearapt
4.4. Revenue Tracker (Done by Galvin Leow)
Homerce knows that revenue tracking is very important for your business. Thus, this feature allows you to track the revenue that you have generated effortlessly. Revenue will be automatically recorded when an appointment is indicated as done.
4.4.1. Revenue Tracker Command Parameters
Before you dive into using the feature, you may want to have a look at the common parameters used in this feature. The table below shows a list of command parameters that will be used in this feature.
| Parameter Name | Description | Example |
|---|---|---|
DATE |
The date that the revenue was credited. It must be in the format of dd-MM-yyyy. |
E.g. Typing 22-10-2020 would mean 22 October 2020. |
SERVICE_CODE |
The service code is the code that identifies a particular type of service provided. It must be alphanumeric words of 5 characters long. |
E.g. If you have added an eyelash extension service into Homerce and its service code is SC001. Typing SC001 would refers to the eyelash extension service. |
ORDER |
The order refers to ascending or descending. It must be in the format of asc or desc
|
E.g. Typing asc would mean ascending. E.g. Typing desc would mean descending. |
INDEX |
The index number of the revenue in the displayed revenue list. The first entry of the list has an index number of 1 and all entries are listed in increasing index numbers. |
E.g Typing in 5 would refer to the fifth revenue in the displayed revenue list. |
4.4.2. Find a revenue : findrev
You can use this command to find revenues by ‘date’ or ‘service code’ in the Revenue Tracker.
Format : findrev [dt/DATE]* [s/SERVICE_CODE]*
![]() Note:
Note:
- Refer to Revenue Tracker Command Parameters for more details about each parameter.
Example :
Let’s say you have just stopped operations for the day, and you wish to view all the revenues generated for today (22-10-2020).
You can follow the steps below to get the list of revenues for the day.
Steps :
- Type
findrev dt/22-10-2020in the Command Box. - Press
Enterto execute.
Outcome :
- The Result Display will show a success message.
- Homerce will list out all the revenue for 22-10-2020 in the Revenue Tab.
- You can now see all your revenues earned on
22-10-2020.
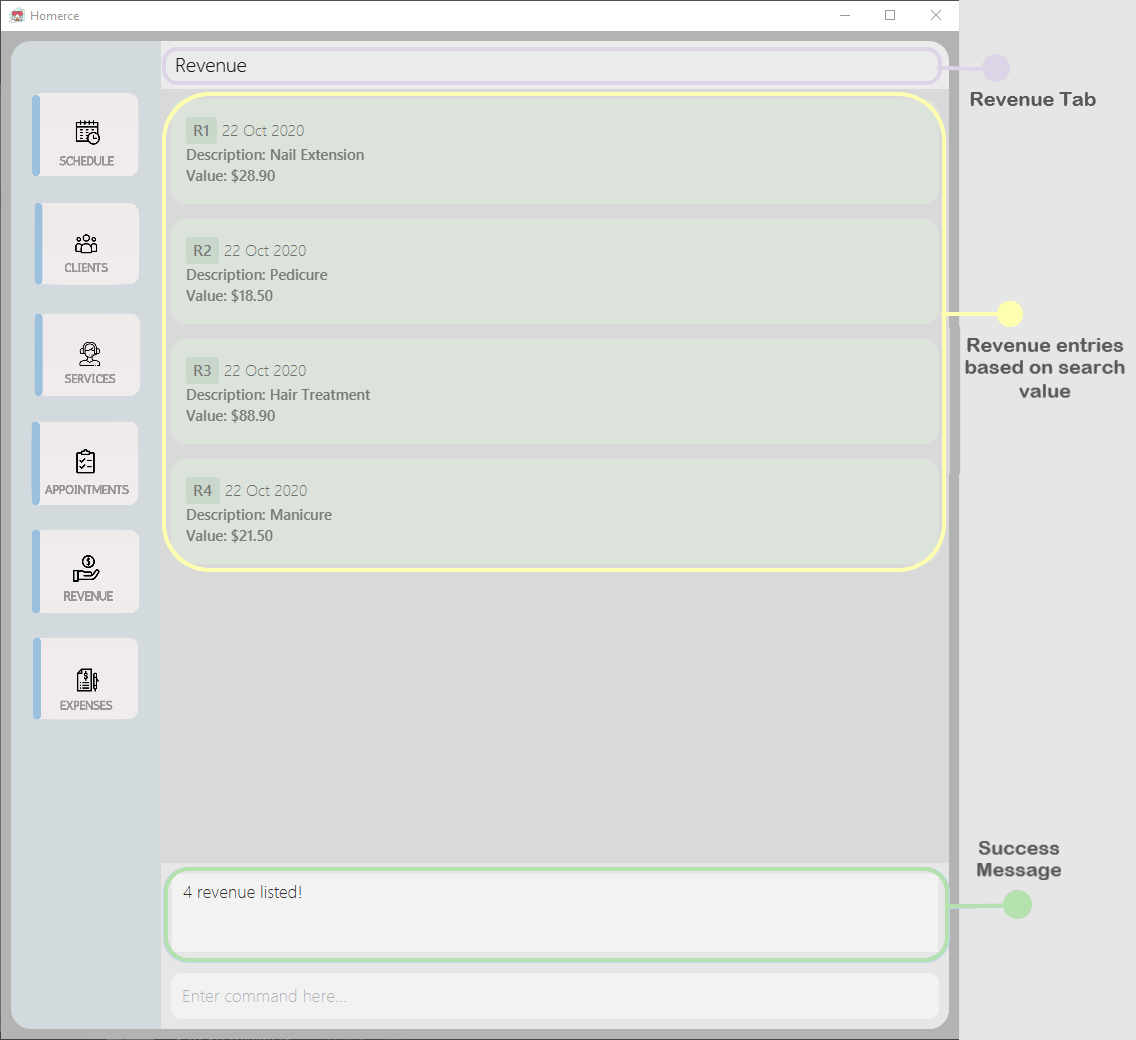
Figure 23 - GUI outcome for findrev
4.4.3. Sort revenues: sortrev
You can use this command to sort the list of revenue in ascending or descending order by value in the Revenue Tracker.
Format : sortrev ORDER
![]() Note:
Note:
- Refer to Revenue Tracker Command Parameters for more details about each parameter.
Example :
Let’s say you wish to view your revenue from highest to lowest cost to determine which revenue contributes most to your profits.
You can follow the steps below to sort your list of revenues.
Steps :
- Type
sortrev descin the Command Box. - Press
Enterto execute.
Outcome :
- The Result Display will show a success message.
- Homerce will list out all the revenue entries sorted from highest to lowest cost in the Revenue Tab.
- You can now see your revenues sorted by descending order.
.png)
Figure 24 - GUI outcome for sortrev
4.4.4. List revenues : listrev
You can use this command to list all your revenue entries in the Revenue Tracker. The list will be sorted by descending chronological order.
Format : listrev
Example :
Let’s say you wish to list your revenues to view all the earnings that you currently have.
You can follow the steps below to list all your revenue entries.
Steps :
- Type
listrevin the Command Box. - Press
Enterto execute.
Outcome :
- The Result Display will show a success message.
- Homerce will list out all your revenue entries in the Revenue Tab.
- You can now see all your revenues sort by descending chronological order.
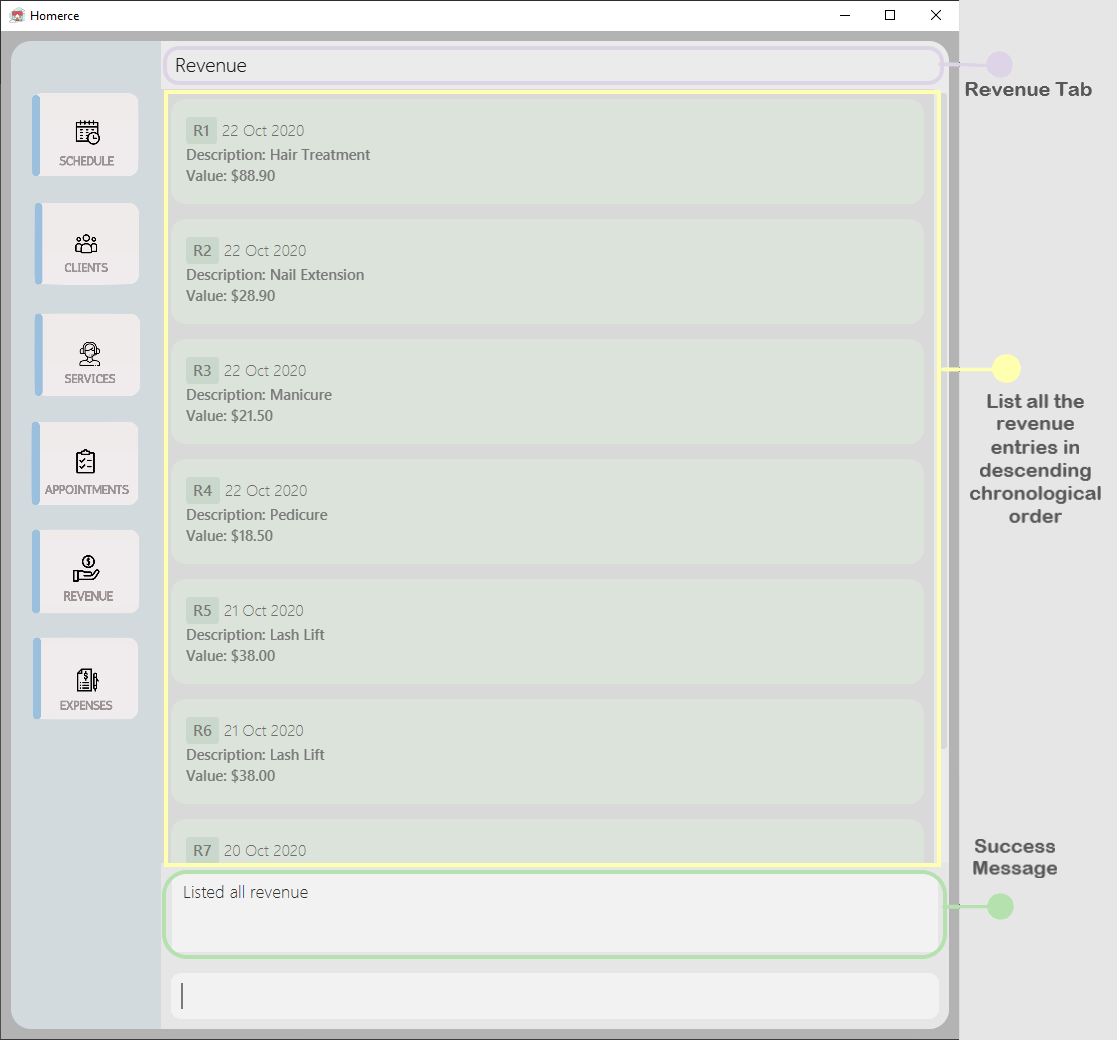
Figure 25 - GUI outcome for listrev
4.4.5. Clear revenue : clearrev
You can use this command to clear all revenue entries in the Revenue Tracker.
Format : clearrev
![]() Notes:
Notes:
- Clearing the revenue entries will not affect the status of the appointments.
Example :
Let’s say you wish to remove all revenues entries in the Revenue Tracker and restart your revenue tracking from scratch.
You can follow the steps below to clear all your revenue entries.
Steps :
- Type
clearrevinto the Command Box. - Press
Enterto execute.
Outcome :
- The Result Display will show a success message.
- Homerce will clear all the revenue data.
- You will have no more revenues listed in the tracker.
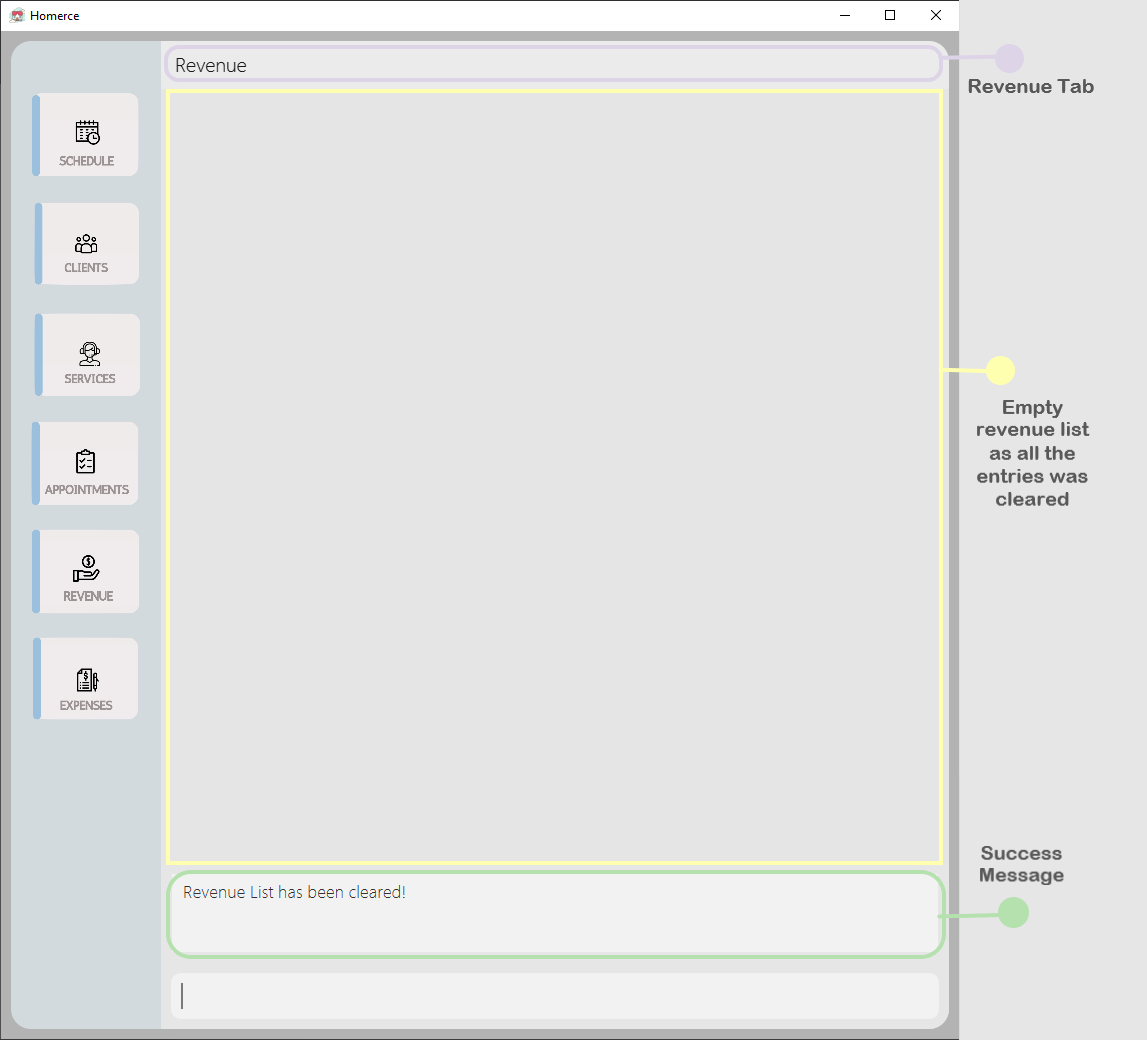
Figure 26 - GUI outcome for clearrev
4.5 Expense Tracker (Done by Tan Yan Lyn)
Homerce understands that expense tracking is essential in managing your business expenditure.
Thus, this feature allows you to track your expenses seamlessly and with ease.
Our expense tracker supports both fixed expenses that recur monthly, and one-time expenses that are incurred only once.
A fixed expense only has to be added to the tracker once, as Homerce will automatically record the same fixed expense for you every month.
You can record the following information about your expenses: DESCRIPTION, IS_FIXED, VALUE, DATE and TAG.
4.5.1. Expense Tracker Command Parameters
Before you dive into using the feature, you may want to have a look at the common parameters used in this feature. The table below shows a list of command parameters that will be used.
| Parameter Name | Description | Example |
|---|---|---|
DESCRIPTION |
The description of the expense. It must be one or more alphanumeric words or special characters not more than 50 characters long in total. |
E.g. Typing Conditioner as the description indicates that the expense was made on a bottle of Conditioner. |
IS_FIXED |
The indication of whether an expense is fixed. It must be in the format of y or n. Note: A fixed expense is an expense that recurs monthly. For example, the monthly air-conditioning bill is a fixed expense as it recurs every month, while a box of tissues is a one-time expense and should not be indicated as fixed. |
E.g. Typing y would mean the expense is fixed. You only have to add a fixed expense to the tracker once, as Homerce will automatically record the same expense for you every month. E.g. Typing n would mean the expense is not fixed. |
VALUE |
The value refers to the monetary value of the expense. It must be a positive number above 0.00 and below 1,000,000.00 and must have two decimal places. |
E.g. Typing 10.00 would mean the expense costs $10.00. |
DATE |
The date of the expense. It must be a valid date in the format of dd-MM-yyyy. A valid year is any year from 0001 to 9999. |
E.g. Typing 28-09-2020 would mean the expense was made on 28 September 2020. |
TAG |
The tag you want to attach to the expense. It must be a single alphanumeric word not more than 30 characters long. Note: Tags are used to categorize and organize your expenses. For example, an expense on eyelash glue can be tagged under ‘lashsupplies’. Tags are optional, and expenses without a tag specified will automatically be categorized under ‘others’. |
E.g. Typing equipment would mean that the expense is tagged as an equipment. |
INDEX |
The index of the expense in the displayed list. It must be a valid index number. |
E.g. Typing 2 would refer to the expense with the second index in the displayed list. |
ORDER |
The order refers to ascending or descending. It must be in the format of asc or desc. Note: Order is used in the sortexp command, to indicate whether you want the list to be sorted from lowest to highest value (ascending), or from highest to lowest value (descending).
|
E.g. Typing asc would mean ascending. Expenses will be displayed from lowest to highest value. E.g. Typing desc would mean descending. Expenses will be displayed from highest to lowest value. |
4.5.2. Add an expense addexp
Use this command to add a new expense to the Expense Tracker.
Format : addexp d/DESCRIPTION f/IS_FIXED v/VALUE dt/DATE [t/TAG]
![]() Note:
Note:
- Tags are optional, and only one tag is allowed per expense. The last tag will be used if multiple tags are entered.
- If no tag is entered, the expense will automatically be tagged under ‘others’.
- Refer to Expense Tracker Command Parameters for more details about each parameter.
Example :
Let’s say you just purchased a bottle of conditioner today for $15 (28-10-2020), and wish to record the expense.
You can follow the steps below to add the expense to the Expense Tracker.
Steps :
- Type
addexp d/conditioner f/n v/15.00 dt/28-10-2020 t/hairsuppliesin the Command Box. - Press
Enterto execute.
Outcome :
- The Result Display will show a success message.
- Homerce will switch to the Expense Tab.
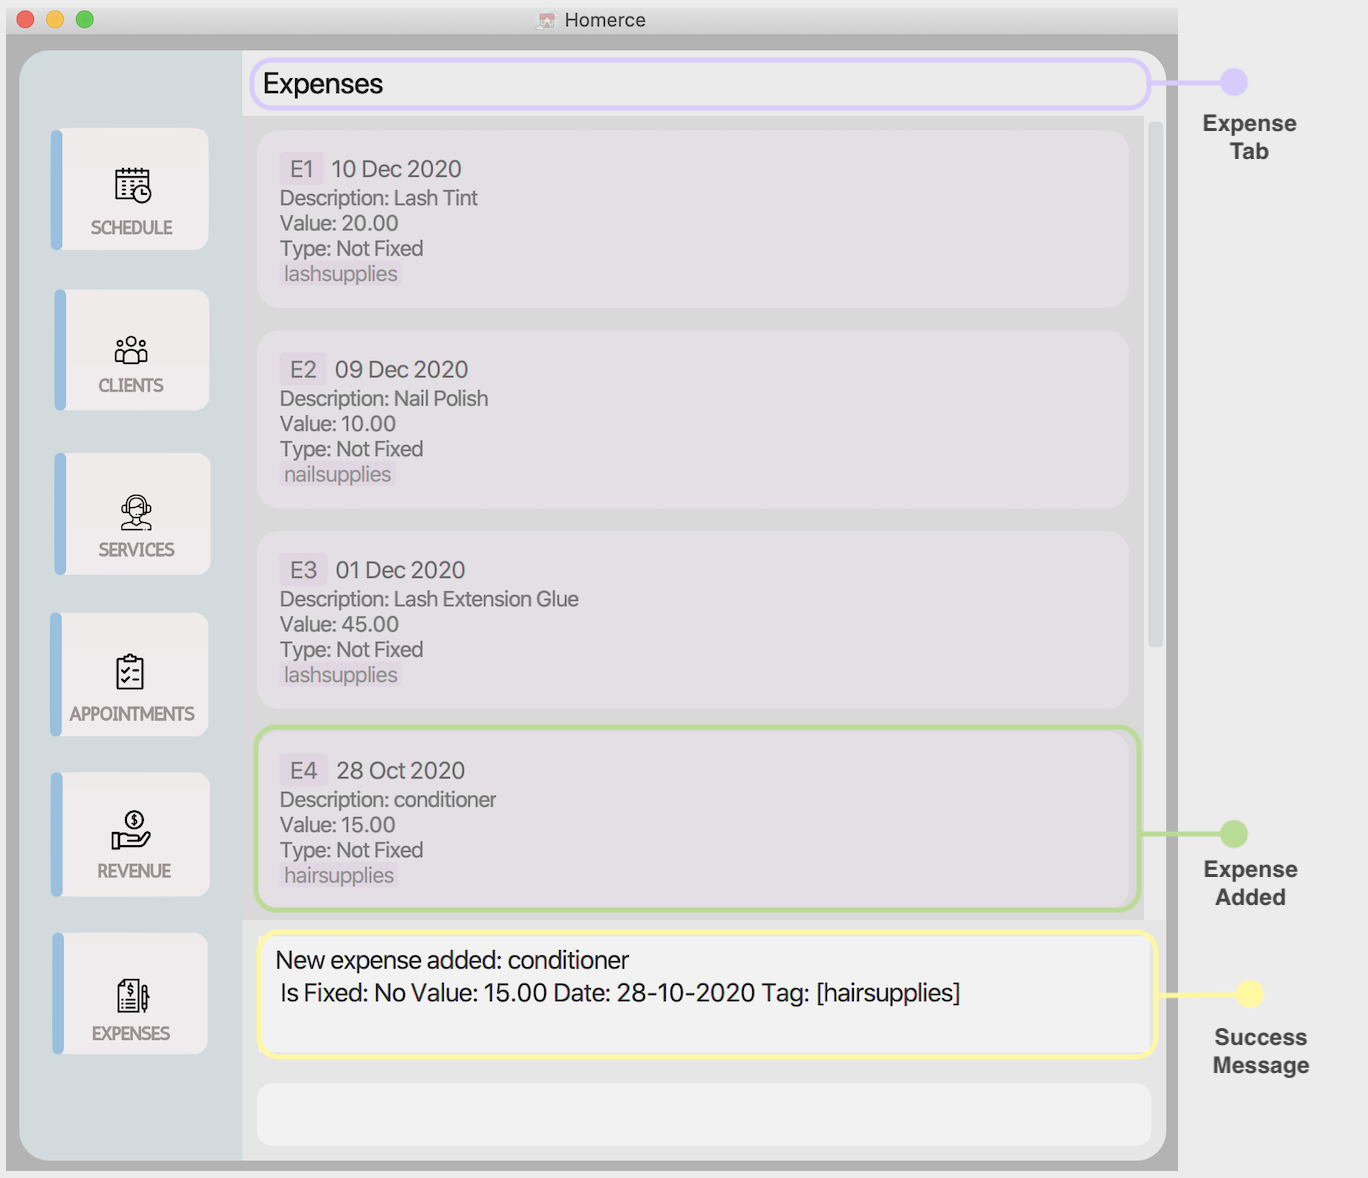
Figure 27 - GUI outcome for addexp
4.5.3. Edit an expense editexp
Use this command to edit an expense in the Expense Tracker.
Format : editexp INDEX [d/DESCRIPTION] [f/IS_FIXED] [v/VALUE] [dt/DATE] [t/TAG]
![]() Notes:
Notes:
- You must enter at least one optional parameter.
- The new parameter entered will overwrite the existing parameter.
- Refer to Expense Tracker Command Parameters for more details about each parameter.
Example :
Let’s say you misspelled the description of an expense when adding it to the tracker, and wish to change it to “Eyelash Curler”.
You search for the expense using listexp or findexp, and see that it has an index of 2 in the displayed list.
You can follow the steps below to edit the expense.
Steps :
- Type
editexp 2 d/Eyelash Curlerin the Command Box. - Press
Enterto execute.
Outcome :
- The Result Display will show a success message.
- You will see your edited expense displayed alongside other expenses in your tracker.
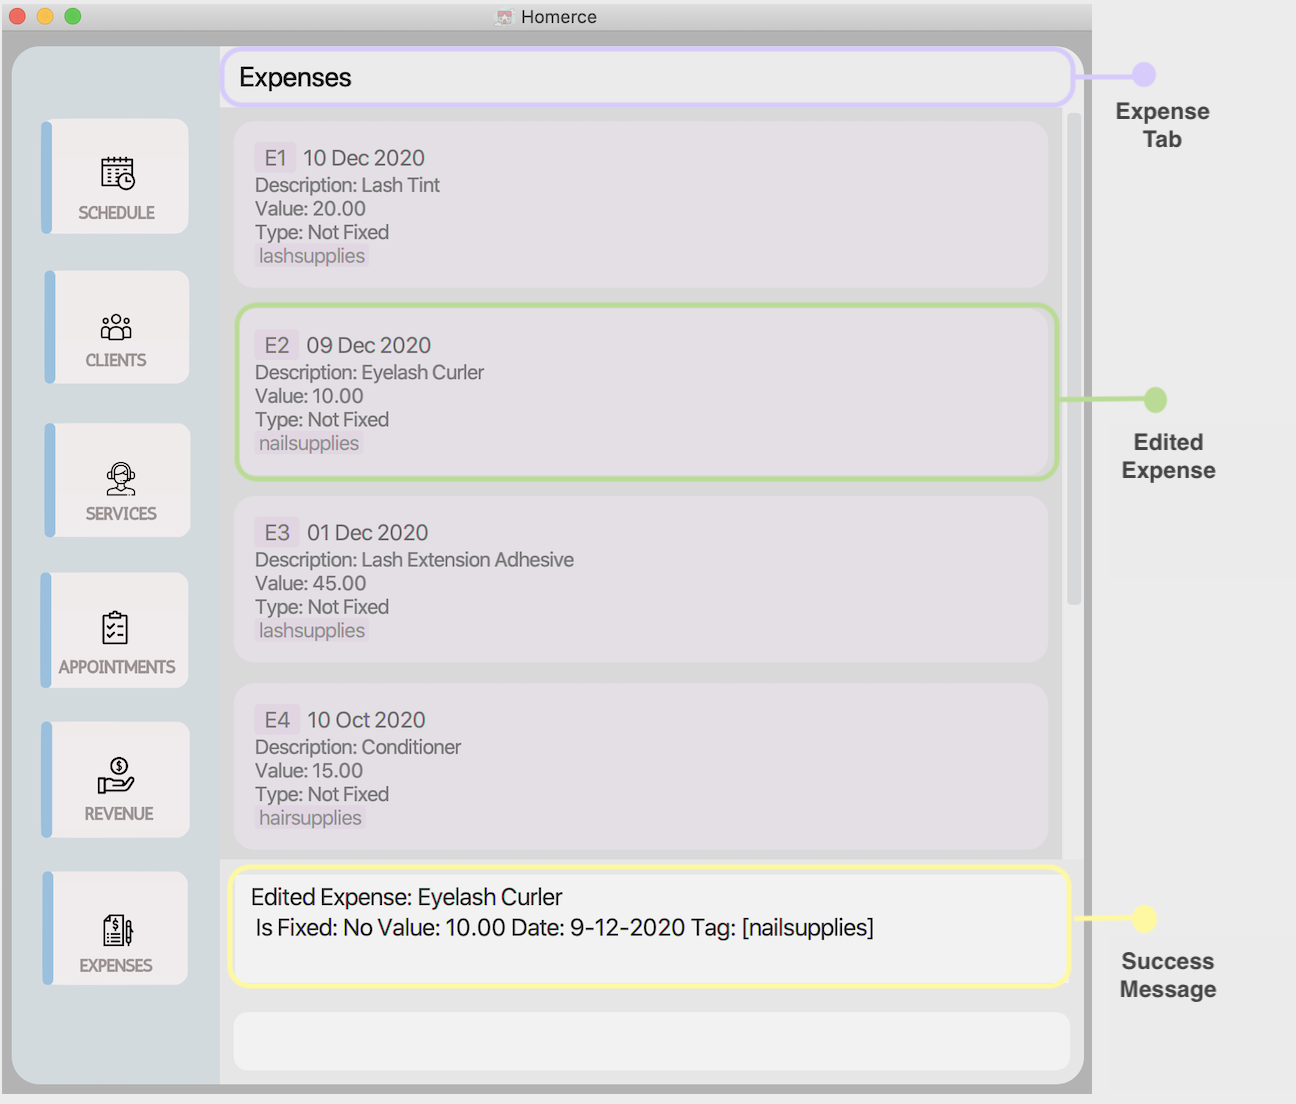
Figure 28 - GUI outcome for editexp
4.5.4. Delete an expense deleteexp
Use this command to delete an expense from the Expense Tracker.
Format : deleteexp INDEX
![]() Note:
Note:
- Refer to Expense Tracker Command Parameters for more details about each parameter.
Example :
Let’s say you mistakenly entered an expense and wish to remove it from the tracker.
You search for the expense using listexp or findexp, and see that it has an index of 3 in the displayed list.
You can follow the steps below to delete the expense.
Steps :
- Type
deleteexp 3in the Command Box. - Press
Enterto execute.
Outcome :
- The Result Display will show a success message.
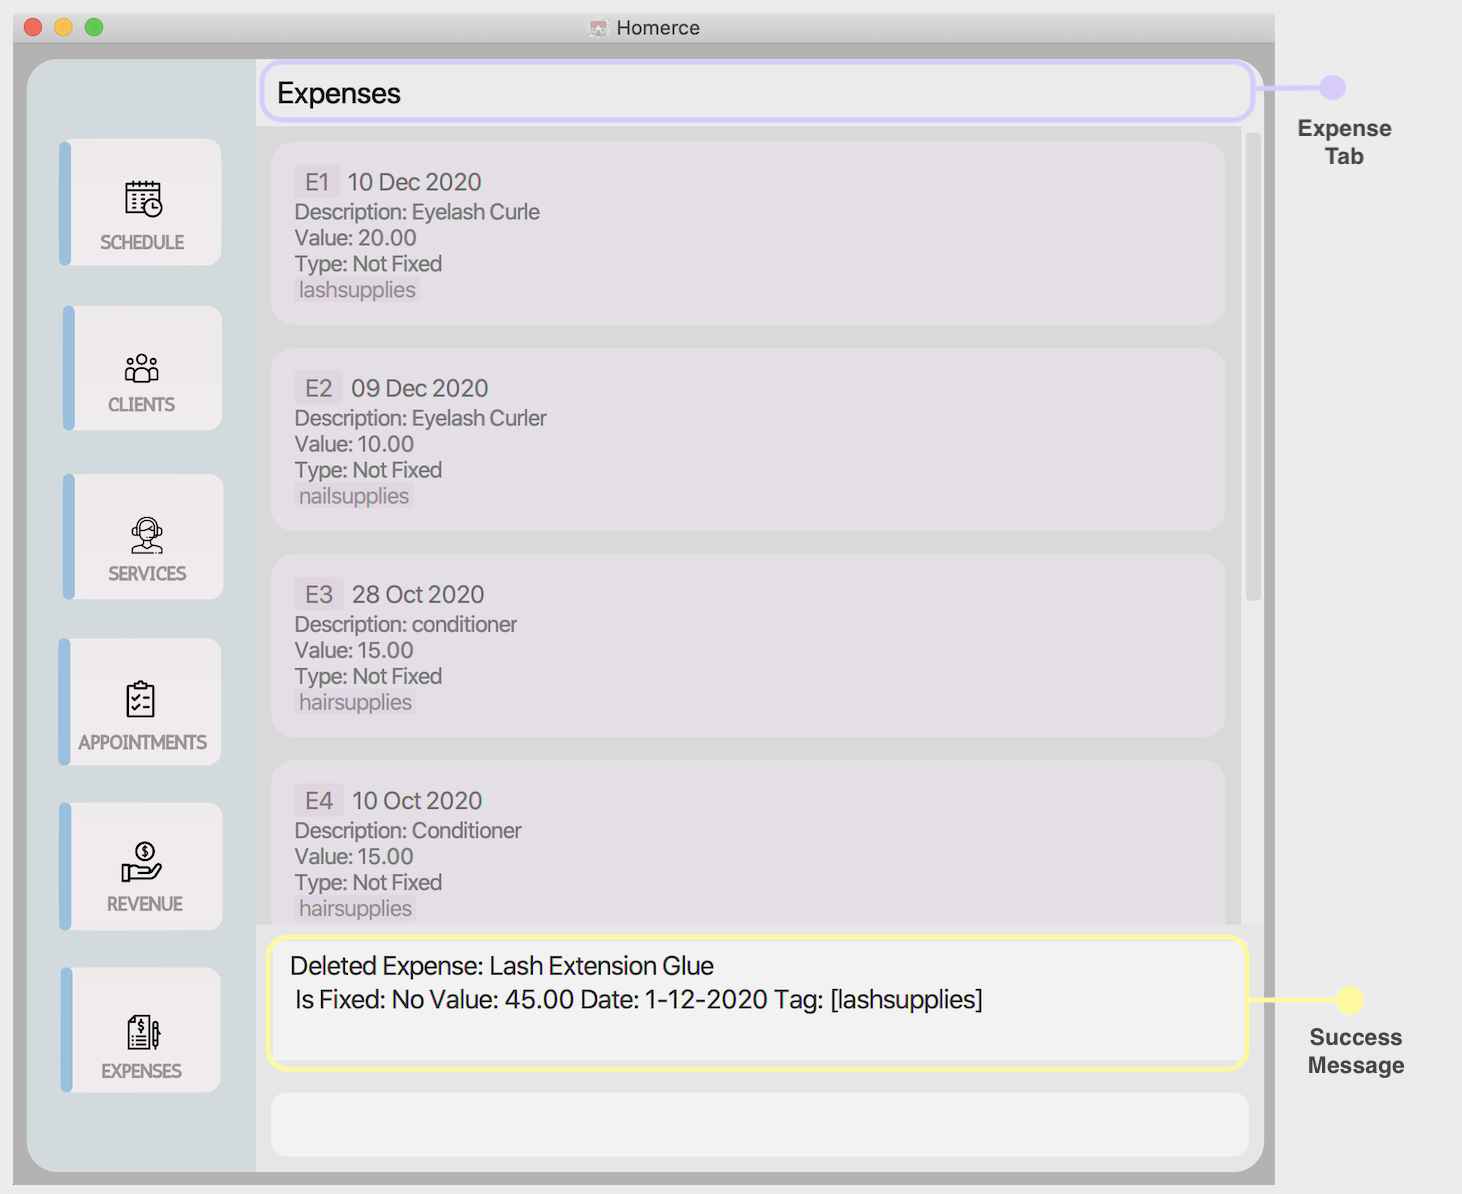
Figure 29 - GUI outcome for deleteexp
4.5.5. Find an expense findexp
Use this command to find specific expenses in the Expense Tracker.
Format : findexp [d/DESCRIPTION]* [dt/DATE]* [f/IS_FIXED]* [t/TAG]*
![]() Notes:
Notes:
- You must enter exactly one parameter.
- The search using description is case-insensitive. e.g conditioner will match Conditioner.
- The order of the keywords in the description does not matter. e.g. Lash Extensions Kit will match Kit Lash Extensions.
- Only full words in the description will be matched e.g. Las will not match Lash.
- Expenses matching at least one keyword will be returned. e.g. Lash will return Lash Extensions Kit
- Refer to Expense Tracker Command Parameters for more details about each parameter.
Example :
Let’s say you wish to view a list of all the expenses you incurred on 10 October 2020.
You can follow the steps below to get a list of expenses for the day.
Steps :
- Type
findexp dt/10-10-2020in the Command Box. - Press
Enterto execute.
Outcome :
- The Result Display will show a success message.
- Homerce will switch to the Expense Tab.
- Homerce will list out all the expenses made on 10 October 2020.
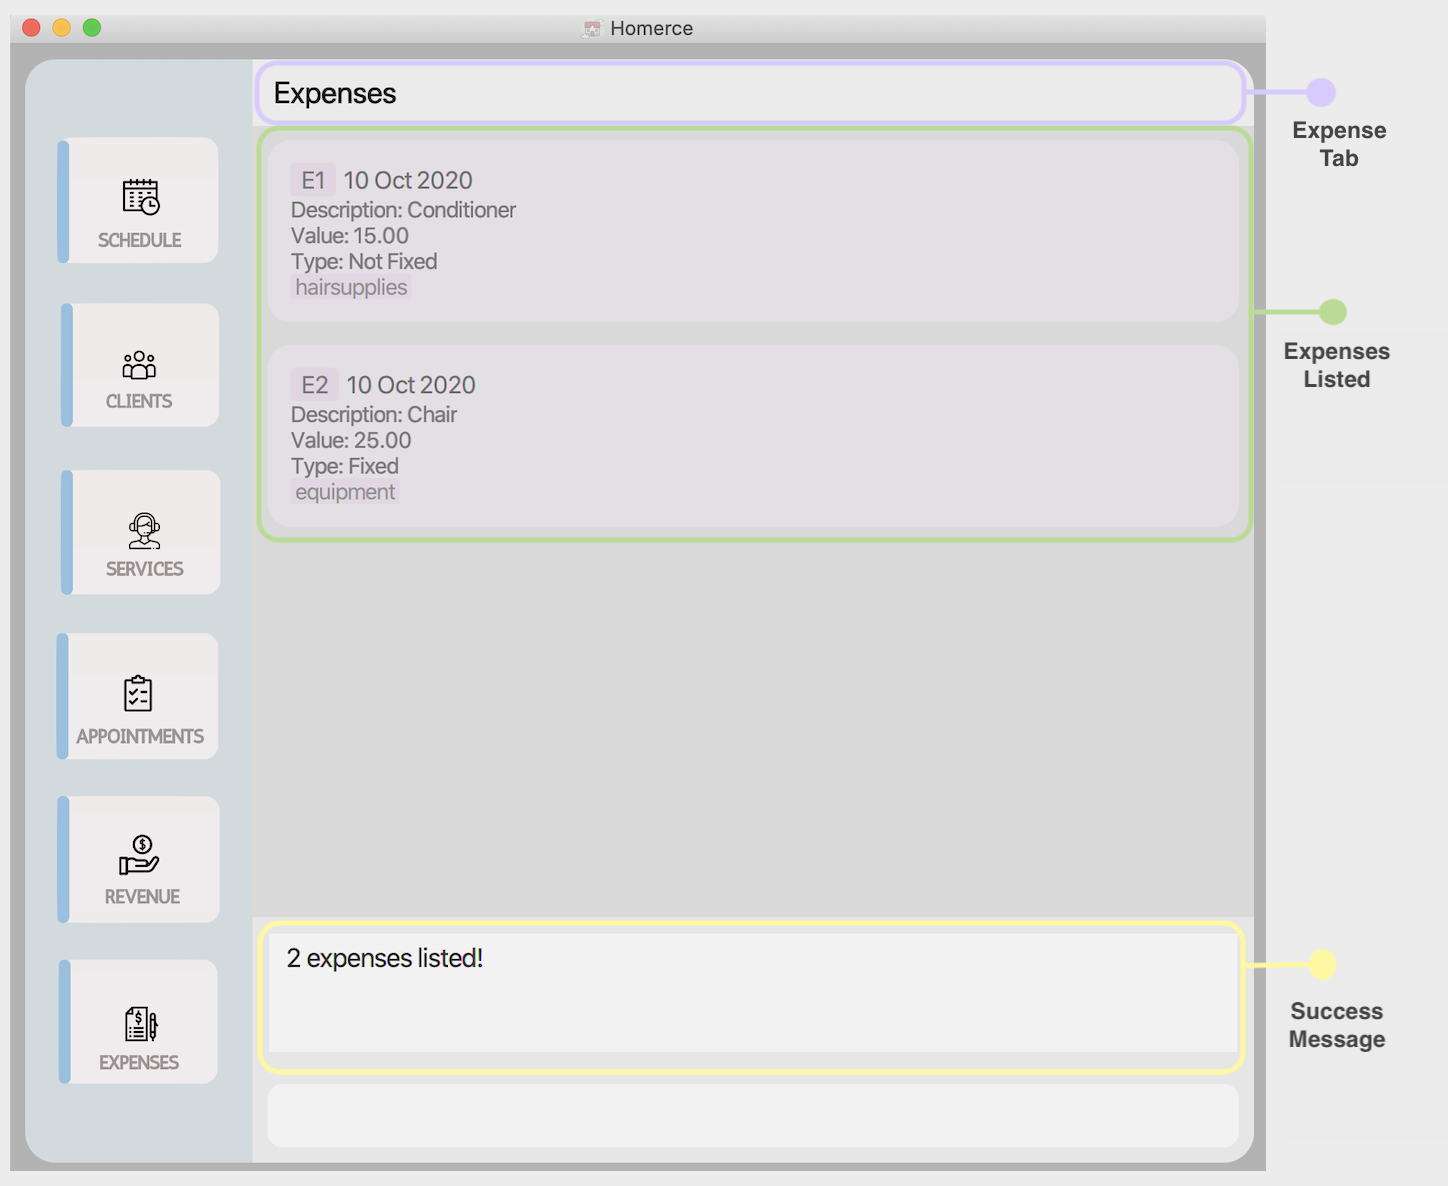
Figure 30 - GUI outcome for findexp
4.5.6. Sort expenses sortexp
Use this command to sort your expenses based on their value.
Format : sortexp ORDER
![]() Note:
Note:
- Refer to Expense Tracker Command Parameters for more details about each parameter.
Example :
Let’s say you wish to view your expenses from highest to lowest cost to determine which expenses are contributing most to your total expenditure.
You can follow the steps below to sort your list of expenses.
Steps :
- Type
sortexp descin the Command Box. - Press
Enterto execute.
Outcome :
- The Result Display will show a success message.
- Homerce will switch to the Expense Tab.
- Homerce will list out all the expenses sorted from highest to lowest cost.
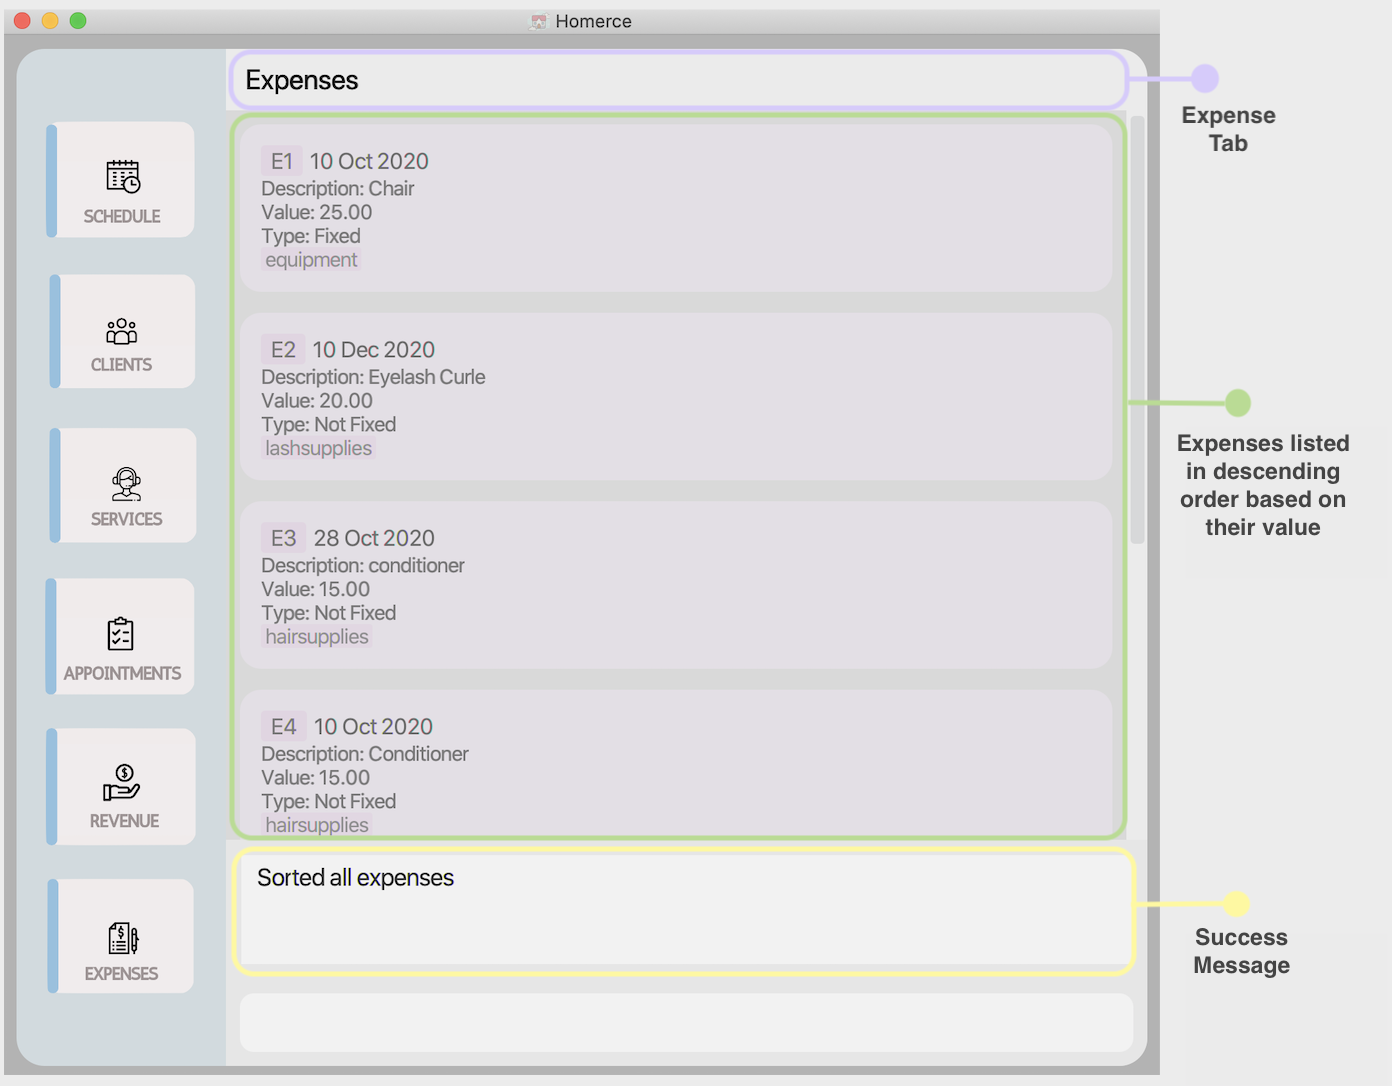
Figure 31 - GUI outcome for sortexp
4.5.7. List expenses listexp
Use this command to list all your expenses in the Expense Tracker. By default, the expenses will be sorted in reverse chronological order, with the most recent expenses at the top and the least recent expenses at the bottom.
Format : listexp
Example :
Let’s say you wish to view a list of all the expenses you have currently have.
You can follow the steps below to list your expenses.
Steps :
- Type
listexpin the Command Box. - Press
Enterto execute.
Outcome :
- The Result Display will show a success message.
- Homerce will switch to the Expense Tab.
- Homerce will list out all your expenses.
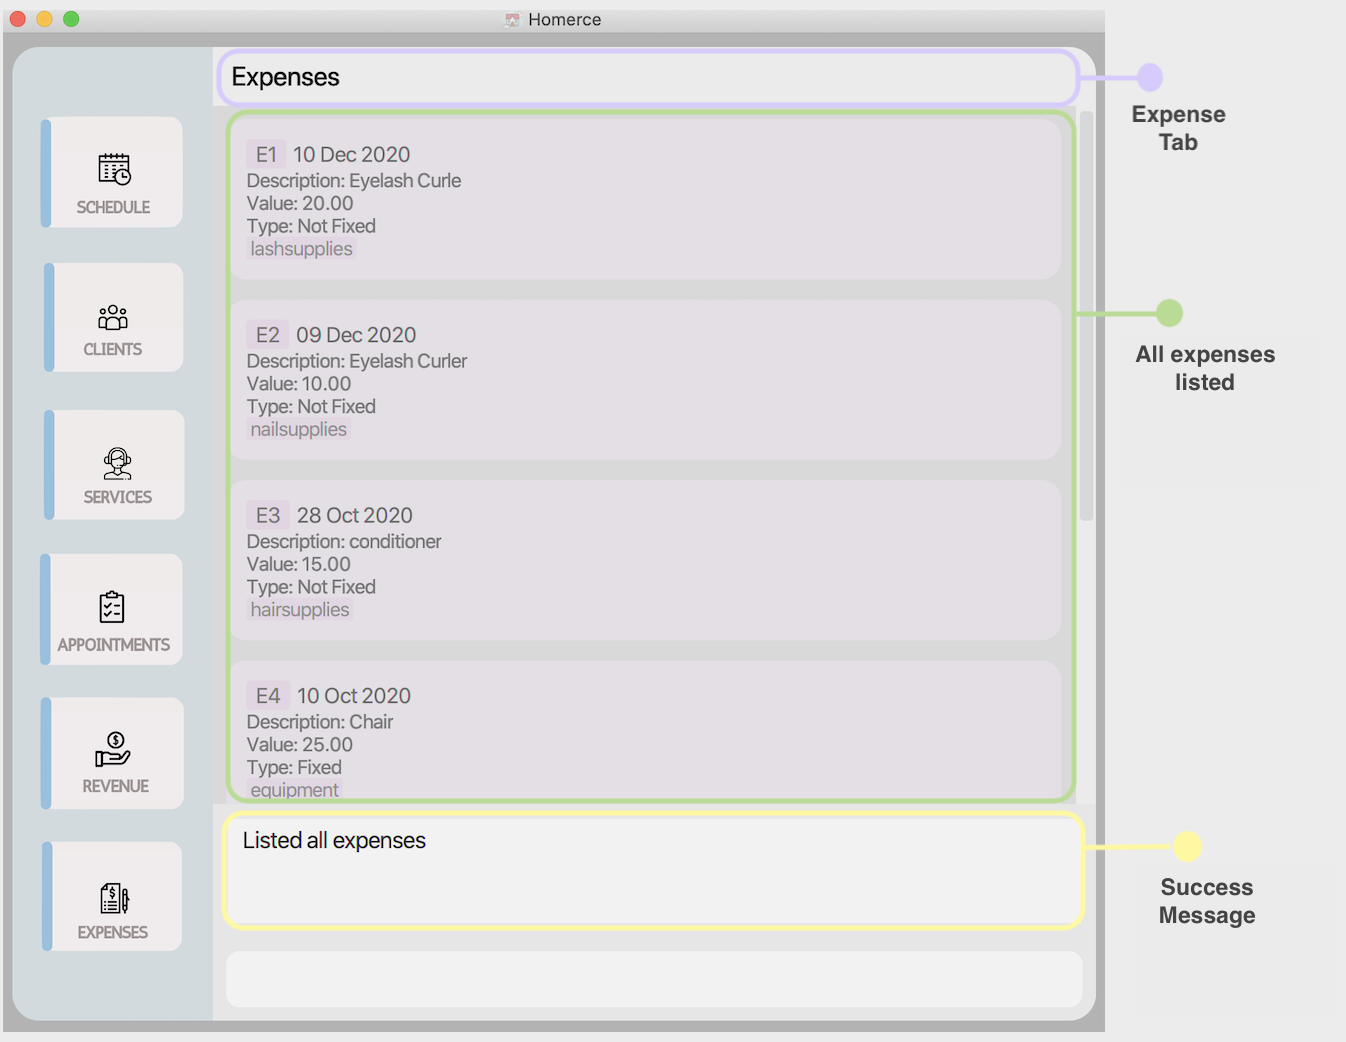
Figure 32 - GUI outcome for listexp
4.5.8. Clear expenses clearexp
Use this command to clear all your expenses from the Expense Tracker.
Format : clearexp
Example :
Let’s say you wish to remove all expense entries in the Expense Tracker and restart your expense tracking from scratch.
You can follow the steps below to clear all your expenses.
Steps :
- Type
clearexpin the Command Box. - Press
Enterto execute.
Outcome :
- The Result Display will show a success message.
- Homerce will switch to the Expense Tab.
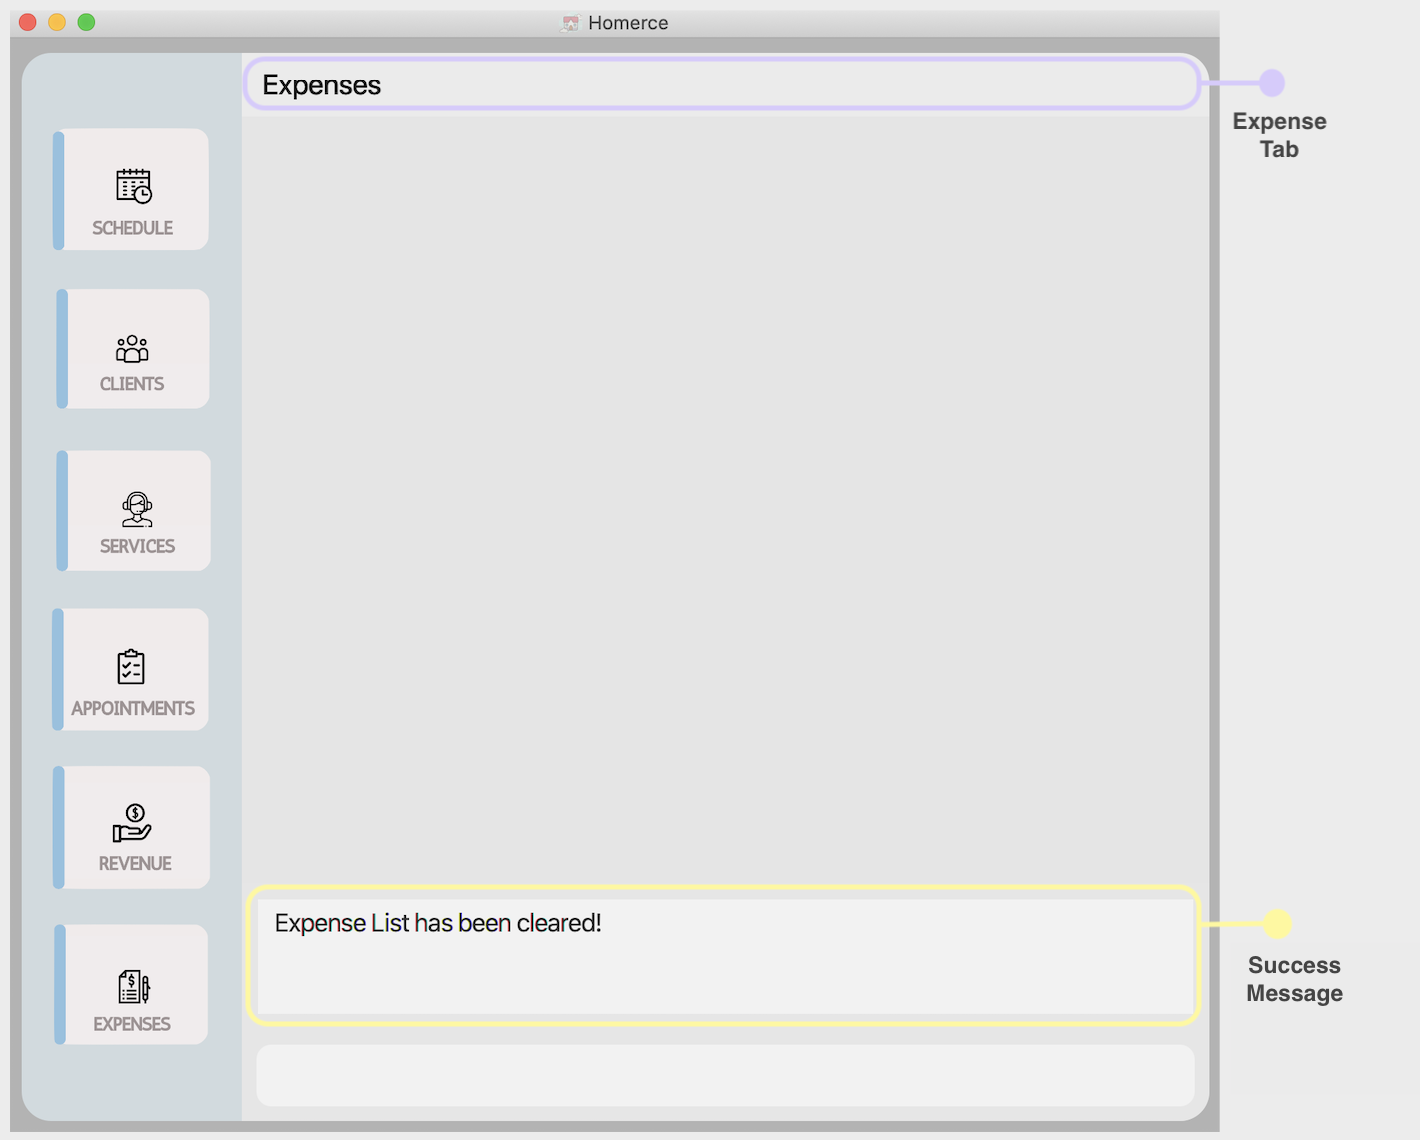
Figure 33 - GUI outcome for clearexp
4.6 Schedule Viewer (Done by Every Team Member)
Homerce knows how useful it is to be able to view all your weekly appointments at a glance. Thus, this feature consolidates all your appointments on a weekly basis and allows you to see it at a glance.
4.6.1. Schedule Viewer Command Parameters
Before you dive into using the feature, you may want to have a look at the common parameter(s) used in this feature. The table below shows a list of command parameter(s) that will be used.
| Parameter Name | Description | Example |
|---|---|---|
DATE |
The date which is in the week you are interested in. It must be in the format of dd-MM-yyyy. |
E.g. Typing 28-09-2020 would mean that you are interested in the week having 28 September 2020. |
4.6.2. View appointments schedule schedule
You can use this command to view your weekly appointments schedule. When Homerce is first booted up, schedule will show the appointments
scheduled for the current week based on system date. As you navigate to other weeks, the week is remembered by Homerce and using schedule
will show you the schedule of appointments belonging to the remembered week.
Format : schedule [dt/DATE]
![]() Note:
Note:
- Refer to Schedule Viewer Command Parameters for more details about the parameter.
Example :
Let’s say you want to view your appointments schedule for a particular week, such as the week containing the 27th of November 2020. You can follow these instructions.
Steps :
- Type
schedule dt/27-11-2020into the Command Box. - Press
Enterto execute.
Outcome :
- The Result Display will show a success message.
- Homerce will switch to the Schedule Tab.
- You can now see all the appointments in your schedule for today’s week.
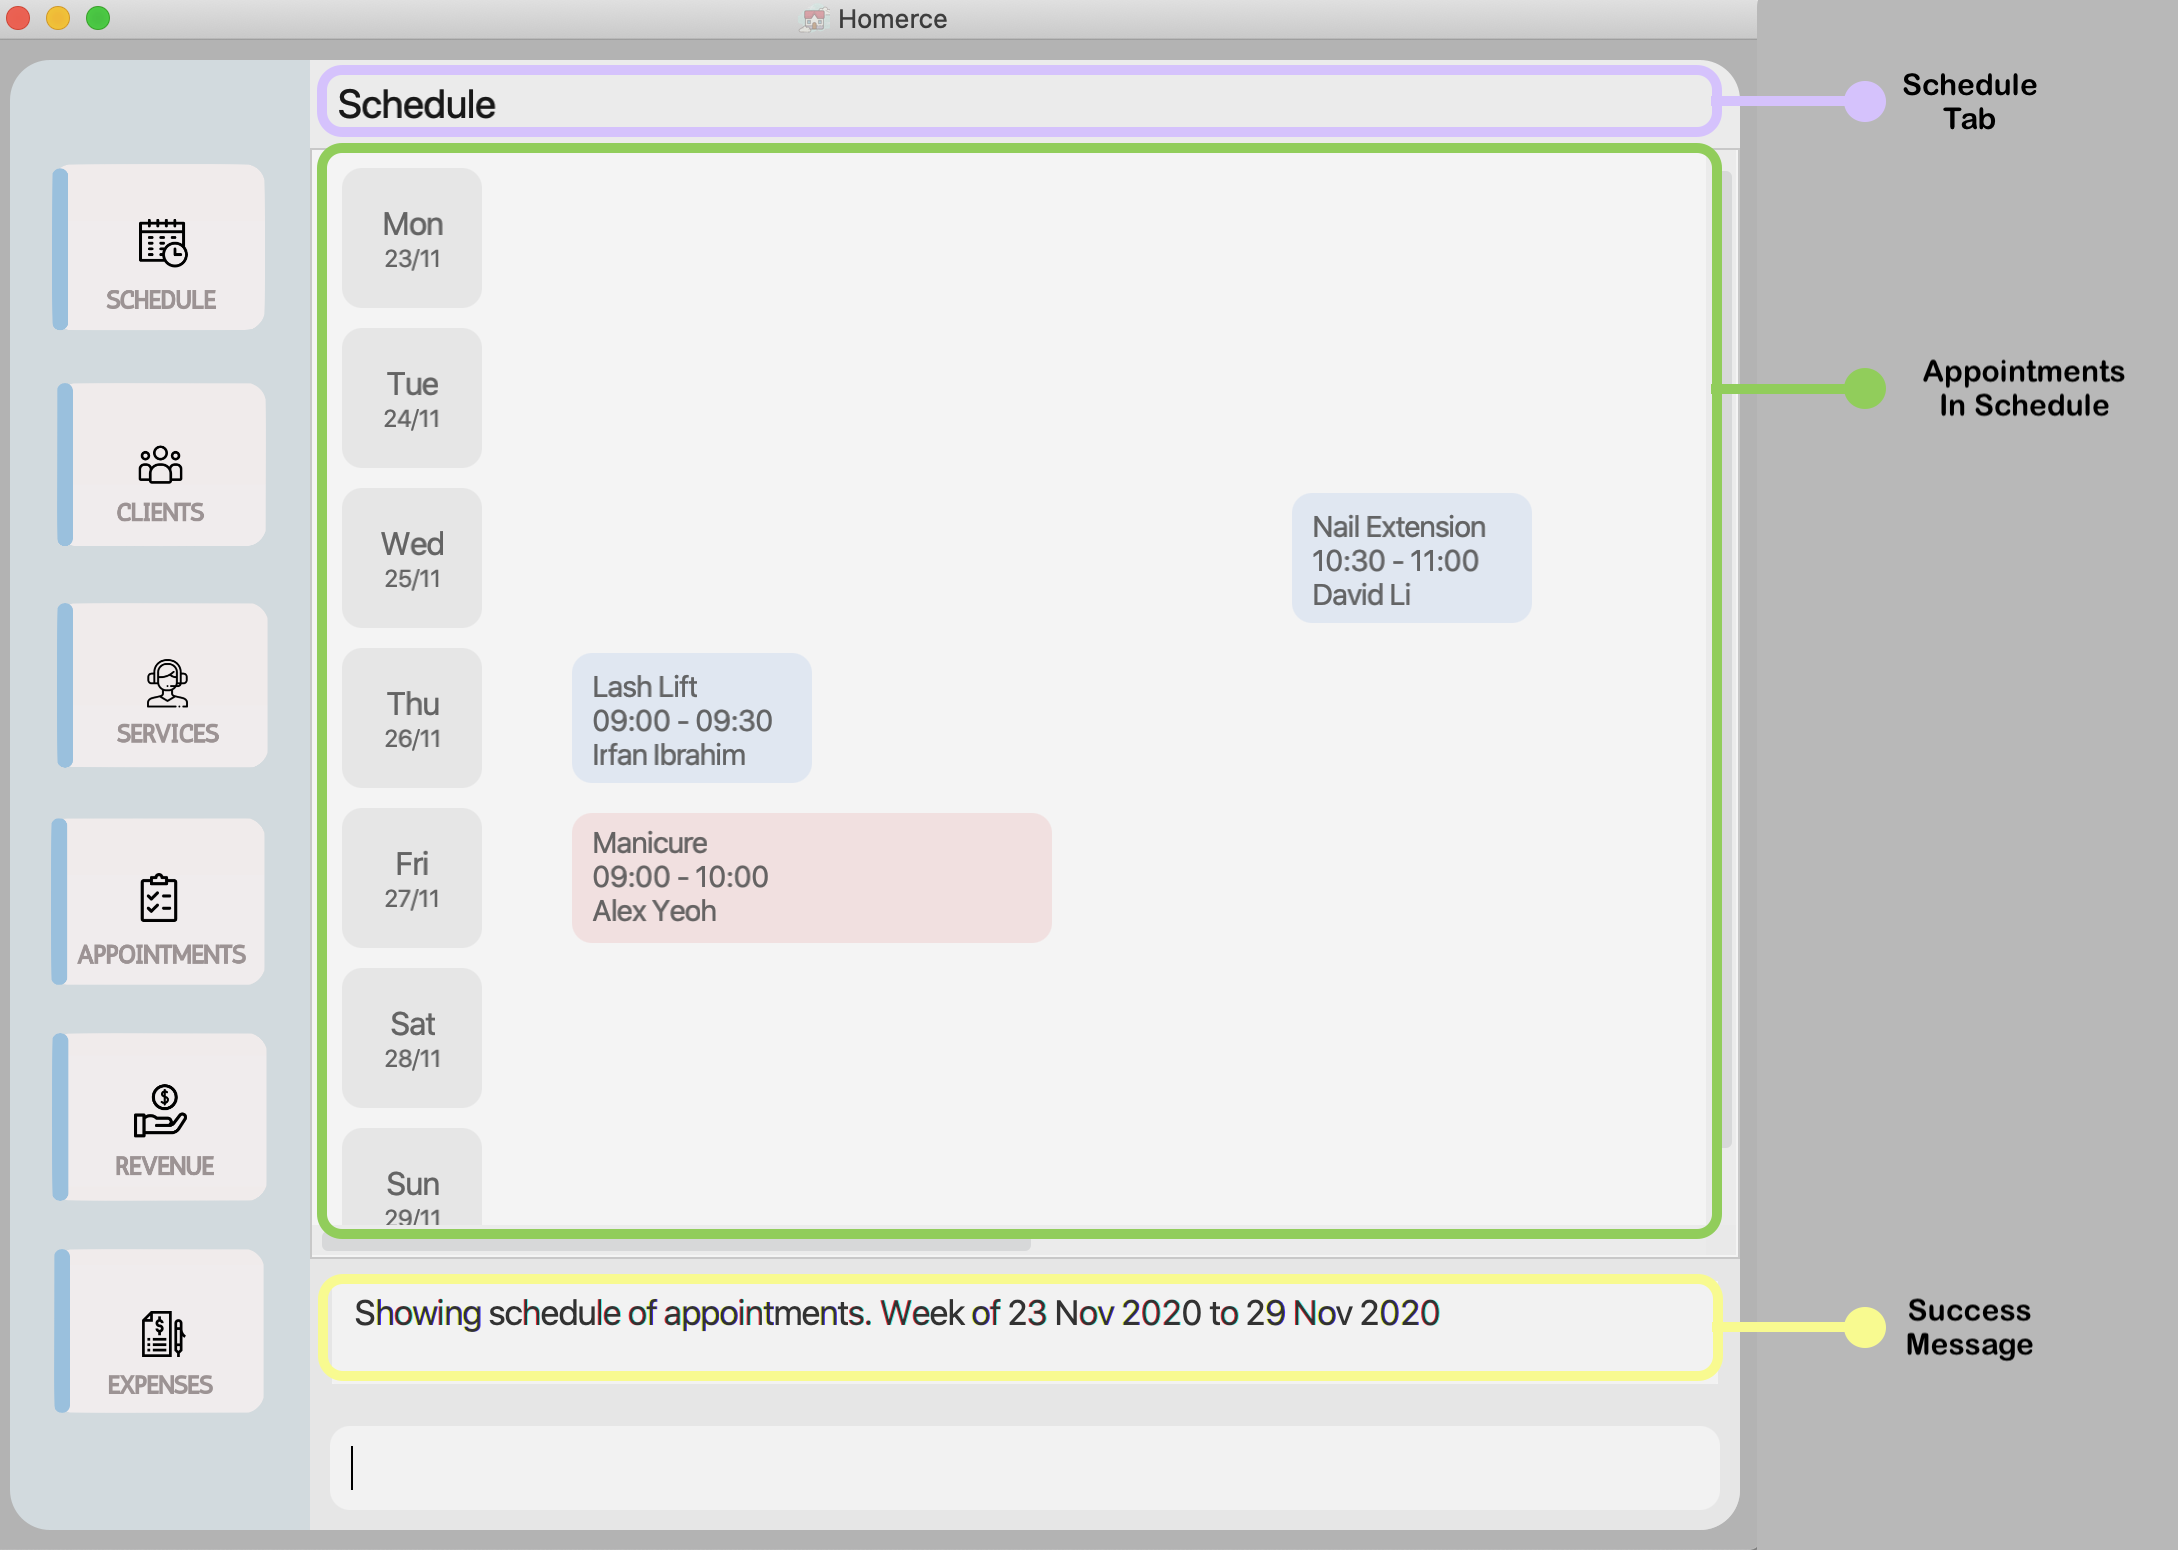
Figure 34 - GUI outcome for schedule
4.6.3. View schedule for next week nextweek
You can use this command to view your appointments schedule for the next week after the week you are currently viewing.
Format : nextweek
Example :
Let’s say you are currently viewing the schedule for the week on 13th of November 2020, and want to see the schedule for the following week. You can follow these instructions.
Steps :
- Type
nextweekinto the Command Box. - Press
Enterto execute.
Outcome :
- The Result Display will show a success message.
- Homerce will switch to the Schedule Tab.
- You can now see all the appointments in your schedule for the week after 13th of November 2020.
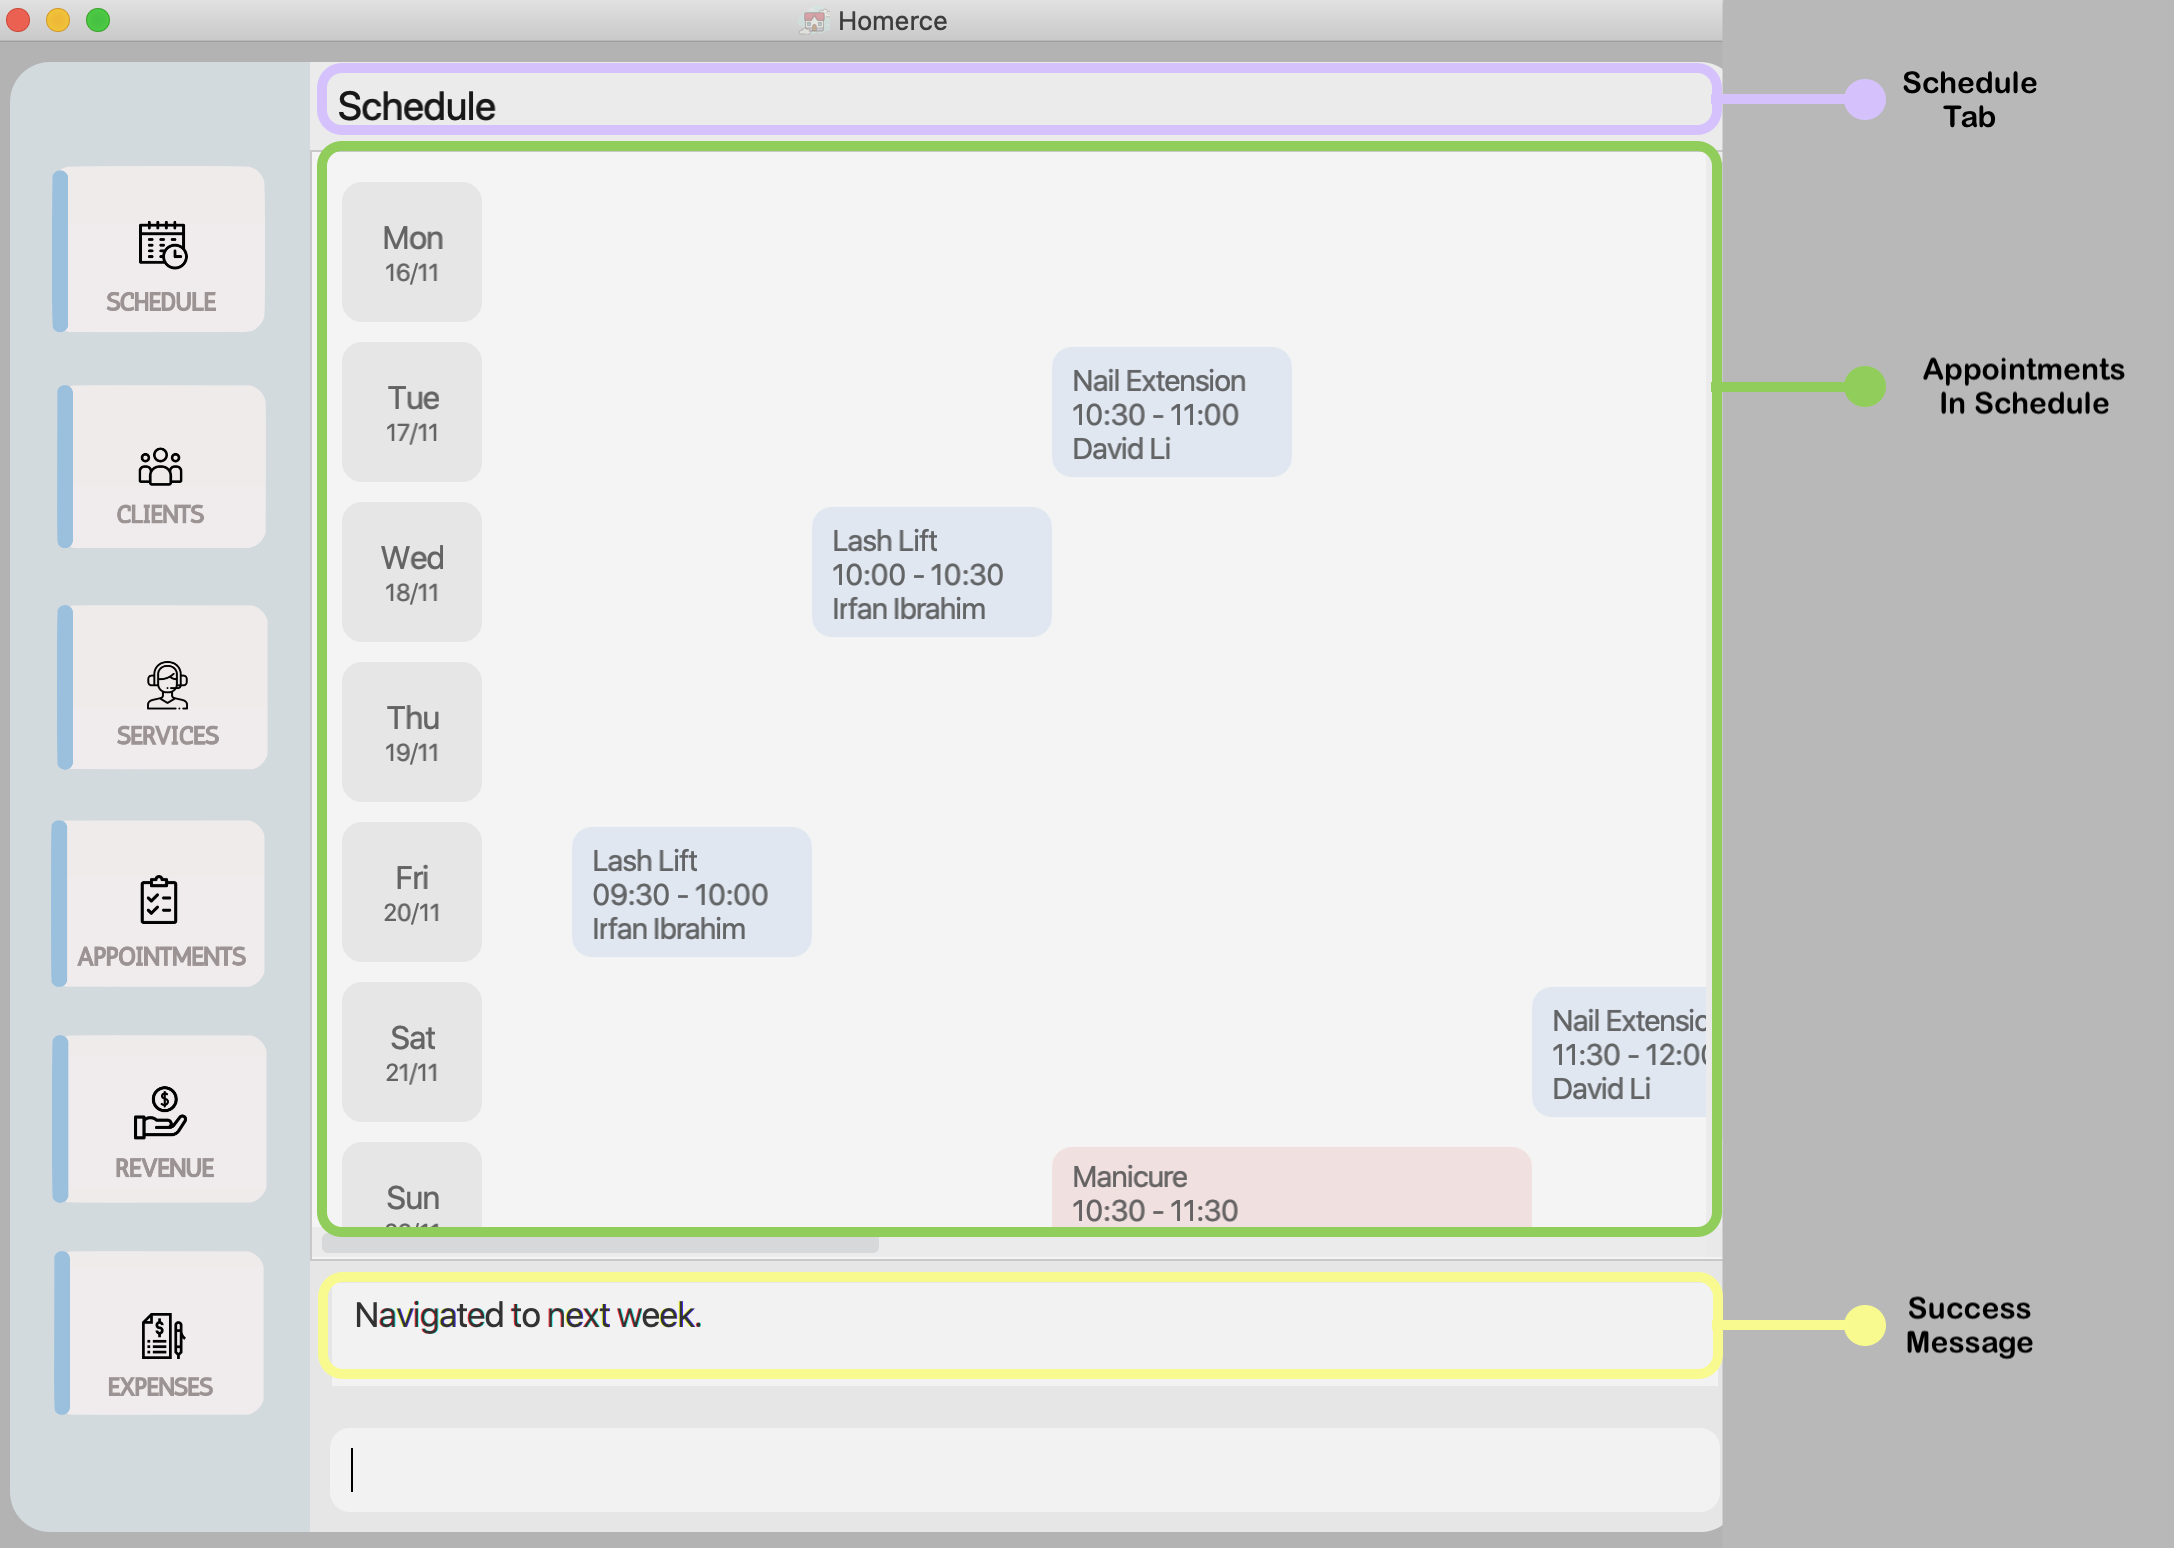
Figure 35 - GUI outcome for nextweek
4.6.3. View schedule for previous week previousweek
You can use this command to view your appointments schedule for the previous week before the week you are currently viewing.
Format : previousweek
Example :
Let’s say you are currently viewing the schedule for the week on 20th of November 2020, and want to see the schedule for the previous week. You can follow these instructions.
Steps :
- Type
previousweekinto the Command Box. - Press
Enterto execute.
Outcome :
- The Result Display will show a success message.
- Homerce will switch to the Schedule Tab.
- You can now see all the appointments in your schedule for the week before 20th of November 2020.
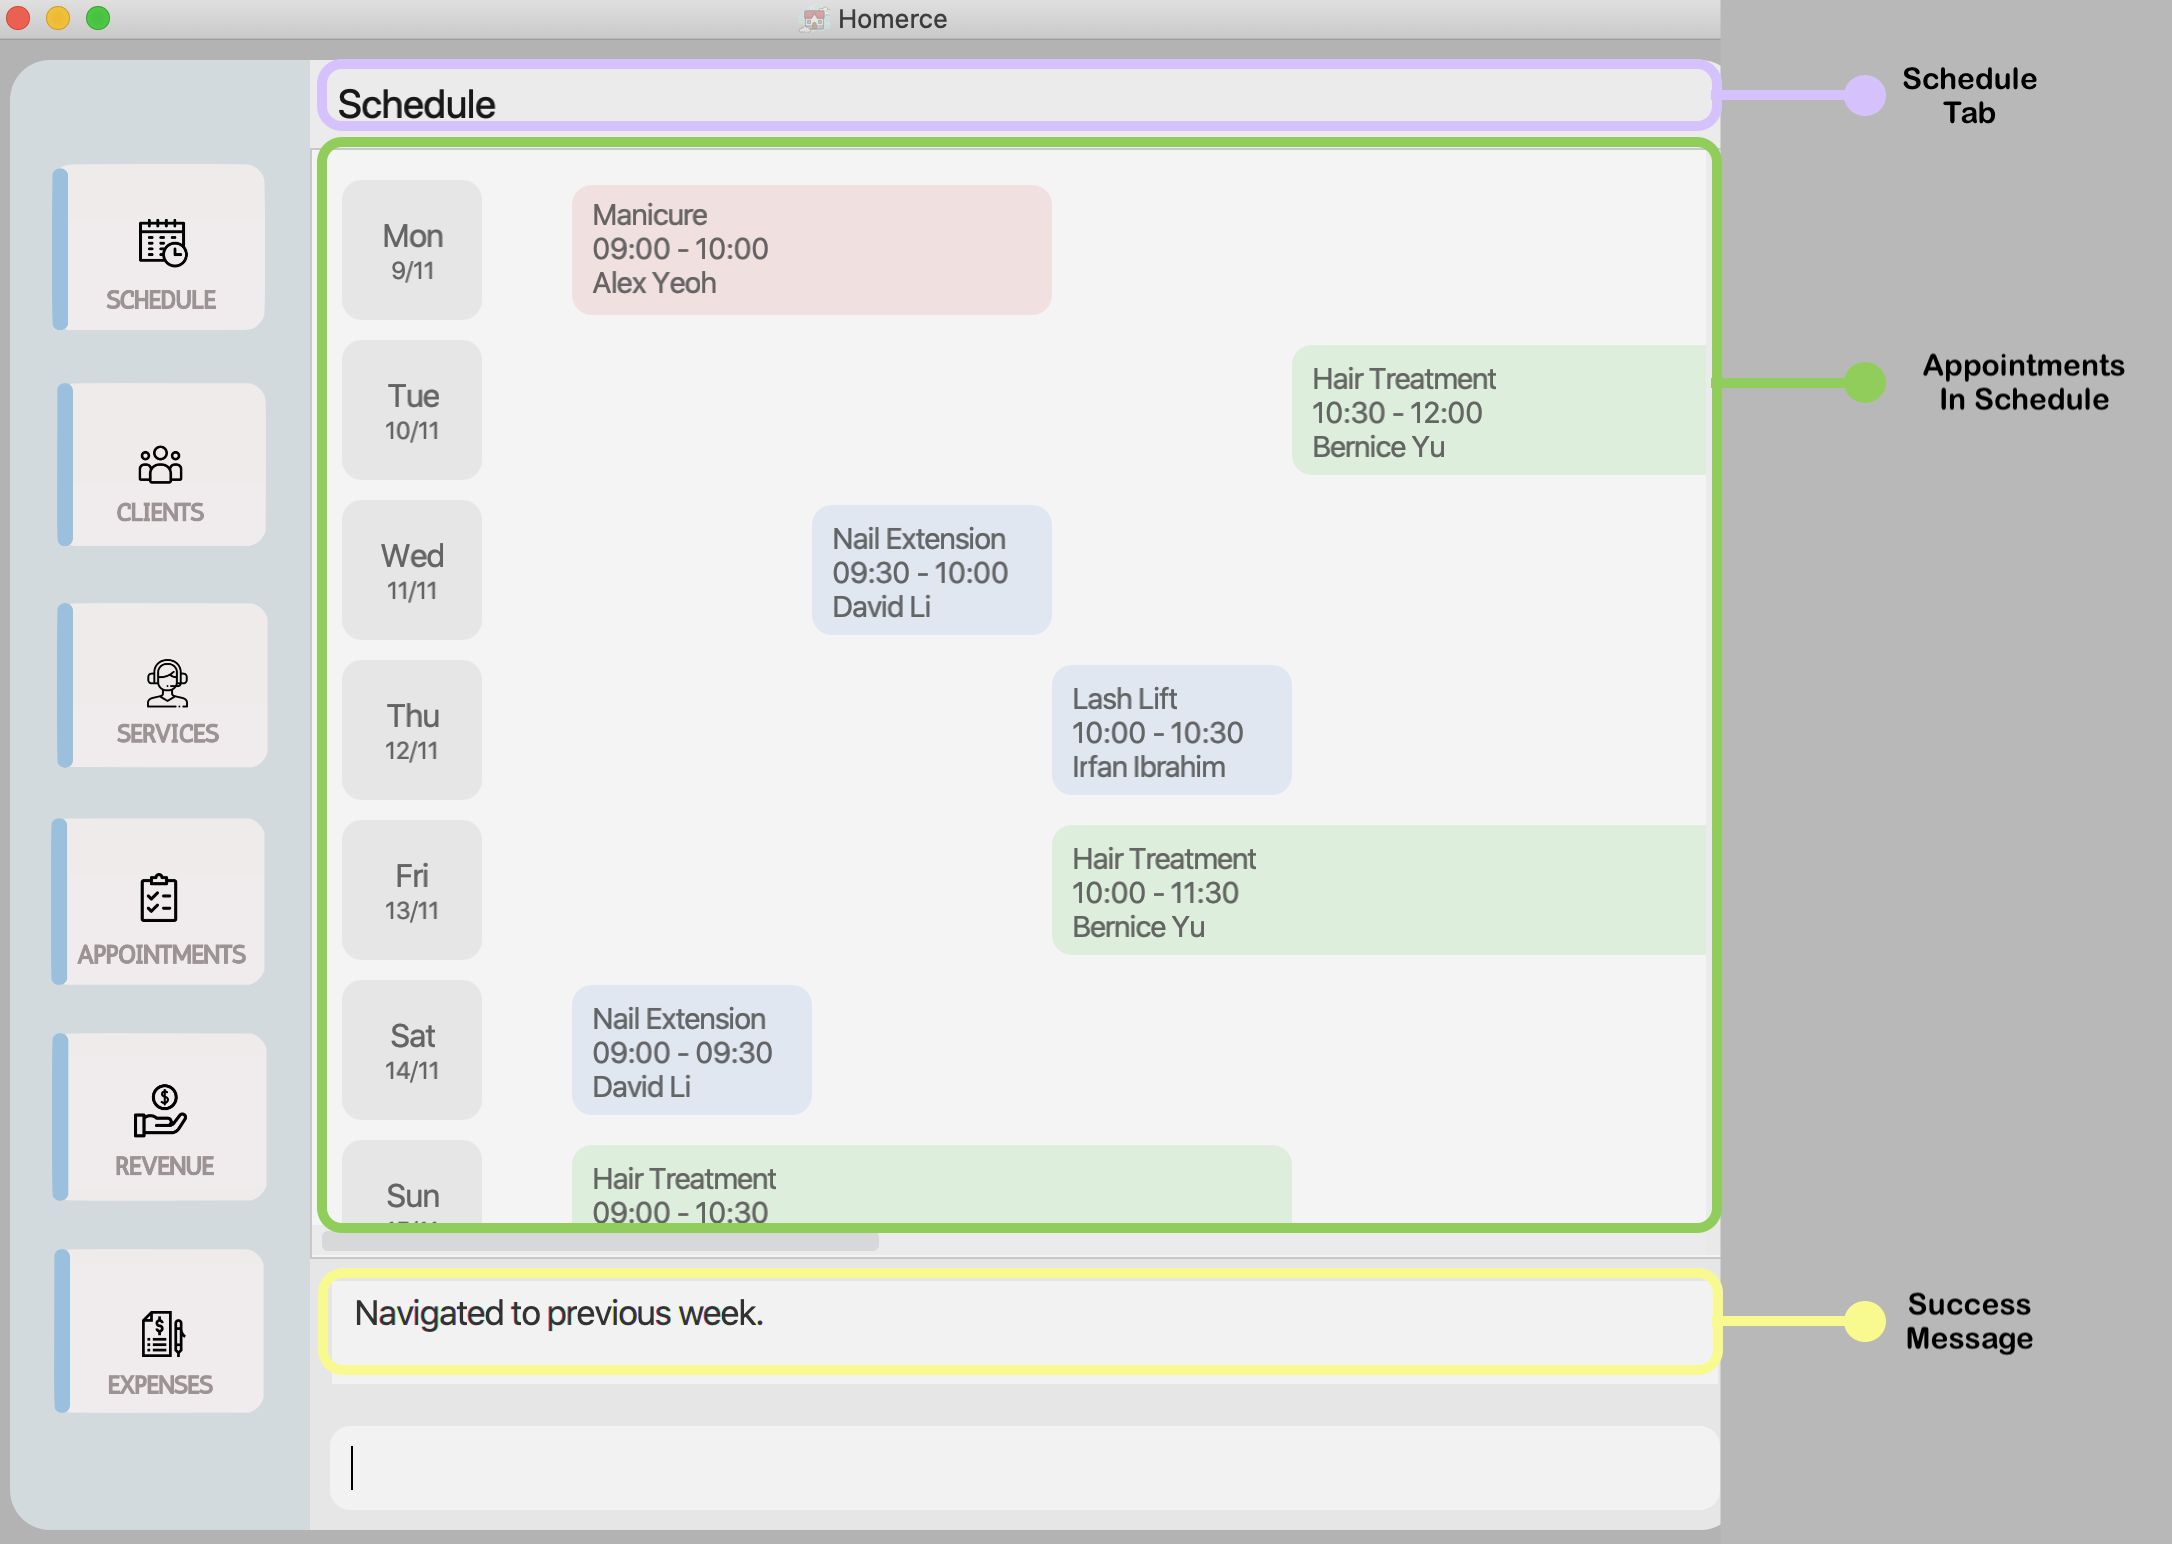
Figure 36 - GUI outcome for previousweek
4.7 Finance Tracker (Done by Every Team Member)
Homerce knows that the financial information of your home-based business is important to you. Thus, this feature allows you to view the monthly breakdown of your expenses and revenue, and calculate your profit for the month.
4.7.1. Finance Tracker Command Parameters
Before you dive into using the feature, you may want to have a look at the common parameters used in this feature. The table below shows a list of command parameters that will be used.
| Parameter Name | Description | Example |
|---|---|---|
MONTH |
The month on which the revenue and expenses are added. It must be a valid integer between 1 - 12. |
E.g. Typing ‘12’ would refer to the month of December. |
YEAR |
The year on which the revenue and expenses are added. It must be a valid year. A valid year is defined as a year with 1 - 4 digits, from 0 - 9999 |
E.g. Typing ‘2020’ would refer to the year 2020. |
4.7.2. Breakdown Finances breakdownfinance
You can use this command to view the monthly breakdown of your finances.
Format : breakdownfinance m/MONTH y/YEAR
![]() Note:
Note:
- Refer to Finance Tracker Command Parameters for more details about each parameter.
Example :
You want to see the breakdown of your revenue and expenses for the month of October in 2020, and see how much profit your home-based business brought in. You can follow the steps below to do so.
Steps :
- Type
breakdownfinance m/10 y/2020in the Command Box. - Press
Enterto execute.
Outcome :
- The Result Display will show a success message.
- Homerce will open up the Financial Breakdown window.
- You can now see the breakdown of your revenue and expenses for October 2020, and see how much profit your home-based business brought in.
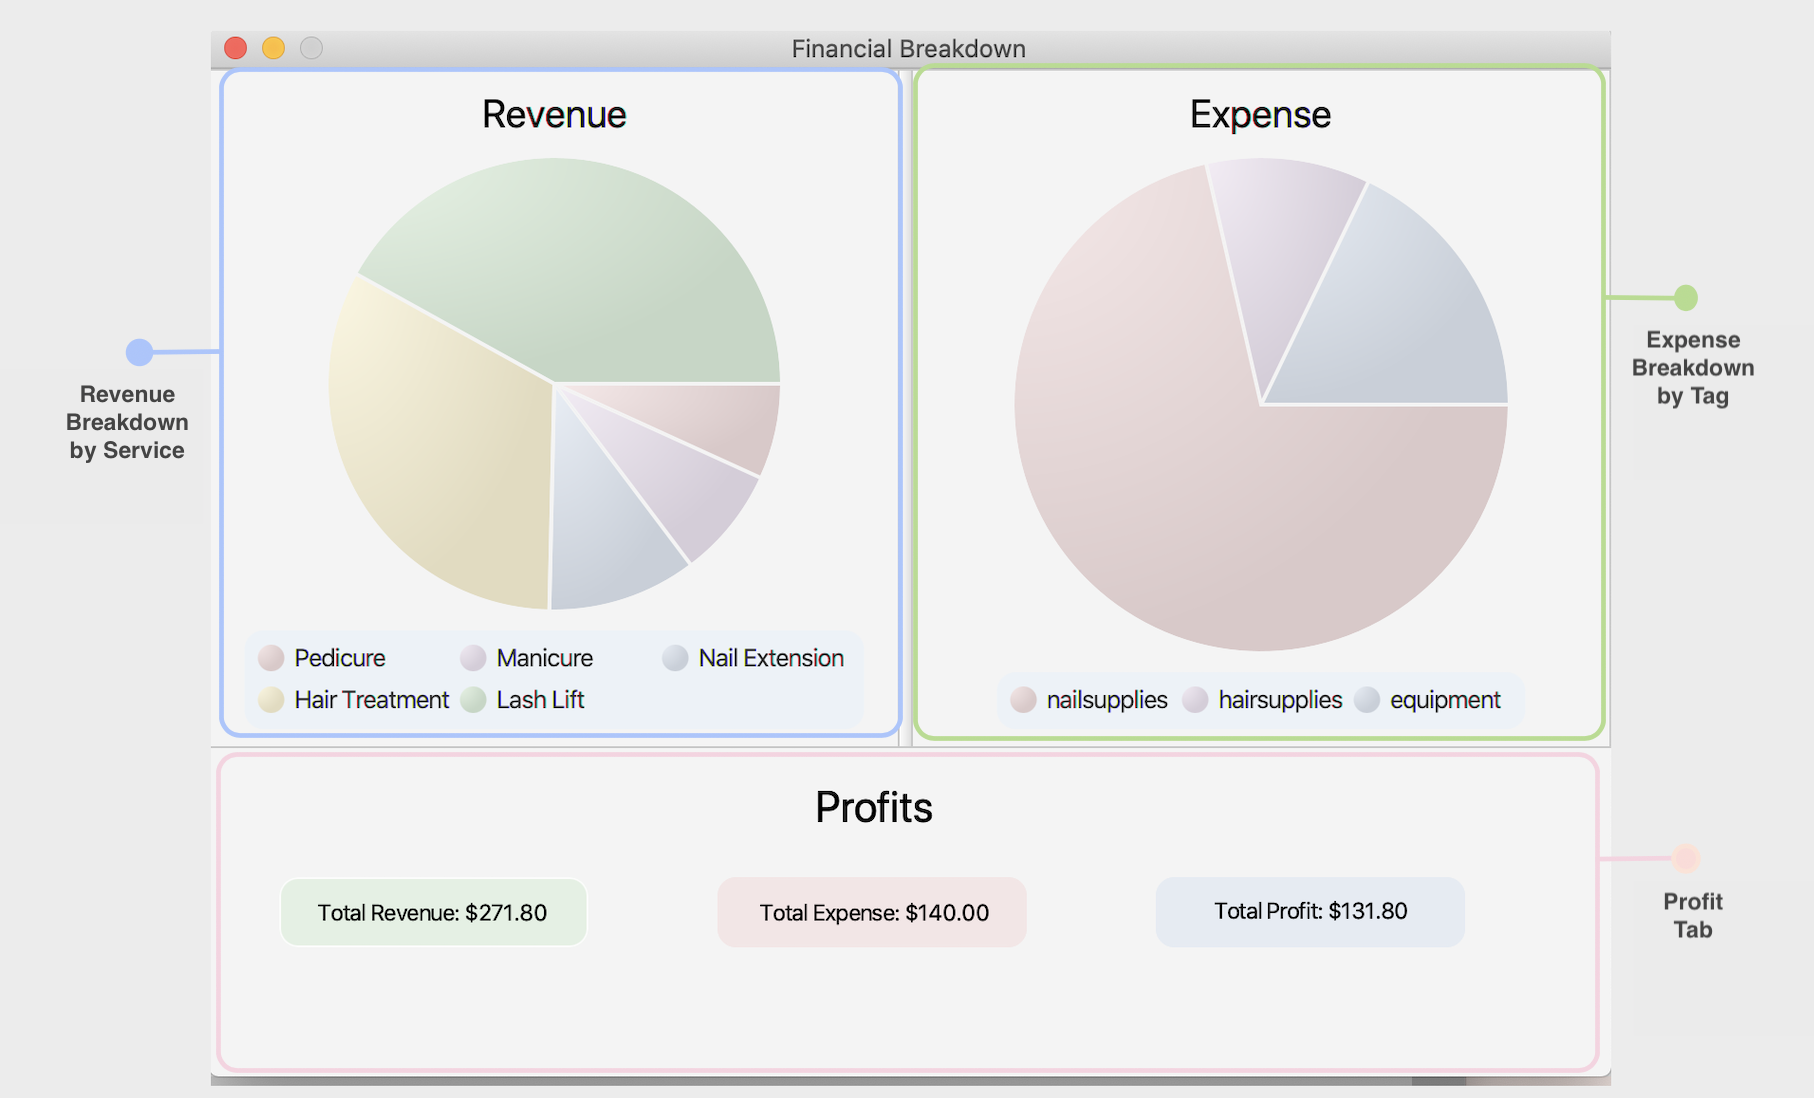
Figure 37 - GUI for breakdownfinance
4.8 Others (Done by Every Team Member)
This section provides an overview of the miscellaneous commands in Homerce. These commands include undo,
help, and exit.
4.8.1. Undo previous change: undo
Undo the last change you made to Homerce.
Example:
Let’s say you accidentally deleted an appointment from Homerce and wish to undo that mistake. You can follow the steps below to undo the command.
Steps:
- Type
undoin the Command Box. - Press
Enterto execute.
Outcome:
- Homerce will undo the last change you made.
- The Result Display will show a success message.
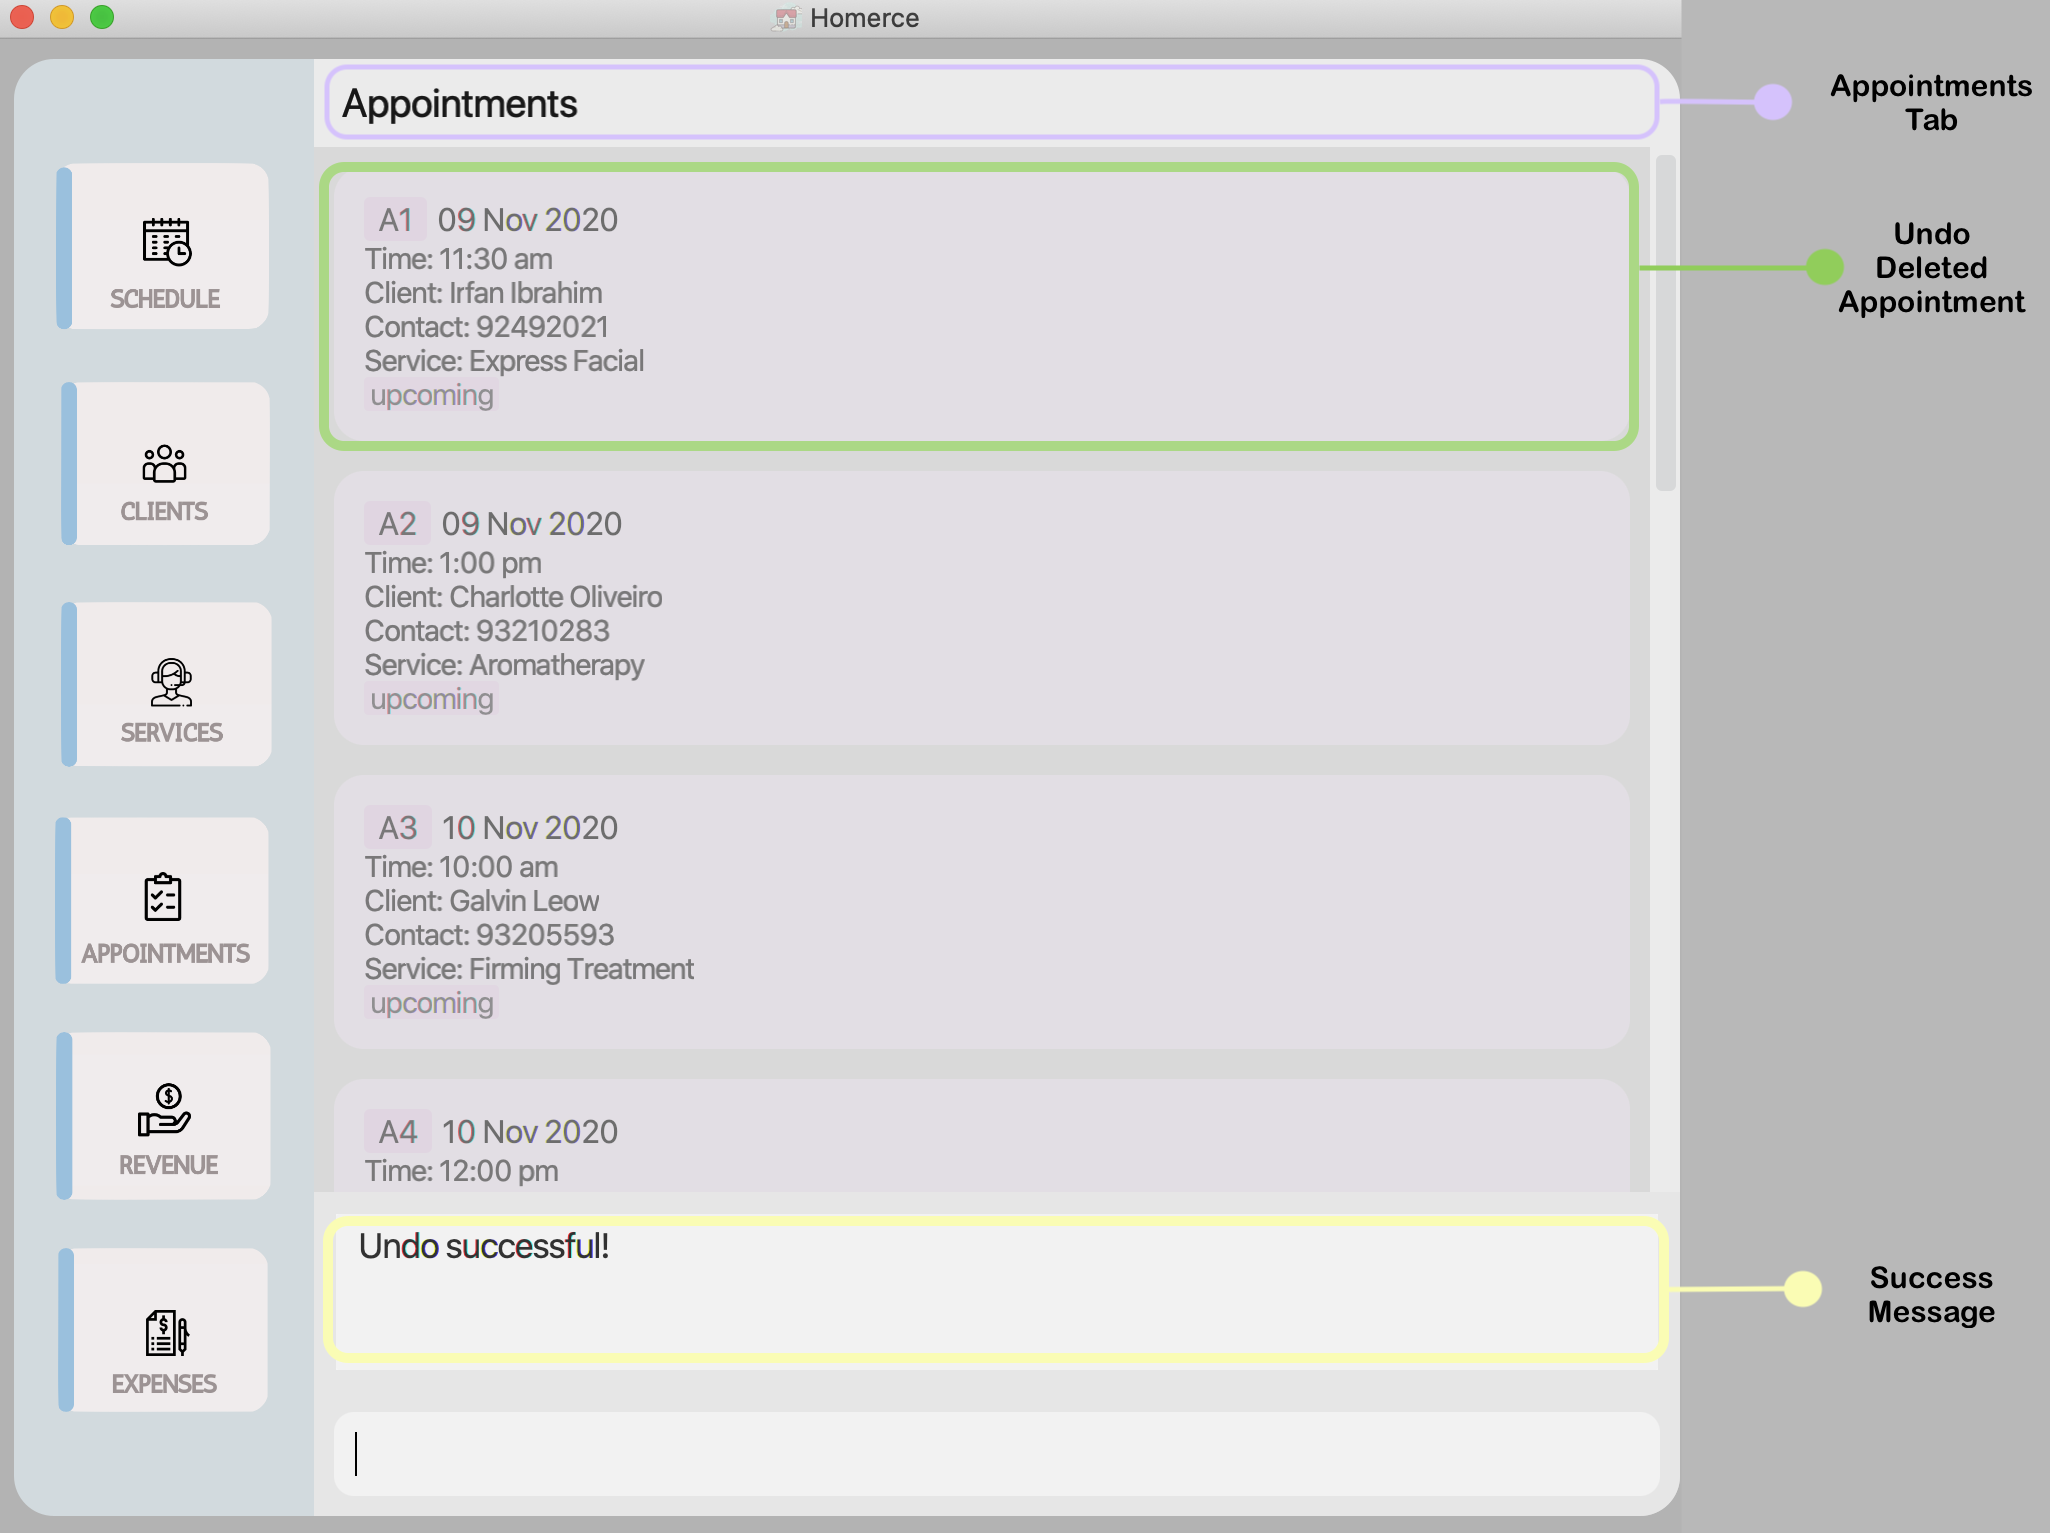
Figure 38 - GUI outcome for undo
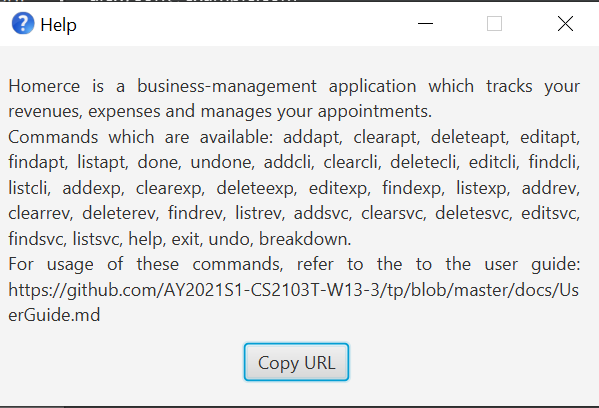
4.8.2. Viewing help : help
Show a message explaining how to access the help page.
Format : help
Example:
Let’s say you are unsure of the commands that Homerce offers. You can follow the steps below to get a full list of all the commands.
Steps:
- Type
helpin the Command Box. - Press
Enterto execute.
Outcome:
- Homerce will open up the Help window.
4.8.3. Exit Homerce : exit
Exits the program.
Format : exit
Example:
Let’s say you wish to exit Homerce.
Steps:
- Type
exitinto the Command Box. - Press
Enterto execute.
Outcome:
- Homerce will close its window.
4.8.4. Saving the Data
Homerce data is saved in the hard disk automatically after any command that changes the data. There is no need to save manually.
4.9. Features coming in v2.0
We have some exciting updates planned for Version 2.0 of Homerce, to better facilitate your business needs and further enhance your experience with us. This section provides an overview of the various features we have in mind.
4.9.1. Reminder for Appointments v2.0
This feature will allow you to create reminders for your appointments.
Homerce will send you a notification before each appointment, to keep you up-to-date with your appointment schedule.
You will be able to specify the time before each appointment you want the reminder to be sent, and whether
you want the reminder for a specific appointment or for all appointments.
4.9.2. Financial Analytics v2.0
This feature will employ complex algorithms to analyze trends in your revenue, expenses and profits over a given time period, and recommend ways for you to adjust your revenue model or better manage your business expenditure to maximise profitability. This feature also provides you with a more in-depth visualization of your business finances, to help you better understand your business and optimize your operational efficiency.
4.9.3. Export of Service List v2.0
This feature will allow you to export your list of services into a formatted text file, so that you can easily share your list of services with potential clients for promotional purposes.
4.9.4. Customizable Interface v2.0
This feature will allow you to customize the interface of Homerce. You will be able to choose between a ‘dark mode’, a ‘light mode’, or even customize your own colours for the schedule and individual panels.
5. FAQ
Q: How do I create a Revenue in Homerce?
A: Unfortunately, Homerce does not allow you to directly create a revenue. A Revenue will only be created when an appointment
is marked as done.
Q: What is the IS_FIXED parameter in the Expense Tracker for?
A: Marking an expense as ‘Fixed’ indicates to Homerce that the particular expense is fixed and recurs every month. Homerce
will automatically add the same expense to your list of expenses every month.
Q: How do I transfer my data to another Computer?
A: By default, Homerce saves all your data in a folder named data in the same directory as the application.
You can copy and transfer the data folder into the same directory as Homerce on your other computer and Homerce will automatically load your data for you.
6. Glossary
- Alphanumeric: Alphanumeric does not include special characters, it only includes letters a to z (uppercase and lowercase) and digits 0 to 9.
- Special Characters: Refers to any of the characters within these set of characters: +!#$%&’*+/=?`{}~^.-|
7. Command summary
7.1. Client Manager Commands
| Action | Format | Examples |
|---|---|---|
| Add | addcli n/NAME p/PHONE e/EMAIL [t/TAG]… |
addcli n/John p/91234567 e/john@gmail.com t/new |
| Edit | editcli INDEX [n/NAME] [p/PHONE] [e/EMAIL] [t/TAG] |
editcli 2 n/Johnny |
| Delete | deletecli INDEX |
deletecli 3 |
| Find | findcli [n/NAME]* [p/PHONE]* |
findcli n/John |
| List | listcli |
|
| Clear | clearcli |
7.2. Service Manager Commands
| Action | Format | Examples |
|---|---|---|
| Add | addsvc t/TITLE d/DURATION p/PRICE |
addsvc t/Microdermabrasion du/2.0 p/68.00 |
| Edit | editsvc INDEX [t/TITLE] [d/DURATION] [p/PRICE] |
editsvc 1 d/1.5 |
| Delete | deletesvc INDEX |
deletesvc 1 |
| Find | findsvc [t/TITLE]* [s/SERVICE_CODE]* |
findsvc t/lash |
| List | listsvc |
|
| Clear | clearsvc |
7.3. Appointment Manager Commands
| Action | Format | Examples |
|---|---|---|
| Add | addapt dt/DATE t/TIME s/SERVICE_CODE p/PHONE_NUMBER |
addapt dt/15-10-2020 t/1300 s/SC001 p/98429700 |
| Edit | editapt INDEX [dt/DATE] [t/TIME] [p/PHONE_NUMBER] [s/SERVICE_CODE] |
editapt 1 dt/30-10-2020 t/1300 p/87438807 |
| Delete | deleteapt INDEX |
deleteapt 1 |
| Find | findapt [p/PHONE_NUMBER]* [n/NAME]* [dt/DATE]* [s/SERVICE_CODE]* |
findapt p/87438807 |
| List | listapt |
|
| Clear | clearapt |
|
| Done | done INDEX |
done 1 |
| Undone | undone INDEX |
undone 3 |
7.4. Revenue Tracker Commands
| Action | Format | Examples |
|---|---|---|
| Find | findrev [dt/DATE]* [sc/SERVICE_CODE]* |
findrev dt/22-10-2020 |
| Sort | sortrev ORDER |
sortexp desc |
| List | listrev |
|
| Clear | clearrev |
7.5. Expense Tracker Commands
| Action | Format | Examples |
|---|---|---|
| Add | addexp d/DESCRIPTION f/IS_FIXED v/VALUE dt/DATE [t/TAG] |
addexp d/conditioner f/n v/15.00 dt/28-10-2020 t/hairsupplies |
| Edit | editexp INDEX [d/DESCRIPTION] [f/IS_FIXED] [v/VALUE] [dt/DATE] [t/TAG] |
editexp 2 d/Eyelash Curler |
| Delete | deleteexp INDEX |
deleteexp 3 |
| Find | findexp [d/DESCRIPTION]* [dt/DATE]* [f/IS_FIXED]* [t/TAG]* |
findexp dt/08-09-2020 |
| Sort | sortexp ORDER |
sortexp desc |
| List | listexp |
|
| Clear | clearexp |
7.6. Schedule Viewer Commands
| Action | Format | Examples |
|---|---|---|
| Schedule | schedule [dt/DATE] |
schedule dt/27-10-2020 |
| Next Week | nextweek |
|
| Previous Week | previousweek |
7.7. Finance Tracker Commands
| Action | Format | Examples |
|---|---|---|
| Breakdown Finances | breakdownfinance m/MONTH y/YEAR |
breakdownfinance m/10 y/2020 |
7.8. Other Commands
| Action | Format | Examples |
|---|---|---|
| Undo | undo |
|
| Help | help |
|
| Exit | exit |